Are you a fan of hunting and outdoor activities? Then you'll love the bone collector camo gel nail art design! It's a perfect way to show off your love for the great outdoors while also having a stylish and edgy look. In this tutorial, we'll guide you step-by-step on how to create this unique and eye-catching nail art design. To start, you'll need to gather your materials. Make sure you have a base coat, a top coat, a white gel nail polish, and a brown or green gel nail polish for the camo pattern. You'll also need a small brush or a dotting tool for creating the pattern. Begin by applying a thin layer of base coat on your nails to protect them from staining and to help the polish adhere better. Let it dry completely before moving on to the next step. Next, apply two coats of white gel nail polish on your nails and cure them under a LED or UV lamp according to the instructions on the polish bottle. This will serve as the base for your camo pattern. Once your base color is dry, it's time to create the camo pattern. Dip your small brush or dotting tool into the brown or green gel polish and randomly create small dots and lines on your nails. Don't worry about making them perfect, as the natural and imperfect look is what makes the camo pattern unique. After creating the pattern, cure your nails under the lamp again to set the gel polish. Once they're dry, you can add another layer of the camo pattern to make it more opaque and defined. Lastly, apply a top coat to seal your design and give it a glossy finish. Cure your nails one last time and clean up any excess polish around your nails with a small brush dipped in acetone. And there you have it, your very own bone collector camo gel nail art design! Don't be afraid to experiment with different colors and patterns to make this design truly your own.1. Bone Collector Camo Gel Nail Art Design Tutorial


1. Bone Collector Camo Gel Nail Art Design Tutorial

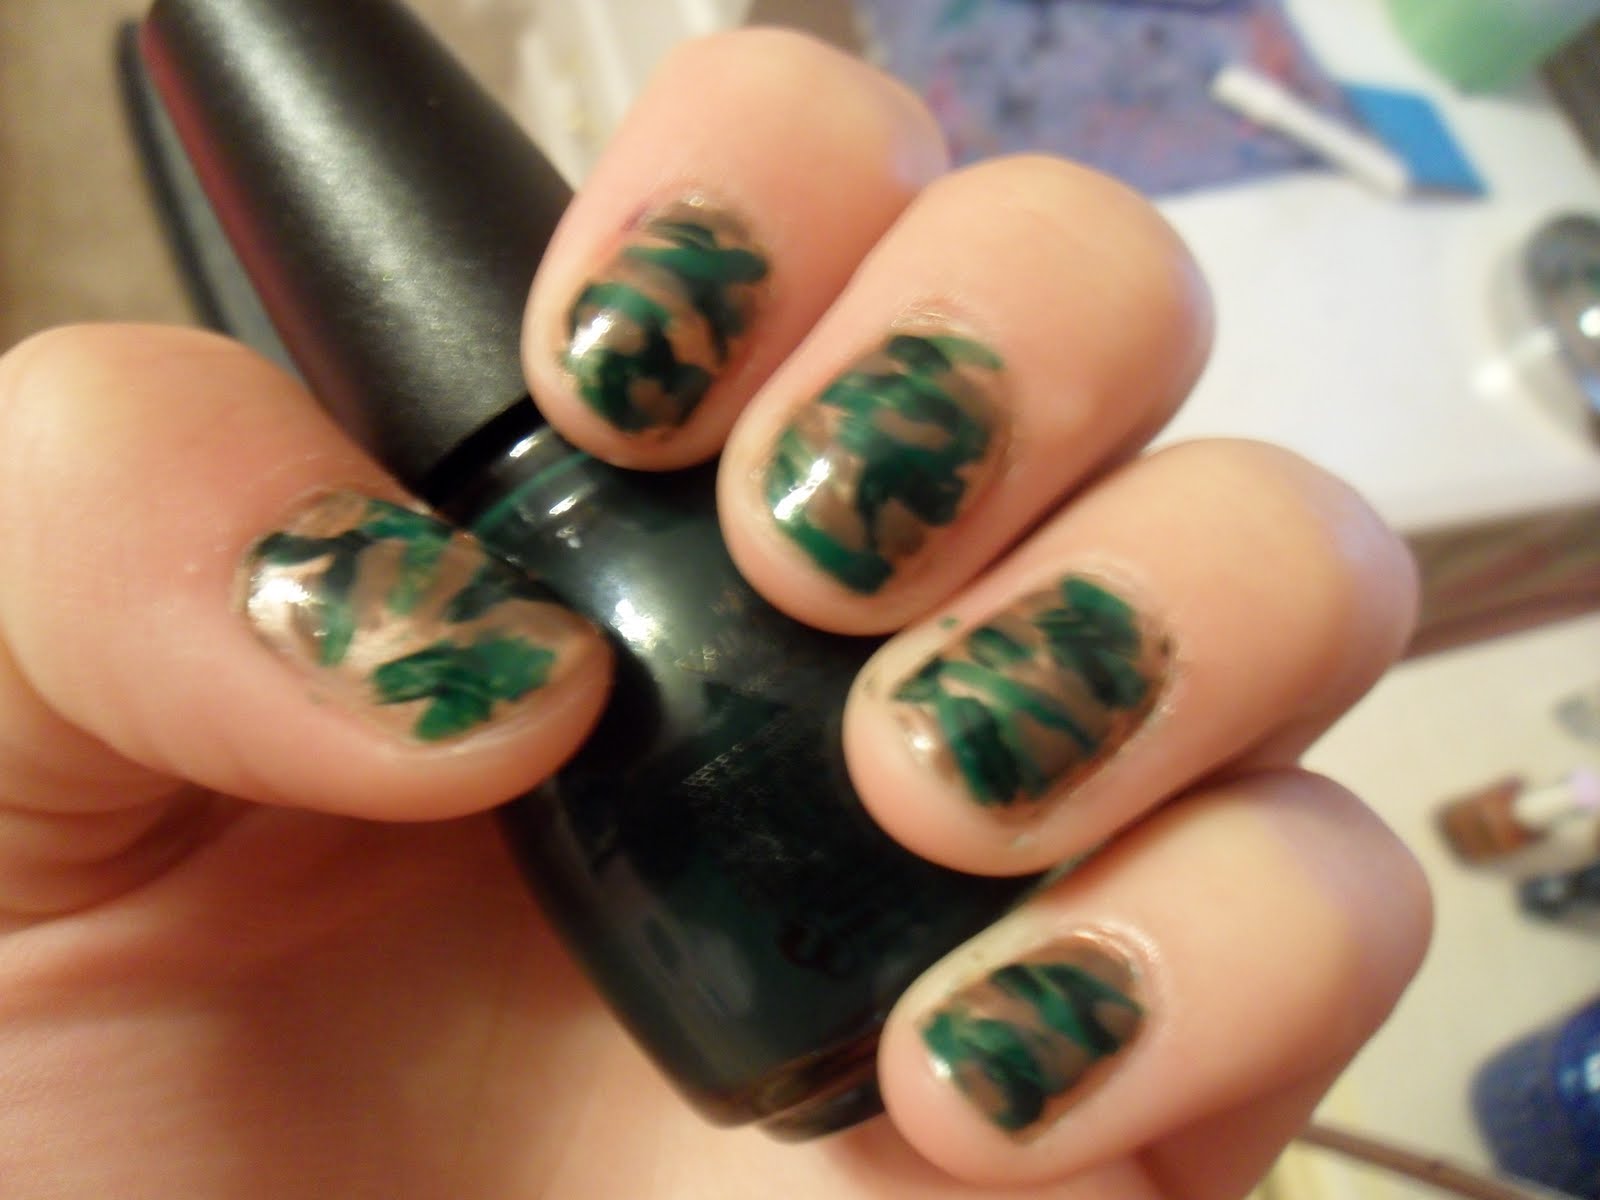

If you're looking for a unique and edgy nail art design, the bone collector camo gel nail art design is perfect for you. It's a combination of hunting-inspired camo pattern and chic gel nail polish that will surely make a statement. Here's a step-by-step guide on how to create this one-of-a-kind design. Before you start, make sure you have all the necessary materials – base coat, top coat, white gel polish, and brown or green gel polish for the camo pattern. You'll also need a small brush or a dotting tool for creating the pattern. Start by applying a thin layer of base coat on your nails to protect them and help the polish adhere better. Let it dry completely before moving on to the next step. Next, apply two coats of white gel polish on your nails and cure them under a LED or UV lamp according to the instructions on the polish bottle. This will serve as the base for your camo pattern. Once your base color is dry, it's time to create the camo pattern. Use a small brush or a dotting tool to randomly create small dots and lines with the brown or green gel polish. Don't worry about making them perfect, as the imperfect look is what makes the camo pattern unique. After creating the pattern, cure your nails under the lamp again to set the gel polish. If you want a more opaque and defined look, you can add another layer of the camo pattern. To finish off, apply a top coat to seal your design and give it a glossy finish. Cure your nails one last time and clean up any excess polish around your nails with a small brush dipped in acetone. There you have it, your very own bone collector camo gel nail art design! Don't be afraid to play around with different colors and patterns to make it your own.2. How to Create a Bone Collector Camo Gel Nail Art Design


2. How to Create a Bone Collector Camo Gel Nail Art Design


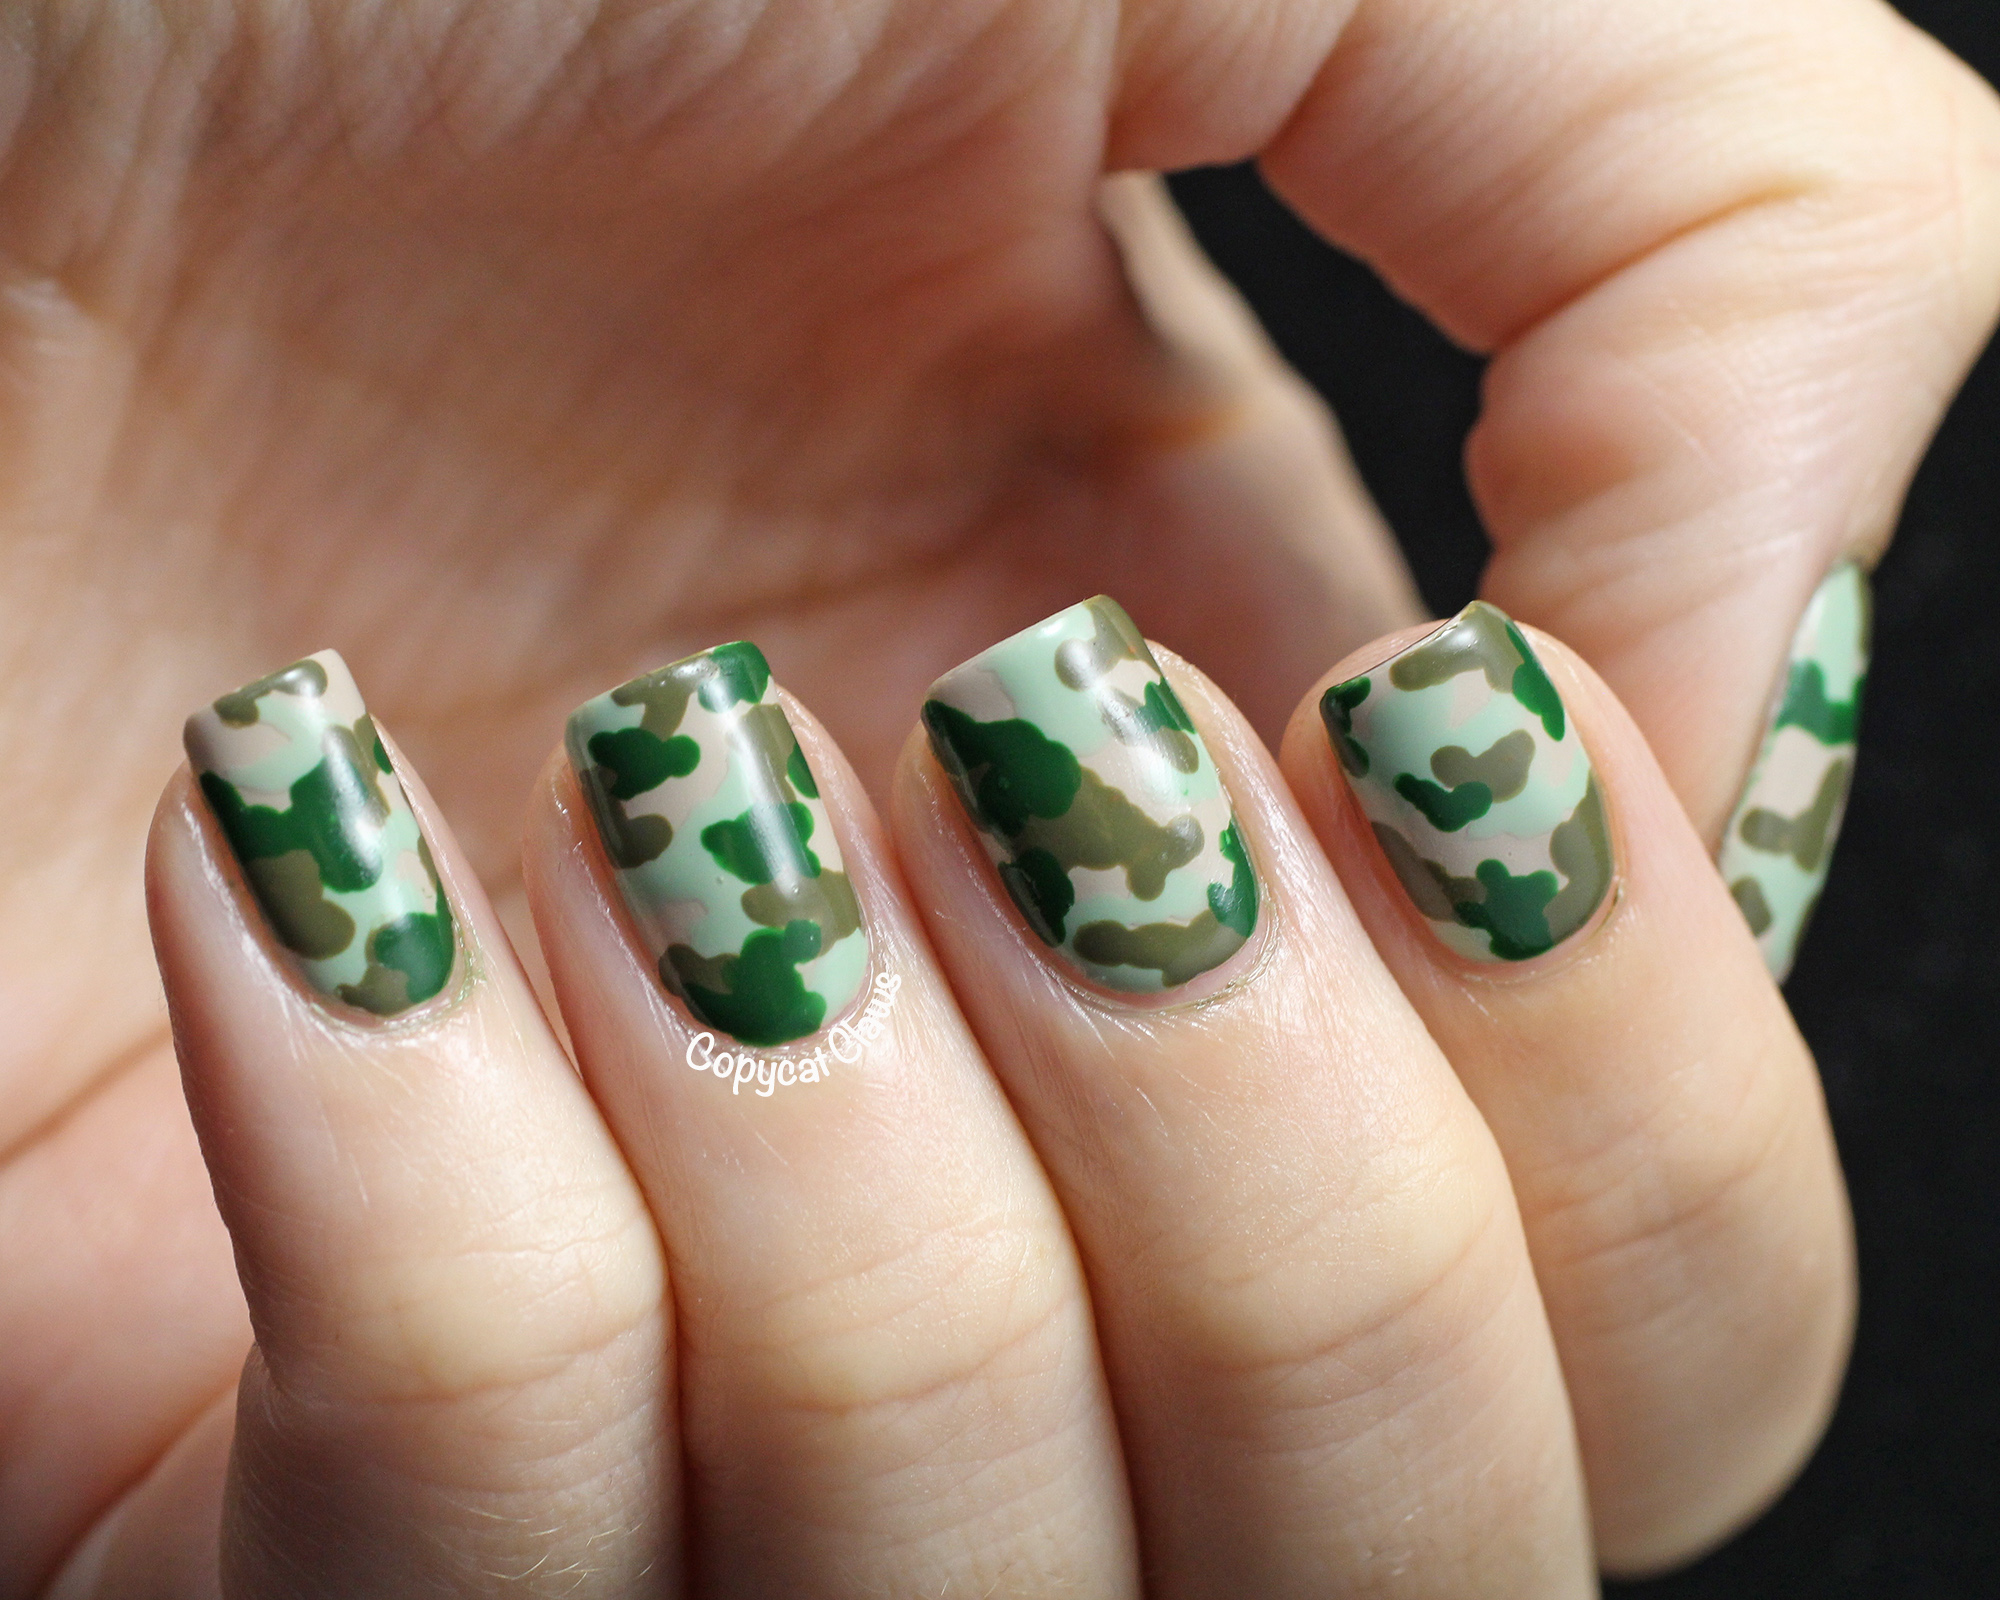
If you're a fan of hunting and outdoor activities, the bone collector camo gel nail art design is perfect for you. It's a unique and bold design that will surely make a statement. Here's a step-by-step guide on how to create this eye-catching design. Before you start, make sure you have all the necessary materials – base coat, top coat, white gel polish, and brown or green gel polish for the camo pattern. You'll also need a small brush or a dotting tool for creating the pattern. Begin by applying a thin layer of base coat on your nails to protect them and help the polish adhere better. Let it dry completely before moving on to the next step. Next, apply two coats of white gel polish on your nails and cure them under a LED or UV lamp according to the instructions on the polish bottle. This will serve as the base for your camo pattern. Once your base color is dry, it's time to create the camo pattern. Use a small brush or a dotting tool to randomly create small dots and lines with the brown or green gel polish. Don't worry about making them perfect, as the imperfect look is what makes the camo pattern unique. After creating the pattern, cure your nails under the lamp again to set the gel polish. If you want a more opaque and defined look, you can add another layer of the camo pattern. To finish off, apply a top coat to seal your design and give it a glossy finish. Cure your nails one last time and clean up any excess polish around your nails with a small brush dipped in acetone. And there you have it, your very own bone collector camo gel nail art design! Don't be afraid to experiment with different colors and patterns to make it truly your own.3. Step-by-Step Guide to a Bone Collector Camo Gel Nail Art Design


3. Step-by-Step Guide to a Bone Collector Camo Gel Nail Art Design


The bone collector camo gel nail art design is a perfect way to show off your love for hunting and the great outdoors. It's a unique and bold design that will surely make a statement. Here are some ideas to inspire your own bone collector camo gel nail art design. - Add a pop of color: Instead of the traditional brown or green camo pattern, why not try using a bright color like pink or blue for a fun twist on the design. - Gradient camo: Create a gradient effect by starting with a light color for the base and gradually adding darker shades for the camo pattern. - Add some bling: Give your nail art some glam by adding some rhinestones or glitter on top of the camo pattern. - Negative space: Leave some of your nails with just the white base and create the camo pattern on the remaining nails for a modern and edgy look. - Mix and match: Combine the bone collector camo pattern with other designs like stripes or polka dots for a unique and personalized nail art design.4. Bone Collector Camo Gel Nail Art Design Ideas


4. Bone Collector Camo Gel Nail Art Design Ideas
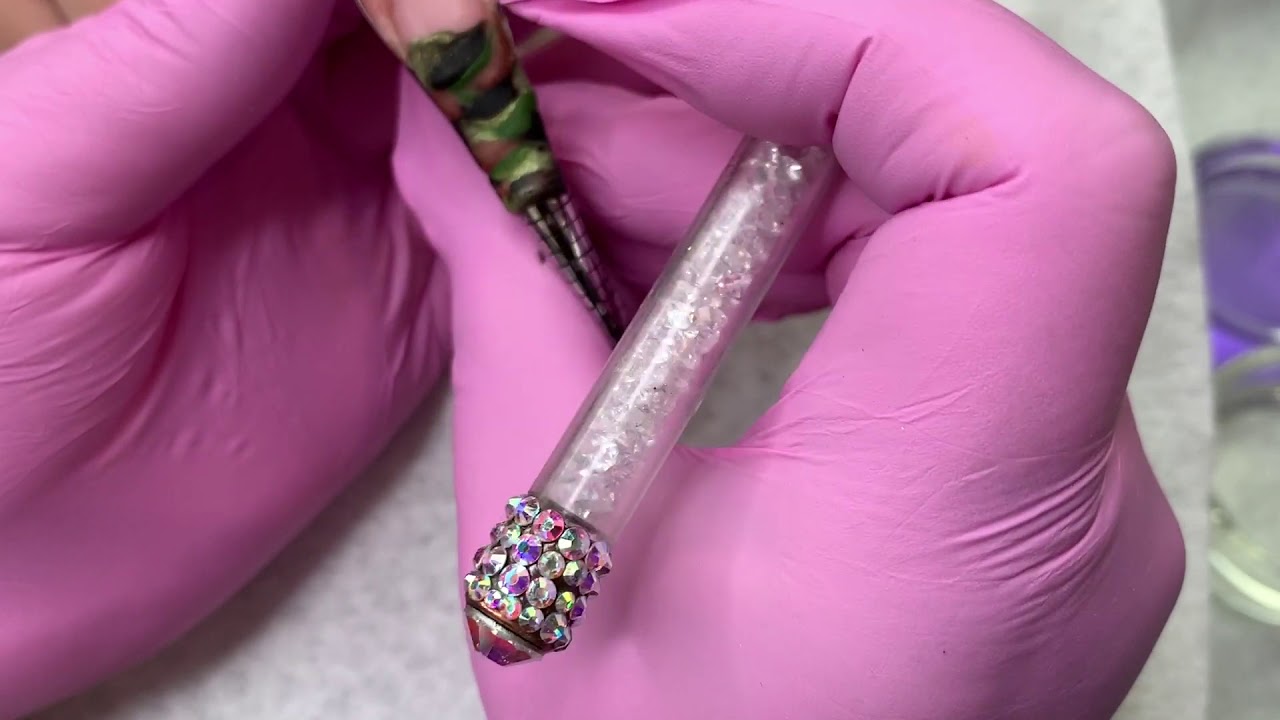
Creating the perfect bone collector camo gel nail art design requires the right products. Here are some of the best products to use for this unique and edgy nail art design. - Base coat: A good base coat is essential for protecting your nails and helping the polish adhere better. Try using Orly Bonder Rubberized Base Coat for a long-lasting hold. - White gel polish: A white base is necessary for the camo pattern to stand out. We recommend using OPI GelColor in Alpine Snow for a smooth and opaque base. - Camo gel polish: For the camo pattern, you can choose either a brown or green gel polish. Some great options are Gelish Soak-Off Gel Polish in Tiger Blossom for a brown camo or Gelish Soak-Off Gel Polish in Amazon Flirt for a green camo. - Top coat: A top coat seals the design and gives it a glossy finish. We love CND Shellac Top Coat for its shiny and long-lasting effect. - Small brush or dotting tool: These tools are essential for creating the camo pattern. You can use a small brush like Winstonia Detail Art Brush or a dotting tool like eBoot 5 Pieces Dotting Tool Set for more precision.5. Best Products for a Bone Collector Camo Gel Nail Art Design


5. Best Products for a Bone Collector Camo Gel Nail Art Design


Looking for some inspiration for your bone collector camo gel nail art design? We've got you covered! Check out these stunning designs for some ideas on how to create your own unique and edgy look. - Classic camo: Stick to the traditional brown or green camo pattern for a timeless and edgy look. - Glitter camo: Add some sparkle to your design by incorporating glitter on top of the camo pattern. - Colorful camo: Experiment with different colors for a fun and playful twist on the design. You can even try a rainbow camo for a bold and unique look. - Minimalistic camo: Leave some negative space on your nails and create a small and simple camo pattern for a modern and chic look. - Camo accent nail: If you don't want to go all out with the camo pattern, you can create it on just one or two nails for a subtle and unique touch.6. Bone Collector Camo Gel Nail Art Design Inspiration

6. Bone Collector Camo Gel Nail Art Design Inspiration


Creating a bone collector camo gel nail art design may seem daunting, but with these tips, you'll be able to perfect your design in no time. - Practice makes perfect: Like with any nail art, it takes practice to master the technique. Don't be afraid to try different patterns and colors until you find what works for you. - Use a light hand: The key to creating a natural-looking camo pattern is to have a light hand. Don't press too hard when creating the pattern, as it can result in a messy and unnatural look. - Clean up with a small brush: To clean up any excess polish around your nails, use a small brush dipped in acetone. This will give you more control and help achieve clean and precise edges. - Don't forget the top coat: A top coat is essential for sealing the design and giving it a glossy finish. Don't skip this step as it can make a big difference in the longevity of your nail art. - Have fun with it: Don't be afraid to get creative and have fun with your bone collector camo gel nail art design. Play around with different colors, patterns, and techniques to make it truly your own.7. Tips for Perfecting a Bone Collector Camo Gel Nail Art Design

7. Tips for Perfecting a Bone Collector Camo Gel Nail Art Design


Think your short nails can't pull off the bone collector camo gel nail art design? Think again. Here's how you can create a shorter version of this unique and edgy design. - Smaller pattern: When creating the camo pattern, make sure to use a smaller brush or dotting tool to create smaller dots and lines. This will help the pattern fit better on shorter nails. - Accent nail: Instead of creating the camo pattern on all nails, you can opt to have it on just one or two accent nails while leaving the rest with a simple white base. - French tip: Give your short nails a twist by creating the camo pattern on the tips instead of the entire nail. This will create a fun and unexpected look. - Vertical pattern: Instead of the traditional horizontal camo pattern, try creating a vertical pattern for a unique and elongating effect on shorter nails.8. Bone Collector Camo Gel Nail Art Design for Short Nails

8. Bone Collector Camo Gel Nail Art Design for Short Nails


The bone collector camo gel nail art design is all about making a bold and edgy statement. Here are some tips to take your design to the next level. - Add some texture: Give your design some dimension by adding texture with a matte top coat or by using a gel polish with a matte finish. - Ombre camo: Create an ombre effect by blending two different colors for the camo pattern, starting with a lighter color and gradually adding a darker one. - Tribal camo: Combine the bone collector camo pattern with tribal-inspired designs for a unique and eye-catching look. - Metallic camo: Add some shine to your design by using metallic gel polishes for the camo pattern. Gold and silver look especially chic and edgy.9. Bold and Edgy Bone Collector Camo Gel Nail Art Design


9. Bold and Edgy Bone Collector Camo Gel Nail Art Design


The bone collector camo gel nail art design is a classic and timeless design, but that doesn't mean you can't put your own unique twist on it. Here are some ideas to make your design stand out. - Animal print camo: Combine two popular patterns by creating a camo design with an animal print twist. You can use leopard, zebra, or even snake print for a wild and unique look. - Neon camo: Add a pop of color to your design by using neon gel polishes for the camo pattern. This will give your design a fun and playful vibe. - Glitter camo: Use different shades of glitter to create the camo pattern for a sparkly and glamorous twist on the classic design. - Water marble camo: Create a water marble effect with the brown and green gel polishes for a unique and eye-catching camo pattern.10. Unique Twist on the Classic Bone Collector Camo Gel Nail Art Design
10. Unique Twist on the Classic Bone Collector Camo Gel Nail Art Design


The Perfect Nails for Outdoor Enthusiasts: Bone Collector Camo Gel Nail Art Design

Unleash Your Wild Side
 For those who love the great outdoors and all things hunting and camouflage, the bone collector camo gel nail art design is the perfect way to express your love for the wild. This bold and unique design features a mix of earthy tones and intricate patterns, making it a standout choice for any outdoor enthusiast.
Easy and Long-Lasting
 One of the biggest advantages of the bone collector camo gel nail art design is its longevity. Unlike traditional nail polish, gel nail art can last up to three weeks without chipping or fading. This means you can enjoy your outdoor adventures without worrying about ruining your manicure.
Customizable to Your Style
 The beauty of the bone collector camo gel nail art design lies in its versatility. You can choose from a variety of base colors such as green, brown, or even black, and then add your desired camo pattern on top. From classic camo to more intricate designs, the possibilities are endless. You can also add
featured keywords such as "outdoor-inspired" or "nature lover" to make the design truly your own.
The beauty of the bone collector camo gel nail art design lies in its versatility. You can choose from a variety of base colors such as green, brown, or even black, and then add your desired camo pattern on top. From classic camo to more intricate designs, the possibilities are endless. You can also add
featured keywords such as "outdoor-inspired" or "nature lover" to make the design truly your own.
Perfect for Any Occasion
 Not only is the bone collector camo gel nail art design perfect for outdoor activities, but it can also be dressed up for special occasions. The subtle yet eye-catching design adds a unique touch to any outfit, making it a great choice for weddings, parties, or even a day at the office.
Get the Look
 To achieve the bone collector camo gel nail art design, simply head to your nearest nail salon and ask for a gel manicure. The process involves applying a base coat, followed by your desired base color and camo pattern. A topcoat is then applied to seal in the design and give it a shiny finish. You can also try DIY nail kits for a more budget-friendly option.
In conclusion, the bone collector camo gel nail art design is a must-try for any outdoor enthusiast looking to add a touch of nature to their style. With its long-lasting and customizable features, this design is perfect for any occasion and will surely make you stand out in a crowd. So why wait? Get your nails ready for your next adventure with the bone collector camo gel nail art design.
To achieve the bone collector camo gel nail art design, simply head to your nearest nail salon and ask for a gel manicure. The process involves applying a base coat, followed by your desired base color and camo pattern. A topcoat is then applied to seal in the design and give it a shiny finish. You can also try DIY nail kits for a more budget-friendly option.
In conclusion, the bone collector camo gel nail art design is a must-try for any outdoor enthusiast looking to add a touch of nature to their style. With its long-lasting and customizable features, this design is perfect for any occasion and will surely make you stand out in a crowd. So why wait? Get your nails ready for your next adventure with the bone collector camo gel nail art design.


