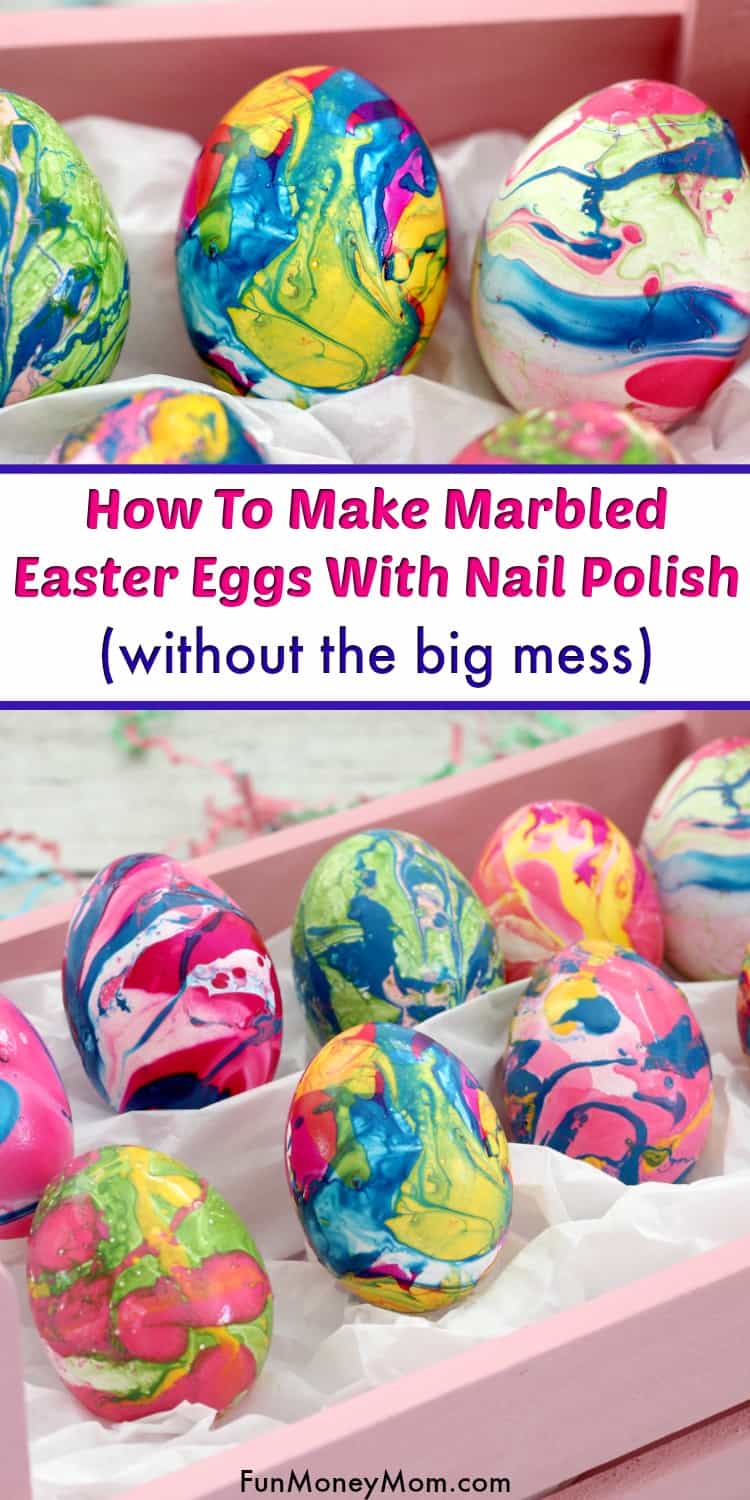
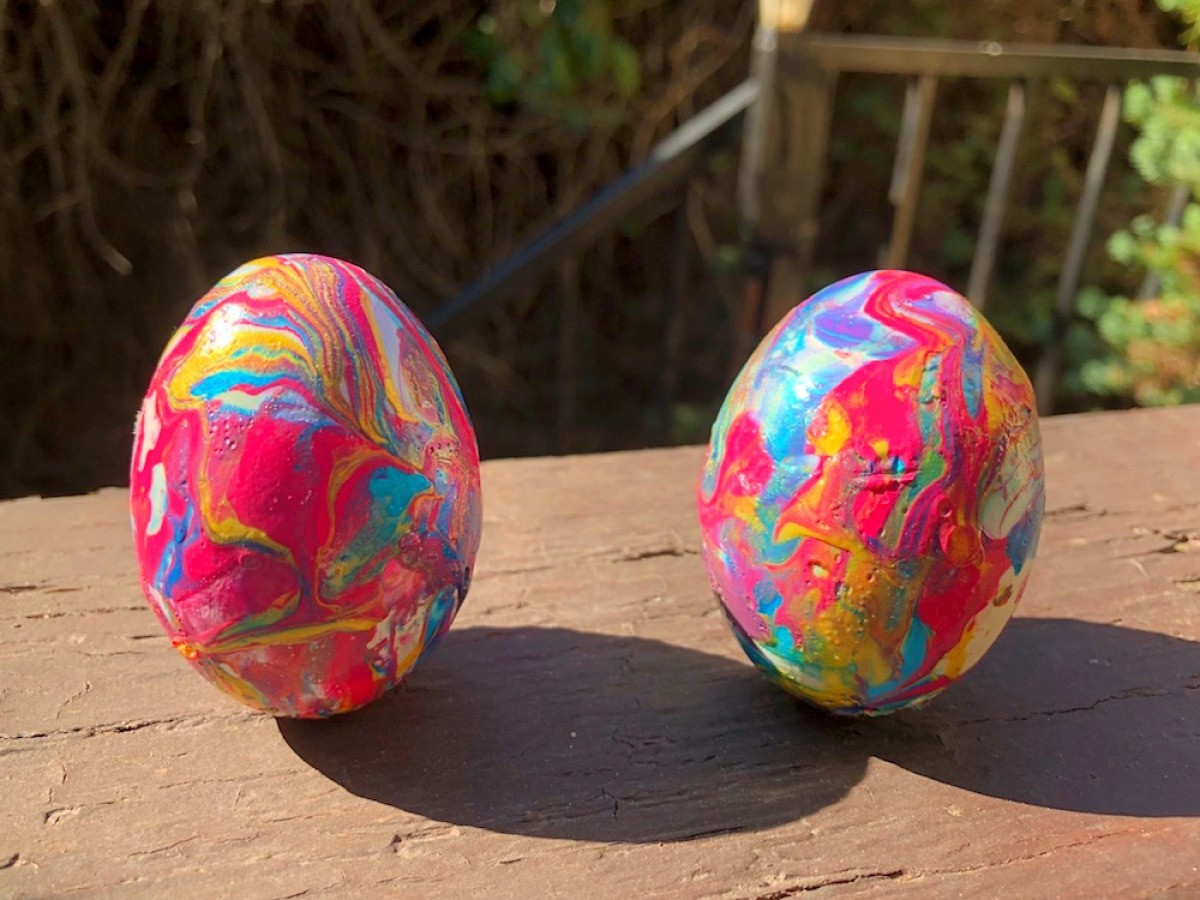
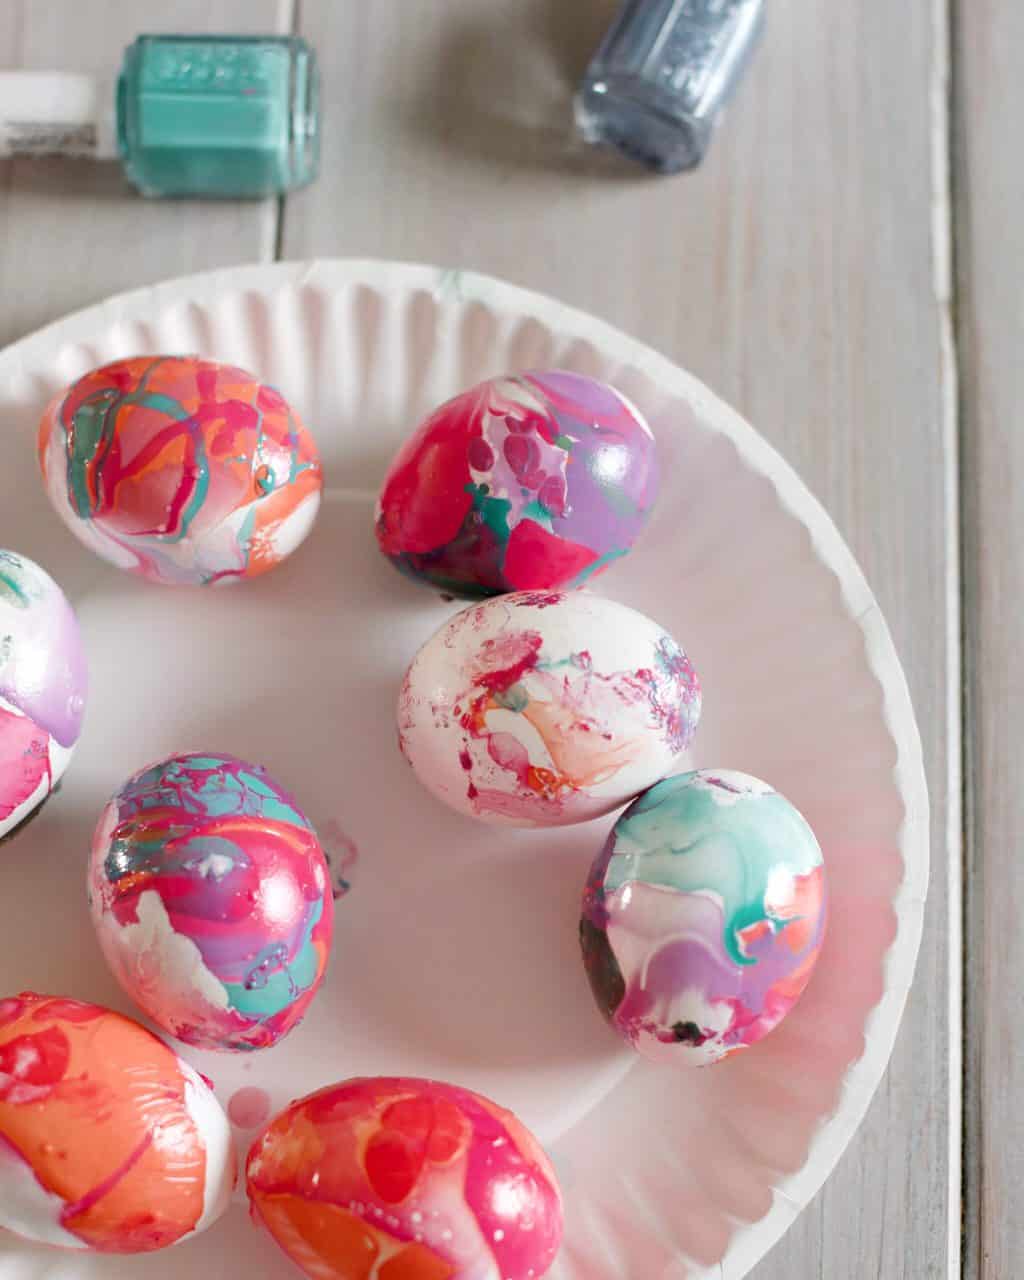
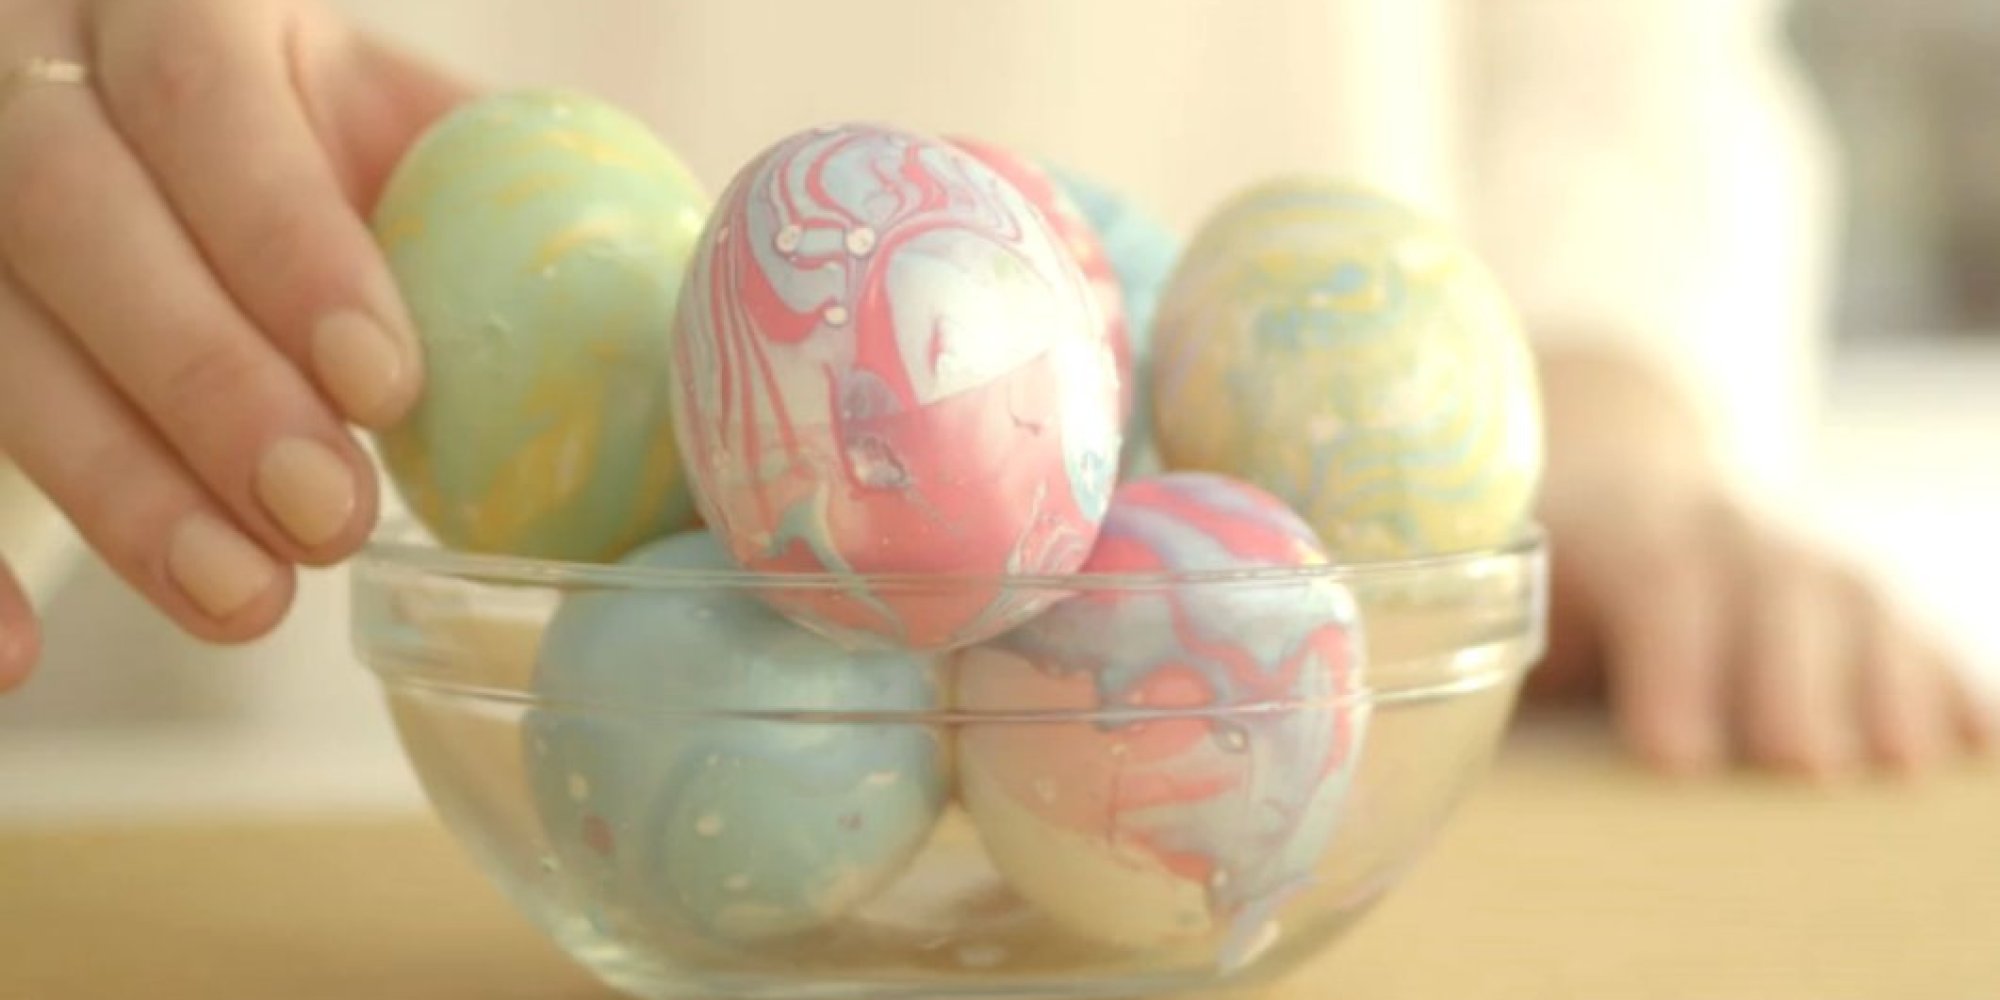
If you're looking for a unique and creative way to decorate your Easter eggs, why not try using nail polish? This fun and easy DIY project will result in beautiful marbled eggs that will impress your family and friends. Plus, it's a great way to use up any old or unwanted nail polish in your collection. To get started, you'll need a few basic supplies: hard-boiled eggs, a bowl of warm water, nail polish in various colors, and toothpicks. Make sure to use non-toxic nail polish, as the eggs will be consumed later on. First, fill the bowl with warm water and add a few drops of each nail polish color on the surface of the water. Use the toothpick to swirl the colors together, creating a marbled effect. Make sure to work quickly, as the nail polish will dry on the surface of the water. Once you have your desired marbled pattern, gently dip the egg into the water, making sure to cover the entire surface. You can also use the toothpick to create more intricate designs by dragging the nail polish across the surface of the water. Let the egg dry on a paper towel and repeat with the remaining eggs.Marbled Easter Eggs with Nail Polish


Marbled Easter Eggs with Nail Polish


:max_bytes(150000):strip_icc()/marbled-easter-eggs2-5aa87859c5542e0036f1608a.jpg)

If you're tired of the same old egg dyeing kits, why not switch things up this Easter and try using nail polish? Not only is it a fun and easy activity, but it also creates beautiful and unique designs. Here's how to dye Easter eggs with nail polish: First, gather your supplies: hard-boiled eggs, a bowl of warm water, nail polish in various colors, and toothpicks. You can also use nail polish remover and cotton balls to clean up any excess polish on your hands. Next, add a few drops of each nail polish color on the surface of the water and use a toothpick to create a marbled effect. Then, gently dip each egg into the water, making sure to cover the entire surface. You can also use the toothpick to create more intricate designs. Let the eggs dry on a paper towel and voila! You have beautifully dyed Easter eggs. Feel free to experiment with different colors and designs to create a unique set of eggs that will impress everyone at your Easter gathering.How to Dye Easter Eggs with Nail Polish

How to Dye Easter Eggs with Nail Polish


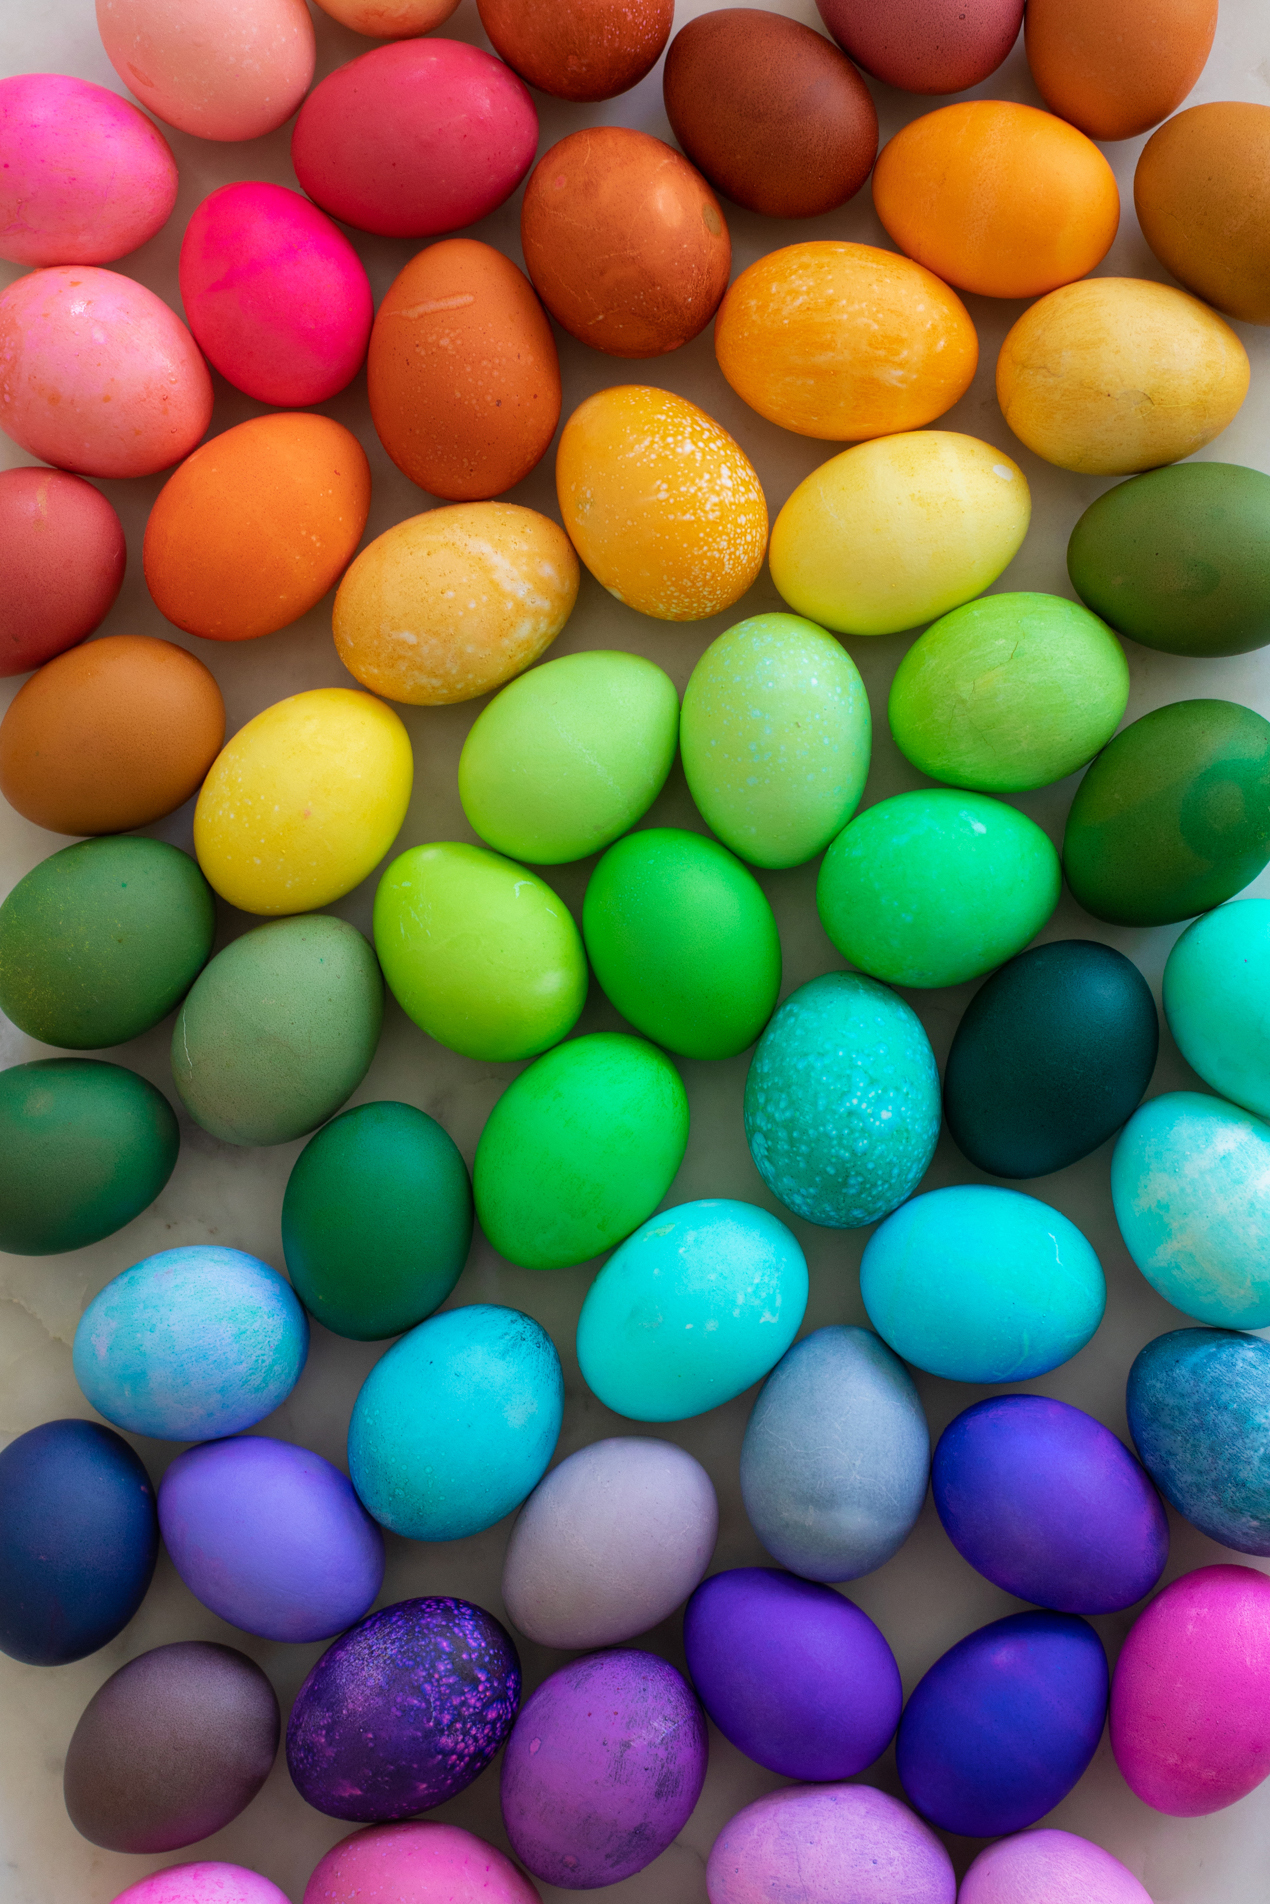
Forget the traditional egg dyeing kits, this year, let's decorate our Easter eggs with nail polish! This fun and easy DIY project will result in colorful and eye-catching eggs that will be the talk of your holiday celebration. First, gather your supplies: hard-boiled eggs, a bowl of warm water, nail polish in various colors, and toothpicks. Make sure to use non-toxic nail polish, as the eggs will be consumed later on. Next, add a few drops of each nail polish color on the surface of the water and use a toothpick to swirl the colors together, creating a marbled effect. Then, gently dip each egg into the water, making sure to cover the entire surface. You can also use the toothpick to create more intricate designs. Let the eggs dry on a paper towel and repeat with the remaining eggs. Once dry, you can display your beautiful nail polish Easter eggs in a basket or use them to decorate your holiday table. Get creative and have fun with this unique Easter egg decorating idea!Nail Polish Easter Eggs

Nail Polish Easter Eggs


If you're tired of the same old egg decorating techniques, why not switch things up this Easter and try using nail polish? This fun and easy DIY project will result in beautiful and unique eggs that will impress your family and friends. To get started, you'll need a few basic supplies: hard-boiled eggs, a bowl of warm water, nail polish in various colors, and toothpicks. You can also use nail polish remover and cotton balls to clean up any excess polish on your hands. First, fill the bowl with warm water and add a few drops of each nail polish color on the surface. Use the toothpick to swirl the colors together, creating a marbled effect. Make sure to work quickly, as the nail polish will dry on the surface of the water. Then, gently dip each egg into the water, making sure to cover the entire surface. You can also use the toothpick to create more intricate designs. Let the eggs dry on a paper towel and voila! You have beautifully decorated Easter eggs. Feel free to experiment with different colors and designs to create a unique set of eggs that will be the highlight of your Easter celebration.Easter Egg Decorating with Nail Polish


Easter Egg Decorating with Nail Polish


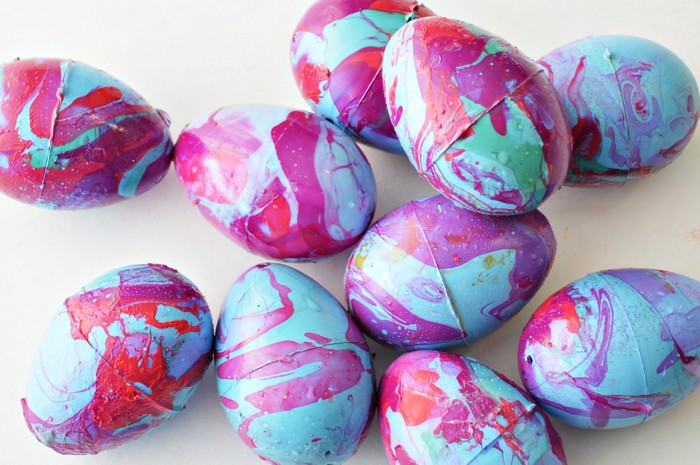
If you're looking for a fun and unique Easter egg decorating idea, why not try using nail polish? This DIY project is easy and results in beautiful marbled eggs that will impress your family and friends. To get started, you'll need a few basic supplies: hard-boiled eggs, a bowl of warm water, nail polish in various colors, and toothpicks. Make sure to use non-toxic nail polish, as the eggs will be consumed later on. First, fill the bowl with warm water and add a few drops of each nail polish color on the surface. Use the toothpick to swirl the colors together, creating a marbled effect. Make sure to work quickly, as the nail polish will dry on the surface of the water. Then, gently dip each egg into the water, making sure to cover the entire surface. You can also use the toothpick to create more intricate designs. Let the eggs dry on a paper towel and repeat with the remaining eggs. Once dry, you can display your beautiful DIY nail polish Easter eggs in a basket or use them to decorate your holiday table. Get creative and have fun with this unique Easter egg decorating idea!DIY Nail Polish Easter Eggs

DIY Nail Polish Easter Eggs


Looking for a fun and easy way to decorate your Easter eggs? Why not try using nail polish? This DIY project will result in beautifully marbled eggs that are sure to impress your family and friends. First, gather your supplies: hard-boiled eggs, a bowl of warm water, nail polish in various colors, and toothpicks. You can also use nail polish remover and cotton balls to clean up any excess polish on your hands. Next, add a few drops of each nail polish color on the surface of the water and use a toothpick to create a marbled effect. Then, gently dip each egg into the water, making sure to cover the entire surface. You can also use the toothpick to create more intricate designs. Let the eggs dry on a paper towel and voila! You have beautifully swirled Easter eggs. Feel free to experiment with different colors and designs to create a unique set of eggs that will be the talk of your Easter celebration.Nail Polish Swirl Easter Eggs

Nail Polish Swirl Easter Eggs


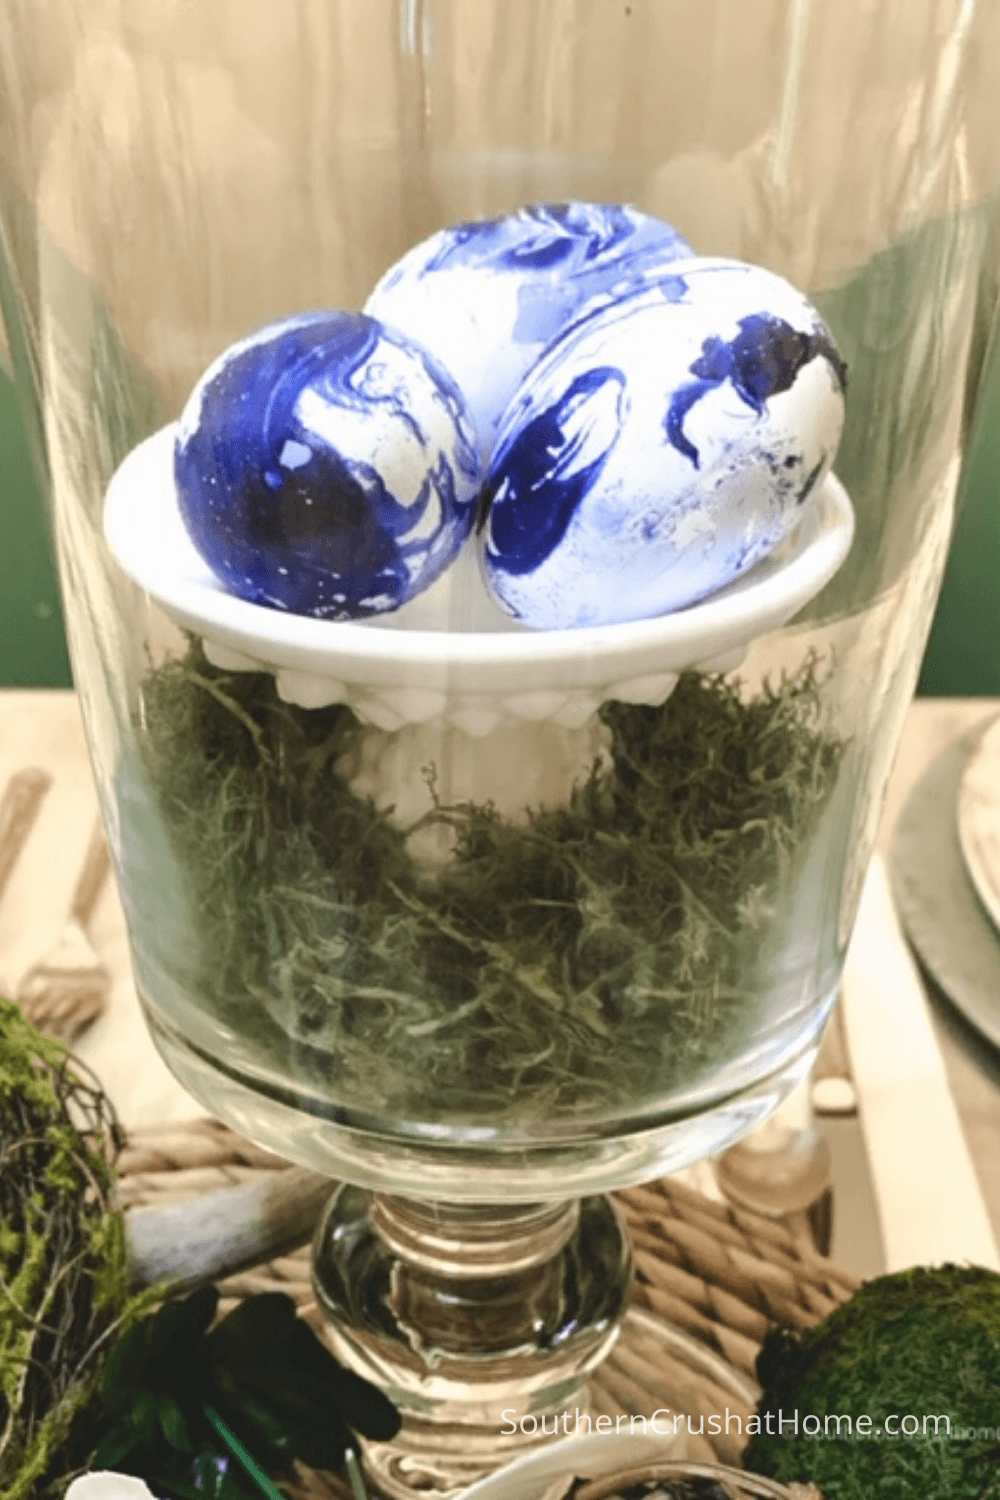
Get ready to add some color to your Easter eggs with this fun and easy DIY project using nail polish. Not only will you have beautifully decorated eggs, but you'll also get to use up any old or unwanted nail polish in your collection. To get started, you'll need a few basic supplies: hard-boiled eggs, a bowl of warm water, nail polish in various colors, and toothpicks. Make sure to use non-toxic nail polish, as the eggs will be consumed later on. First, fill the bowl with warm water and add a few drops of each nail polish color on the surface. Use the toothpick to swirl the colors together, creating a marbled effect. Make sure to work quickly, as the nail polish will dry on the surface of the water. Next, gently dip each egg into the water, making sure to cover the entire surface. You can also use the toothpick to create more intricate designs. Let the eggs dry on a paper towel and repeat with the remaining eggs. Once dry, you can display your colorful Easter eggs in a basket or use them to decorate your holiday table. Get creative and have fun with this unique Easter egg decorating idea!Colorful Easter Eggs with Nail Polish

Colorful Easter Eggs with Nail Polish


If you're looking for a fun and unique way to decorate your Easter eggs, why not try using nail polish? This DIY project is easy and results in beautiful marbled eggs that will impress your family and friends. First, gather your supplies: hard-boiled eggs, a bowl of warm water, nail polish in various colors, and toothpicks. You can also use nail polish remover and cotton balls to clean up any excess polish on your hands. Next, add a few drops of each nail polish color on the surface of the water and use a toothpick to create a marbled effect. Then, gently dip each egg into the water, making sure to cover the entire surface. You can also use the toothpick to create more intricate designs. Let the eggs dry on a paper towel and voila! You have beautifully marbled Easter eggs. Feel free to experiment with different colors and designs to create a unique set of eggs that will be the highlight of your Easter celebration.Nail Polish Marbled Eggs


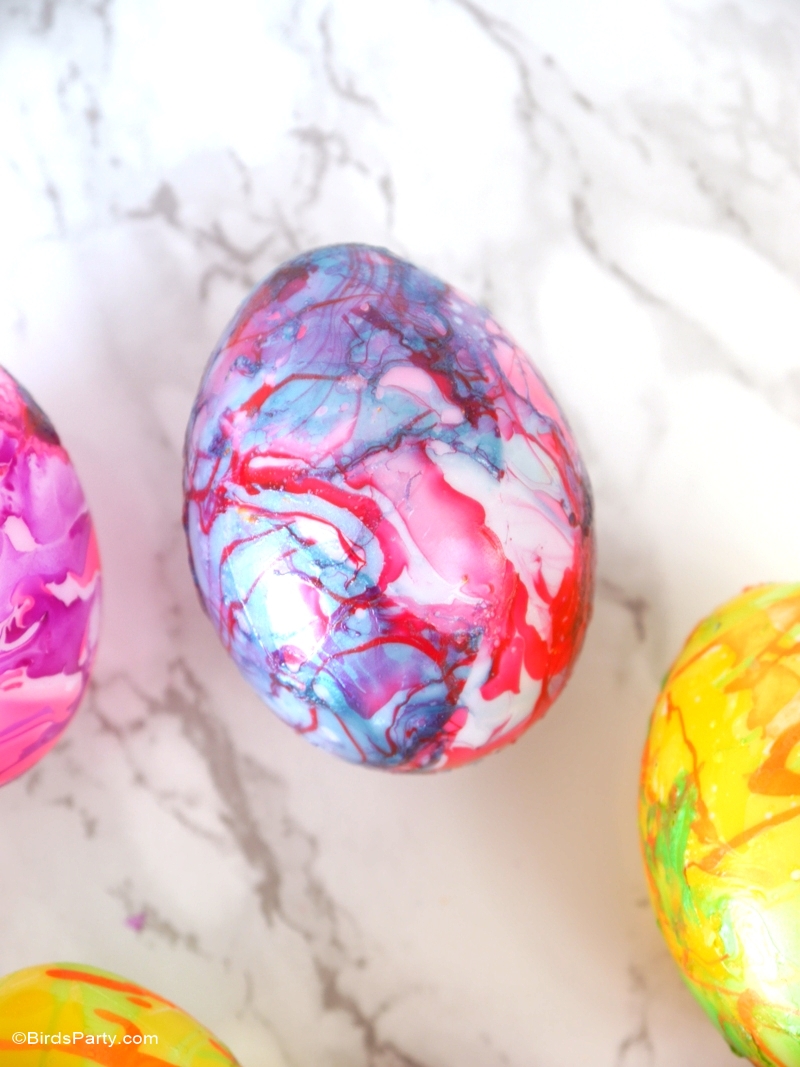
Nail Polish Marbled Eggs

If you're tired of the same old egg decorating techniques, why not switch things up this Easter and try using nail polish? This fun and easy DIY project will result in beautiful and unique eggs that will impress your family and friends. To get started, you'll need a few basic supplies: hard-boiled eggs, a bowl of warm water, nail polish in various colors, and toothpicks. You can also use nail polish remover and cotton balls to clean up any excess polish on your hands. First, fill the bowl with warm water and add a few drops of each nail polish color on the surface. Use the toothpick to swirl the colors together, creating a marbled effect. Make sure to work quickly, as the nail polish will dry on the surface of the water. Next, gently dip each egg into the water, making sure to cover the entire surface. You can also use the toothpick to create more intricate designs. Let the eggs dry on a paper towel and voila! You have beautifully designed Easter eggs. Feel free to experiment with different colors and designs to create a unique set of eggs that will be the talk of your Easter celebration.Easter Egg Designs with Nail Polish


Easter Egg Designs with Nail Polish


If you're looking for a fun and creative way to decorate your Easter eggs, why not try using nail polish? This DIY project will result in beautiful and unique eggs that will impress your family and friends. First, gather your supplies: hard-boiled eggs, a bowl of warm water, nail polish in various colors, and toothpicks. You can also use nail polish remover and cotton balls to clean up any excess polish on your hands. To get started, add a few drops of each nail polish color on the surface of the water and use a toothpick to create a marbled effect. Then, gently dip each egg into the water, making sure to cover the entire surface. You can also use the toothpick to create more intricate designs. Let the eggs dry on a paper towel and repeat with the remaining eggs. Feel free to experiment with different colors and designs to create a unique set of eggs that will be the highlight of your Easter celebration. Get creative and have fun with this unique Easter egg decorating idea!Nail Polish Easter Egg Ideas
Nail Polish Easter Egg Ideas


Creating Unique and Vibrant Easter Eggs with Nail Polish

Adding a Touch of Color to Your Egg Decorating Tradition
 Easter is a time for family gatherings, delicious food, and of course, colorful eggs. While traditional egg coloring methods involve using food coloring or natural dyes, there is a new trend that is taking the Easter egg decorating game to the next level – using
nail polish
. This unconventional method not only produces stunning and unique results, but it also allows for endless creativity and customization. So, grab your favorite
nail polish
shades and let's dive into the world of egg coloring with
nail polish
.
Easter is a time for family gatherings, delicious food, and of course, colorful eggs. While traditional egg coloring methods involve using food coloring or natural dyes, there is a new trend that is taking the Easter egg decorating game to the next level – using
nail polish
. This unconventional method not only produces stunning and unique results, but it also allows for endless creativity and customization. So, grab your favorite
nail polish
shades and let's dive into the world of egg coloring with
nail polish
.
Why Use Nail Polish for Egg Coloring?
 You may be wondering, why use
nail polish
for egg coloring when there are so many other options available? Well, the answer is simple –
nail polish
offers a variety of colors, finishes, and designs that cannot be achieved with traditional methods. Plus, most of us already have a collection of
nail polish
at home, making it a budget-friendly option. Not to mention,
nail polish
is waterproof, ensuring that your beautifully decorated eggs will last longer.
You may be wondering, why use
nail polish
for egg coloring when there are so many other options available? Well, the answer is simple –
nail polish
offers a variety of colors, finishes, and designs that cannot be achieved with traditional methods. Plus, most of us already have a collection of
nail polish
at home, making it a budget-friendly option. Not to mention,
nail polish
is waterproof, ensuring that your beautifully decorated eggs will last longer.
How to Create Stunning Easter Eggs with Nail Polish
 The process of coloring eggs with
nail polish
is similar to the traditional method, but with a few extra steps. First, gather your materials – hard-boiled eggs, a bowl of room temperature water, and a variety of
nail polish
colors. Start by adding a few drops of your chosen
nail polish
into the water and use a toothpick to create swirls or designs. Then, carefully dip the egg into the water, making sure to cover the entire egg. Let the excess polish drip off and place the egg on a paper towel to dry. Repeat this process with different colors and designs until you have achieved your desired look.
The process of coloring eggs with
nail polish
is similar to the traditional method, but with a few extra steps. First, gather your materials – hard-boiled eggs, a bowl of room temperature water, and a variety of
nail polish
colors. Start by adding a few drops of your chosen
nail polish
into the water and use a toothpick to create swirls or designs. Then, carefully dip the egg into the water, making sure to cover the entire egg. Let the excess polish drip off and place the egg on a paper towel to dry. Repeat this process with different colors and designs until you have achieved your desired look.
Tips and Tricks for Egg Coloring with Nail Polish
 To make your egg coloring experience even more successful, here are some tips and tricks to keep in mind:
- Use light-colored
nail polish
for a more vibrant and noticeable result.
- Experiment with different designs and techniques, such as using a toothbrush to create a splatter effect.
- For a more subtle look, use a cotton swab to lightly dab
nail polish
onto the egg.
- Let each layer of
nail polish
dry completely before adding another one to avoid smudging.
- Use a clear topcoat to seal and protect the design on your eggs.
In conclusion, egg coloring with
nail polish
is a fun and creative way to add a unique touch to your Easter egg decorating tradition. With endless color options and designs, you can let your imagination run wild and create one-of-a-kind eggs that will impress your family and friends. So, why stick to the same old methods when you can elevate your egg decorating game with
nail polish
? Happy decorating!
To make your egg coloring experience even more successful, here are some tips and tricks to keep in mind:
- Use light-colored
nail polish
for a more vibrant and noticeable result.
- Experiment with different designs and techniques, such as using a toothbrush to create a splatter effect.
- For a more subtle look, use a cotton swab to lightly dab
nail polish
onto the egg.
- Let each layer of
nail polish
dry completely before adding another one to avoid smudging.
- Use a clear topcoat to seal and protect the design on your eggs.
In conclusion, egg coloring with
nail polish
is a fun and creative way to add a unique touch to your Easter egg decorating tradition. With endless color options and designs, you can let your imagination run wild and create one-of-a-kind eggs that will impress your family and friends. So, why stick to the same old methods when you can elevate your egg decorating game with
nail polish
? Happy decorating!