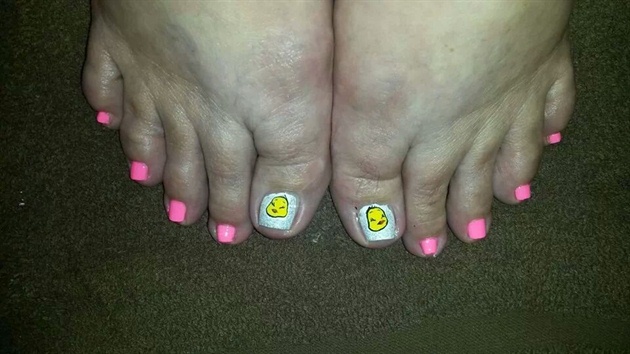
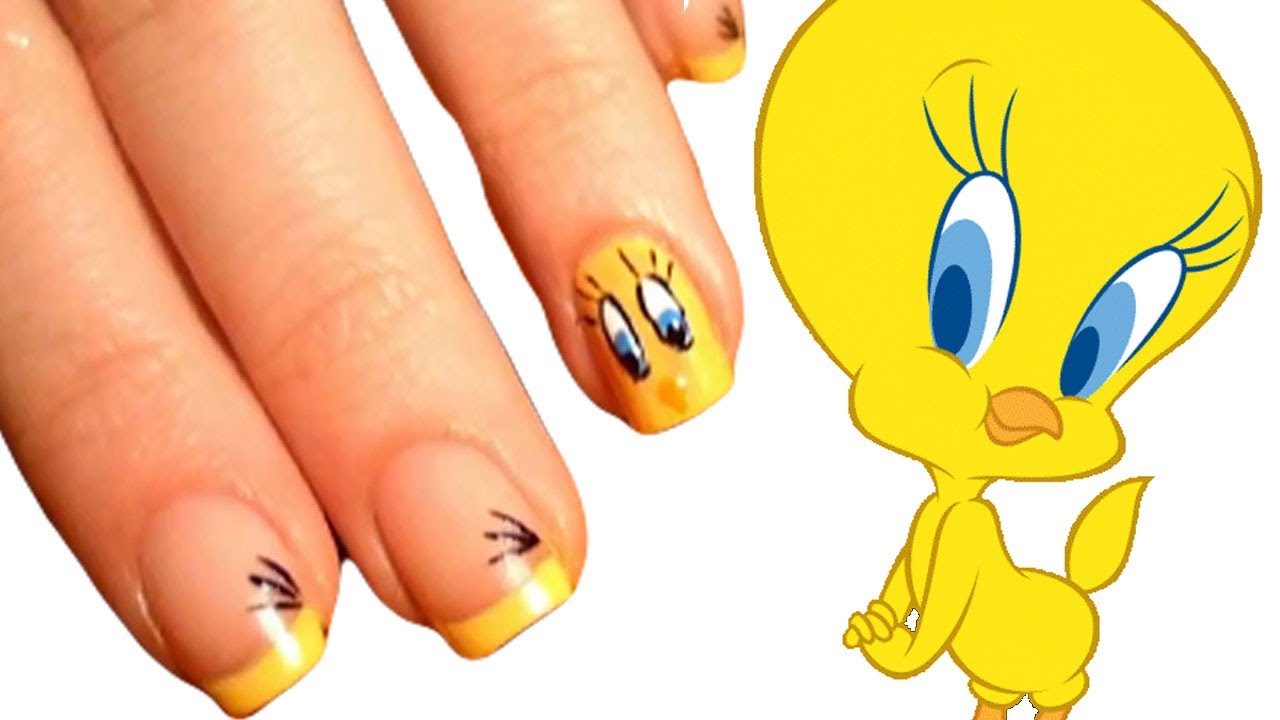
If you're a fan of the iconic yellow canary from Looney Tunes, then you'll love these tweety bird nail art designs! With a little bit of patience and creativity, you can have these adorable cartoon characters adorning your nails in no time. Follow along with this step-by-step tutorial to learn how to create your very own tweety bird nail art. To start, you'll need a few supplies to create this look. Gather a base coat, yellow, black, and white nail polish, a thin nail art brush, and a dotting tool. You can also add some extra bling to your design with some rhinestones or glitter polish. Begin by applying a base coat to your nails to protect them and help your polish last longer. Once your base coat is dry, apply a yellow polish to all of your nails. This will be the base color for your tweety bird design. Let the polish dry completely before moving on to the next step. Using a thin nail art brush and black polish, carefully draw a semi-circle on the tip of your nail. This will be Tweety's head. Next, fill in the rest of the nail with black polish, leaving a small portion at the bottom for Tweety's feet. Let the polish dry completely before moving on. Next, take your dotting tool and dip it into your white nail polish. Create two dots for Tweety's eyes on the black semi-circle you created earlier. Then, using the black polish and your thin nail art brush, add a small triangle beak between the eyes. Let the polish dry completely. For the final touch, use a small dotting tool and black polish to add three small dots on the bottom of your nail for Tweety's feet. You can also add some sparkle to your design by using a glitter polish or adding some rhinestones for a touch of bling. And there you have it, your very own cute tweety bird nail design! This look is perfect for any occasion and is sure to make you smile every time you look at your nails.1. Tweety Bird Nail Art Tutorial


1. Tweety Bird Nail Art Tutorial


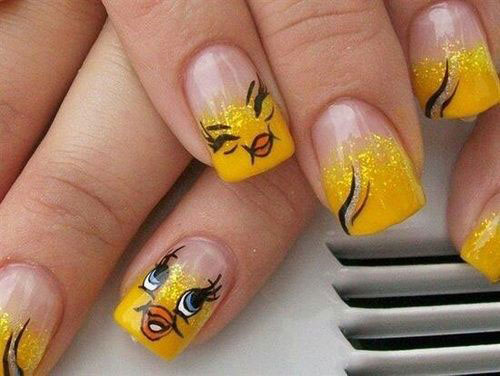
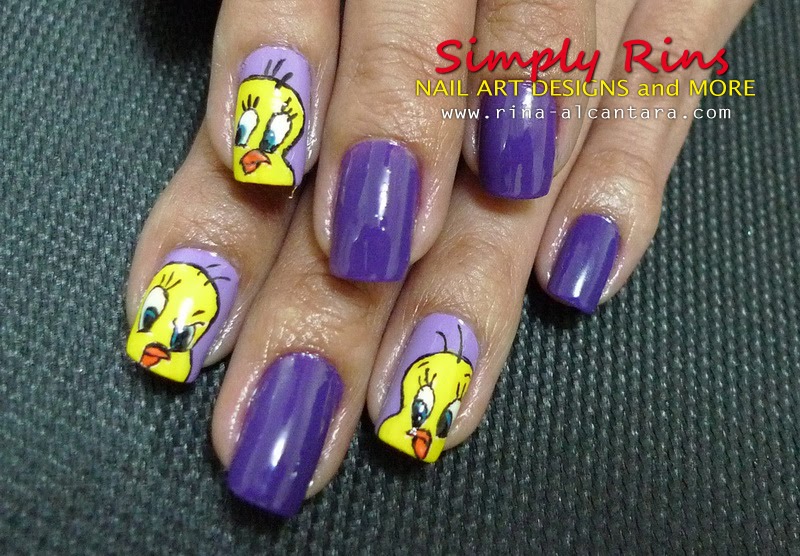
Looking for a cute and fun nail design that will stand out? Look no further than this adorable tweety bird nail art. With bright yellow and a touch of bling, this design is perfect for any nail enthusiast. Start by applying a base coat to your nails to protect them. Once dry, apply a bright yellow polish to all of your nails. You can also use a light yellow or pastel yellow for a softer look. Next, take a thin nail art brush and dip it into black polish. Carefully draw a semi-circle at the tip of your nail for Tweety's head. Then, fill in the rest of your nail with black polish, leaving a small portion at the bottom for Tweety's feet. Let the polish dry completely. Using a dotting tool, create two small dots for Tweety's eyes using white polish. Then, using your thin nail art brush and black polish, add a small triangle beak between the eyes. Let the polish dry completely. For the final touch, use a small dotting tool and black polish to add three small dots on the bottom of your nail for Tweety's feet. You can also add some extra bling to your design by using a glitter polish or adding some rhinestones. And there you have it, a cute and playful tweety bird nail design that is sure to turn heads. Whether you're a fan of Looney Tunes or just love cute nail art, this design is perfect for you.2. Cute Tweety Bird Nail Design


2. Cute Tweety Bird Nail Design

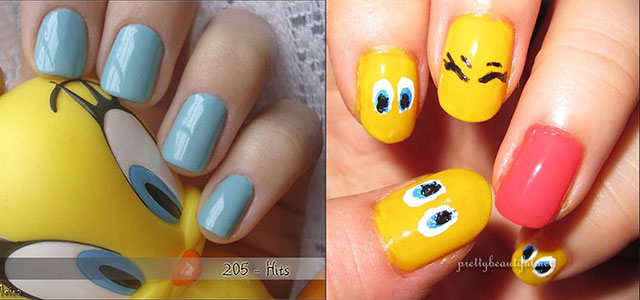

Creating your own tweety bird nail art may seem intimidating, but with this step-by-step guide, you'll be a pro in no time. Follow along to learn how to create this playful design that is sure to make a statement on your nails. First, gather your supplies. You'll need a base coat, yellow, black, and white nail polish, a thin nail art brush, and a dotting tool. You can also add some extra bling to your design with rhinestones or glitter polish. Start by applying a base coat to your nails to protect them. Once dry, apply a bright yellow polish to all of your nails. This will be the base color for your tweety bird design. Let the polish dry completely before moving on. Next, take a thin nail art brush and dip it into black polish. Carefully draw a semi-circle at the tip of your nail for Tweety's head. Then, fill in the rest of your nail with black polish, leaving a small portion at the bottom for Tweety's feet. Let the polish dry completely. Using a dotting tool, create two small dots for Tweety's eyes using white polish. Then, using your thin nail art brush and black polish, add a small triangle beak between the eyes. Let the polish dry completely. For the final touch, use a small dotting tool and black polish to add three small dots on the bottom of your nail for Tweety's feet. You can also add some extra bling to your design by using a glitter polish or adding some rhinestones. And there you have it, a step-by-step guide to creating your own tweety bird nail art. With a little bit of practice, you'll be able to create this playful design with ease.3. Tweety Bird Nail Art Step by Step

3. Tweety Bird Nail Art Step by Step


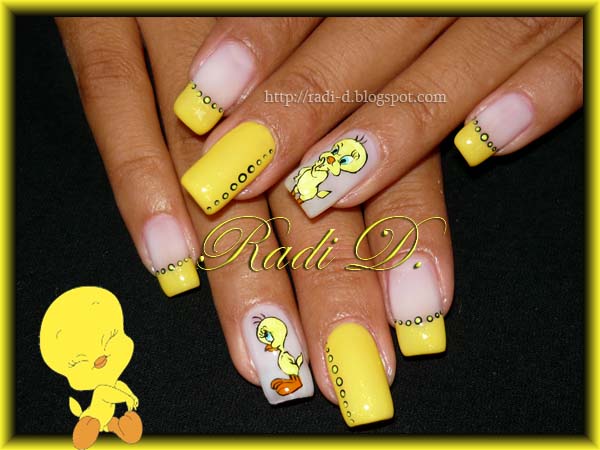
If you're new to nail art or just looking for a simple design to try, this easy tweety bird nail art is perfect for you. With minimal supplies and simple steps, you can have these adorable cartoon characters on your nails in no time. To start, you'll need a base coat, yellow, black, and white nail polish, a thin nail art brush, and a dotting tool. You can also add some extra bling to your design with rhinestones or glitter polish. Begin by applying a base coat to your nails to protect them. Once dry, apply a bright yellow polish to all of your nails. Let the polish dry completely before moving on. Next, take a thin nail art brush and dip it into black polish. Carefully draw a semi-circle at the tip of your nail for Tweety's head. Then, fill in the rest of your nail with black polish, leaving a small portion at the bottom for Tweety's feet. Let the polish dry completely. Using a dotting tool, create two small dots for Tweety's eyes using white polish. Then, using your thin nail art brush and black polish, add a small triangle beak between the eyes. Let the polish dry completely. For the final touch, use a small dotting tool and black polish to add three small dots on the bottom of your nail for Tweety's feet. You can also add some extra bling to your design by using a glitter polish or adding some rhinestones. And there you have it, an easy tweety bird nail art that anyone can do. This design is perfect for beginners or those looking for a quick and simple design that still makes a statement.4. Easy Tweety Bird Nail Art


4. Easy Tweety Bird Nail Art

Short nails can still rock a cute tweety bird design with this modified version for shorter nails. With a few simple tweaks, you can have this adorable cartoon character adorning your nails, no matter their length. You'll need a base coat, yellow, black, and white nail polish, a thin nail art brush, and a dotting tool for this design. You can also add some extra bling with rhinestones or glitter polish. Start by applying a base coat to your nails to protect them. Once dry, apply a bright yellow polish to all of your nails. Let the polish dry completely before moving on. Next, take a thin nail art brush and dip it into black polish. Carefully draw a semi-circle at the tip of your nail for Tweety's head. Then, fill in the rest of your nail with black polish, leaving a small portion at the bottom for Tweety's feet. Let the polish dry completely. Using a dotting tool, create two small dots for Tweety's eyes using white polish. Then, using your thin nail art brush and black polish, add a small triangle beak between the eyes. Let the polish dry completely. For shorter nails, you can skip adding the three small dots for Tweety's feet and instead use a thin nail art brush and black polish to draw two small lines for feet on either side of the black semi-circle. You can also add some extra bling to your design with glitter polish or rhinestones. And there you have it, a cute tweety bird nail art design modified for shorter nails. This look is perfect for anyone with shorter nails who still wants to rock a fun and playful design.5. Tweety Bird Nail Art for Short Nails

5. Tweety Bird Nail Art for Short Nails


If you're new to nail art, don't worry, this tweety bird design is perfect for beginners. With simple steps and minimal supplies, you can have these cute cartoon characters on your nails in no time. Start by gathering your supplies. You'll need a base coat, yellow, black, and white nail polish, a thin nail art brush, and a dotting tool. You can also add some extra bling to your design with rhinestones or glitter polish. Begin by applying a base coat to your nails to protect them. Once dry, apply a bright yellow polish to all of your nails. Let the polish dry completely before moving on. Next, take a thin nail art brush and dip it into black polish. Carefully draw a semi-circle at the tip of your nail for Tweety's head. Then, fill in the rest of your nail with black polish, leaving a small portion at the bottom for Tweety's feet. Let the polish dry completely. Using a dotting tool, create two small dots for Tweety's eyes using white polish. Then, using your thin nail art brush and black polish, add a small triangle beak between the eyes. Let the polish dry completely. For the final touch, use a small dotting tool and black polish to add three small dots on the bottom of your nail for Tweety's feet. You can also add some extra bling to your design by using a glitter polish or adding some rhinestones. And there you have it, a cute tweety bird nail art design that is perfect for beginners. With a little bit of practice, you'll be able to create this playful look with ease.6. Tweety Bird Nail Art for Beginners

6. Tweety Bird Nail Art for Beginners
Take your tweety bird nail art to the next level by adding some bling with rhinestones. This easy modification will give your design a touch of sparkle and make it stand out even more. To start, gather your supplies. You'll need a base coat, yellow, black, and white nail polish, a thin nail art brush, a dotting tool, and some rhinestones. You can also add some extra bling with glitter polish. Begin by applying a base coat to your nails to protect them. Once dry, apply a bright yellow polish to all of your nails. Let the polish dry completely before moving on. Next, take a thin nail art brush and dip it into black polish. Carefully draw a semi-circle at the tip of your nail for Tweety's head. Then, fill in the rest of your nail with black polish, leaving a small portion at the bottom for Tweety's feet. Let the polish dry completely. Using a dotting tool, create two small dots for Tweety's eyes using white polish. Then, using your thin nail art brush and black polish, add a small triangle beak between the eyes. Let the polish dry completely. For the final touch, use a small dotting tool and black polish to add three small dots on the bottom of your nail for Tweety's feet. Then, using a toothpick or tweezers, place small rhinestones along the black semi-circle for a touch of bling. You can also add some extra sparkle with a glitter polish. And there you have it, a tweety bird nail art design with added rhinestones for a touch of glamour. This look is perfect for a special occasion or just when you want to add some extra sparkle to your nails.7. Tweety Bird Nail Art with Rhinestones

7. Tweety Bird Nail Art with Rhinestones


For a more detailed tweety bird design, try using acrylic paint instead of nail polish. This will give you more control and allow you to add more intricate details to your design. To start, gather your supplies. You'll need a base coat, yellow, black, and white acrylic paint, a thin nail art brush, and a dotting tool. You can also add some extra bling with rhinestones or glitter polish. Begin by applying a base coat to your nails to protect them. Once dry, use a thin nail art brush and yellow acrylic paint to create a semi-circle at the tip of your nail for Tweety's head. Then, using black acrylic paint, fill in the rest of your nail, leaving a small portion at the bottom for Tweety's feet. Let the paint dry completely. Using a dotting tool, create two small dots for Tweety's eyes using white acrylic paint. Then, use black acrylic paint and your thin nail art brush to add a small triangle beak between the eyes. Let the paint dry completely. For the final touch, use a small dotting tool and black acrylic paint to add three small dots on the bottom of your nail for Tweety's feet. You can also add some extra bling with rhinestones or glitter polish. And there you have it, a tweety bird nail art design using acrylic paint for a more detailed look. This design is perfect for those who want to add extra details to their nail art.8. Tweety Bird Nail Art with Acrylic Paint

8. Tweety Bird Nail Art with Acrylic Paint

If you're a fan of nail stamping, you'll love this tweety bird nail art design. With a stamping plate and some black and white polish, you can have these cute cartoon characters on your nails in no time.9. Tweety Bird Nail Art with Stamping

9. Tweety Bird Nail Art with Stamping
Tweety Bird Nail Art Design: Adding a Pop of Color to Your Nails

The History of Nail Art
 Nail art has been a popular form of self-expression for centuries. From ancient China to modern-day Instagram, people have been adorning their nails with intricate designs and colors. It wasn't until the 20th century that nail art became more mainstream, with the introduction of nail polish and nail art tools. Today, nail art has become a staple in the fashion and beauty industry, with new trends and designs constantly emerging. One of the latest and most popular nail art designs is the Tweety Bird nail art.
What is Tweety Bird Nail Art?
 Tweety Bird nail art is a fun and playful design that features the beloved cartoon character, Tweety Bird. This design is perfect for those looking to add a pop of color and personality to their nails. The design typically features Tweety Bird's iconic yellow feathers, along with his big blue eyes and signature beak. It can be done on all nails or just as an accent nail, making it a versatile and customizable design.
How to Achieve the Tweety Bird Nail Art Design
 To achieve the Tweety Bird nail art design, you will need a few tools and materials. These include a base coat, yellow, white, black, and blue nail polish, a dotting tool or toothpick, and a small brush. Start by applying a base coat to protect your nails and allow it to dry. Then, using the yellow nail polish, paint your nails as the base color. Once dry, use the white nail polish to create Tweety Bird's face and belly. Next, use the black nail polish to create his eyes and beak. Finally, use the blue nail polish to add his iconic blue eyes. You can use a dotting tool or toothpick to create the smaller details, such as his eyelashes. Finish off with a top coat to seal in the design and add shine.
Why Choose Tweety Bird Nail Art?
 Tweety Bird nail art is a fun and unique way to express your love for the iconic cartoon character. It is also a great way to add a pop of color and personality to your nails. This design is perfect for all ages and can be easily customized to fit your personal style. Plus, with the variety of tools and techniques available, you can achieve this design at home without the need for a professional manicure.
In conclusion, Tweety Bird nail art is a fun and creative way to add a touch of nostalgia and playfulness to your nails. It is a popular design that is easy to achieve and can be customized to fit your personal style. So why not give it a try and add a little bit of Tweety Bird to your next manicure?
Tweety Bird nail art is a fun and unique way to express your love for the iconic cartoon character. It is also a great way to add a pop of color and personality to your nails. This design is perfect for all ages and can be easily customized to fit your personal style. Plus, with the variety of tools and techniques available, you can achieve this design at home without the need for a professional manicure.
In conclusion, Tweety Bird nail art is a fun and creative way to add a touch of nostalgia and playfulness to your nails. It is a popular design that is easy to achieve and can be customized to fit your personal style. So why not give it a try and add a little bit of Tweety Bird to your next manicure?


