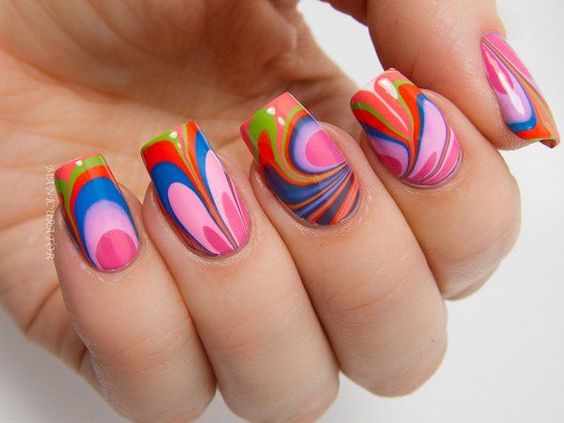
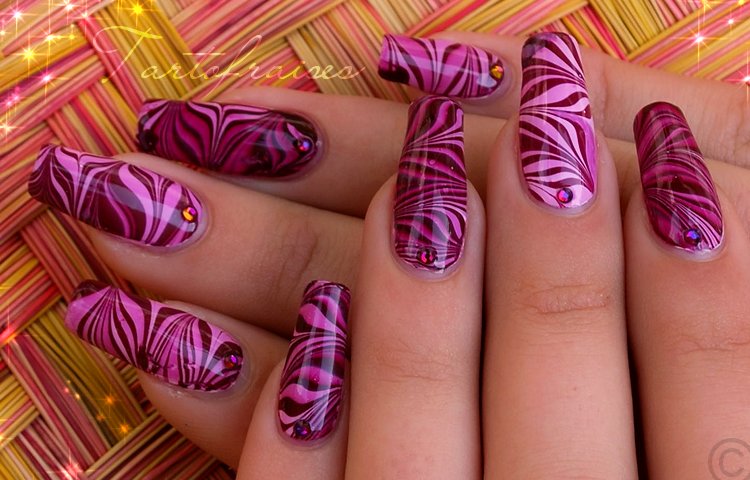
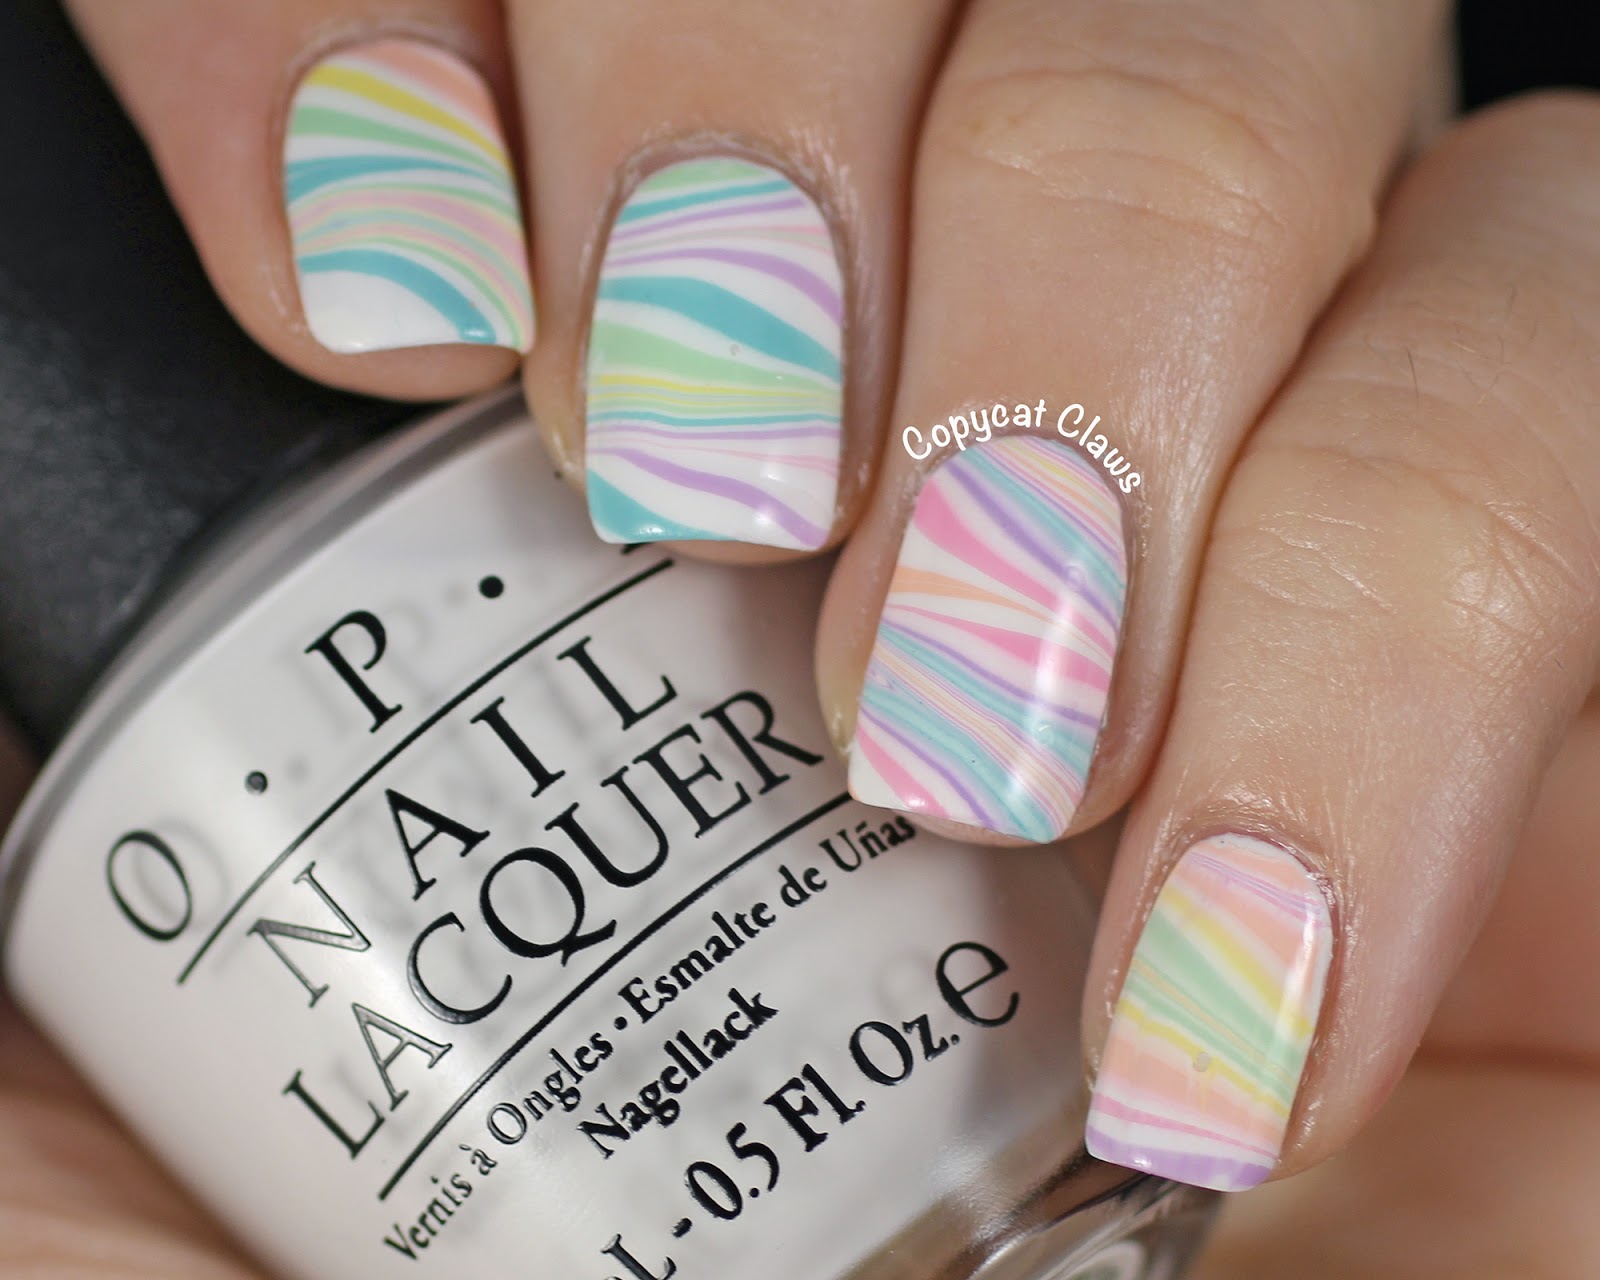
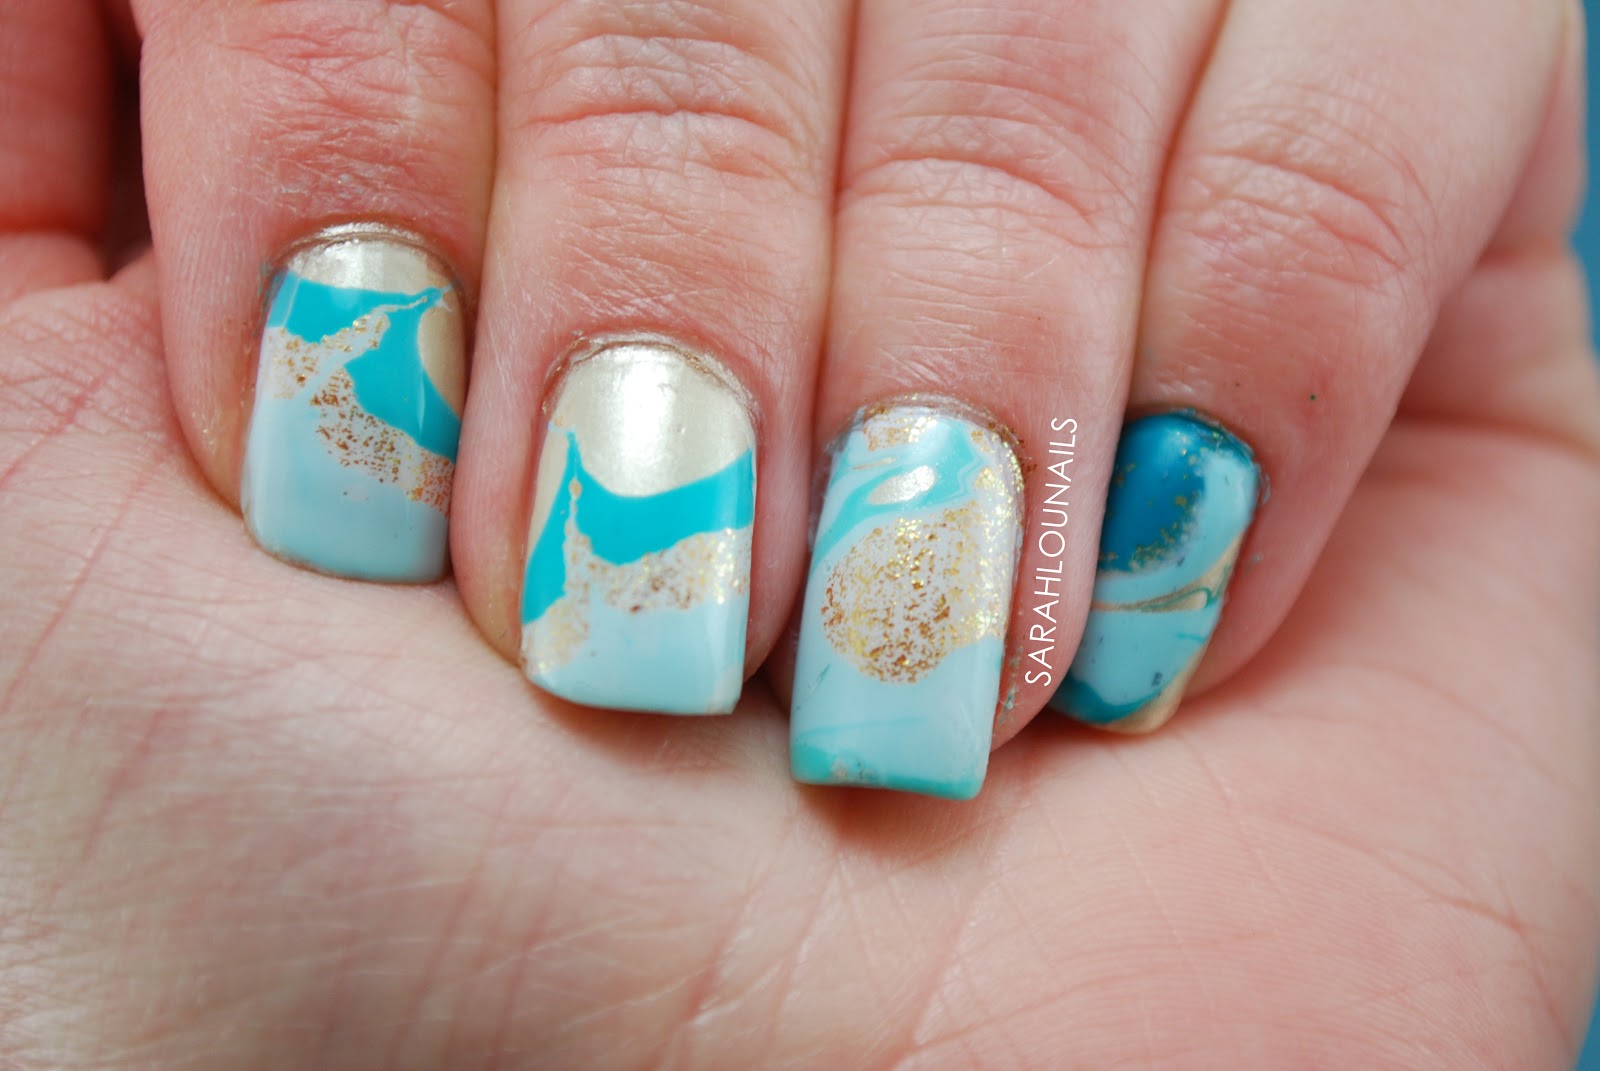
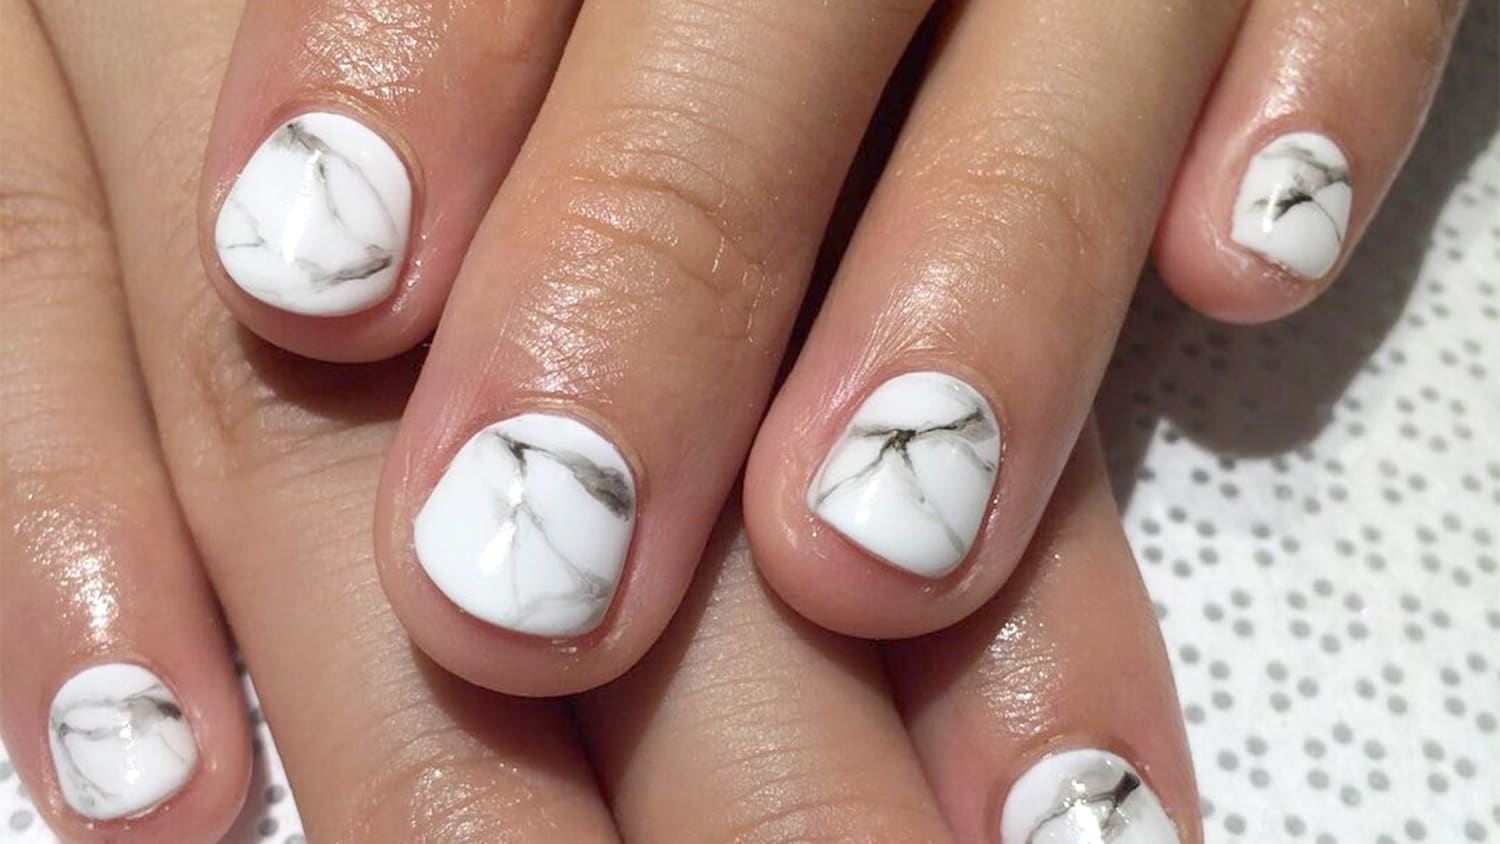
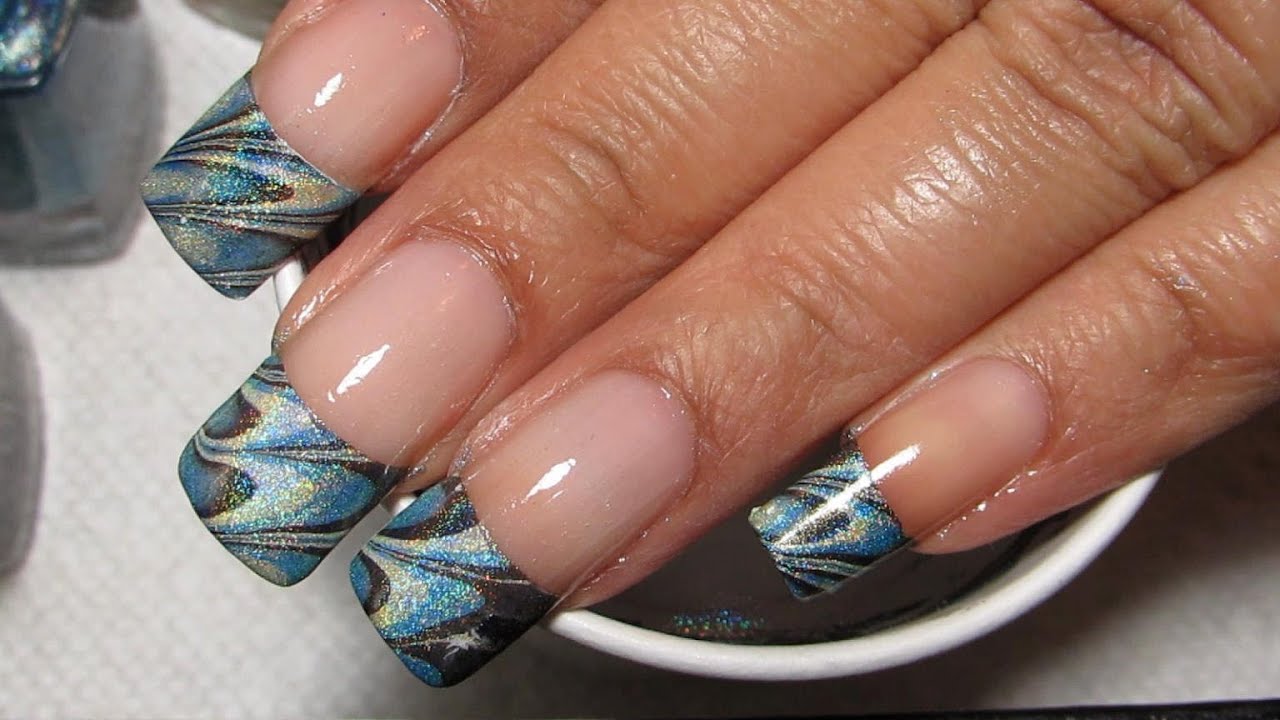
If you're new to the world of nail art, water marble nails may seem intimidating. But fear not, because with this easy water marble nail art tutorial, you'll have gorgeous nails in no time! The first step to achieving this look is to gather your supplies. You'll need a bowl of room temperature water, nail polish remover, cotton swabs, tape, and your desired nail polish colors. Make sure to choose colors that will complement each other and create a cohesive look. Next, apply a base coat to your nails to protect them from staining. Once dry, apply a white nail polish as your base color. This will help the colors in your water marble design to pop. Now it's time to create your design! Take one of your chosen nail polish colors and drop a few drops into the water. You can use the brush or a toothpick to swirl the colors together and create a marble effect. Keep adding drops of different colors and swirling until you're happy with the design. Before dipping your finger into the water, use a cotton swab to remove any excess polish floating on the surface. Then, use tape to protect the skin around your nails. This will make clean up much easier. Now, dip your finger into the water at an angle, making sure to fully submerge your nail. Use a toothpick or pointed tool to remove the excess polish from the surface of the water before pulling your finger out. Wait a few seconds for the polish to set before removing the tape and cleaning up any excess polish around your nail. Repeat this process for all your nails, changing the order of colors for each one to create a unique and abstract design. Finish off with a top coat to seal in your design and give your nails a glossy finish.1. Easy Water Marble Nail Art Tutorial

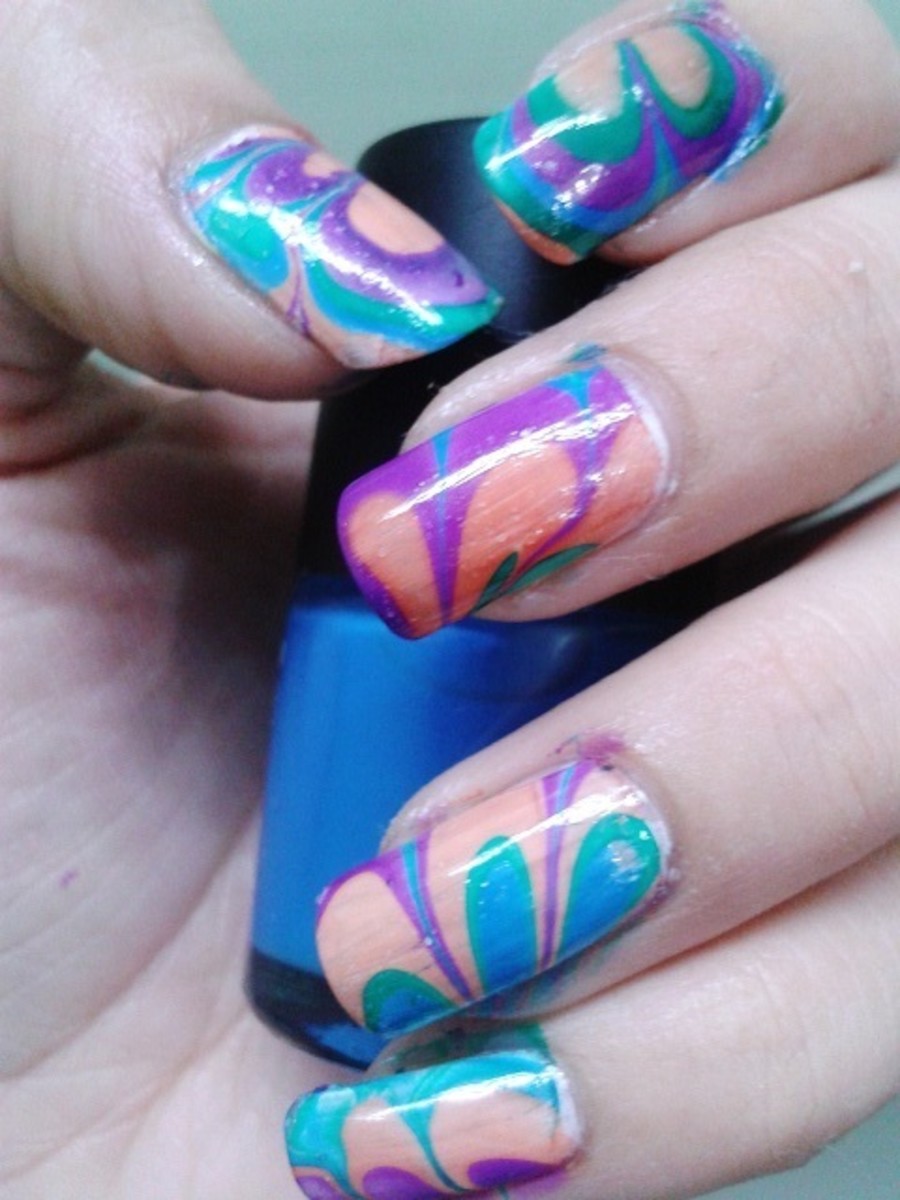
1. Easy Water Marble Nail Art Tutorial


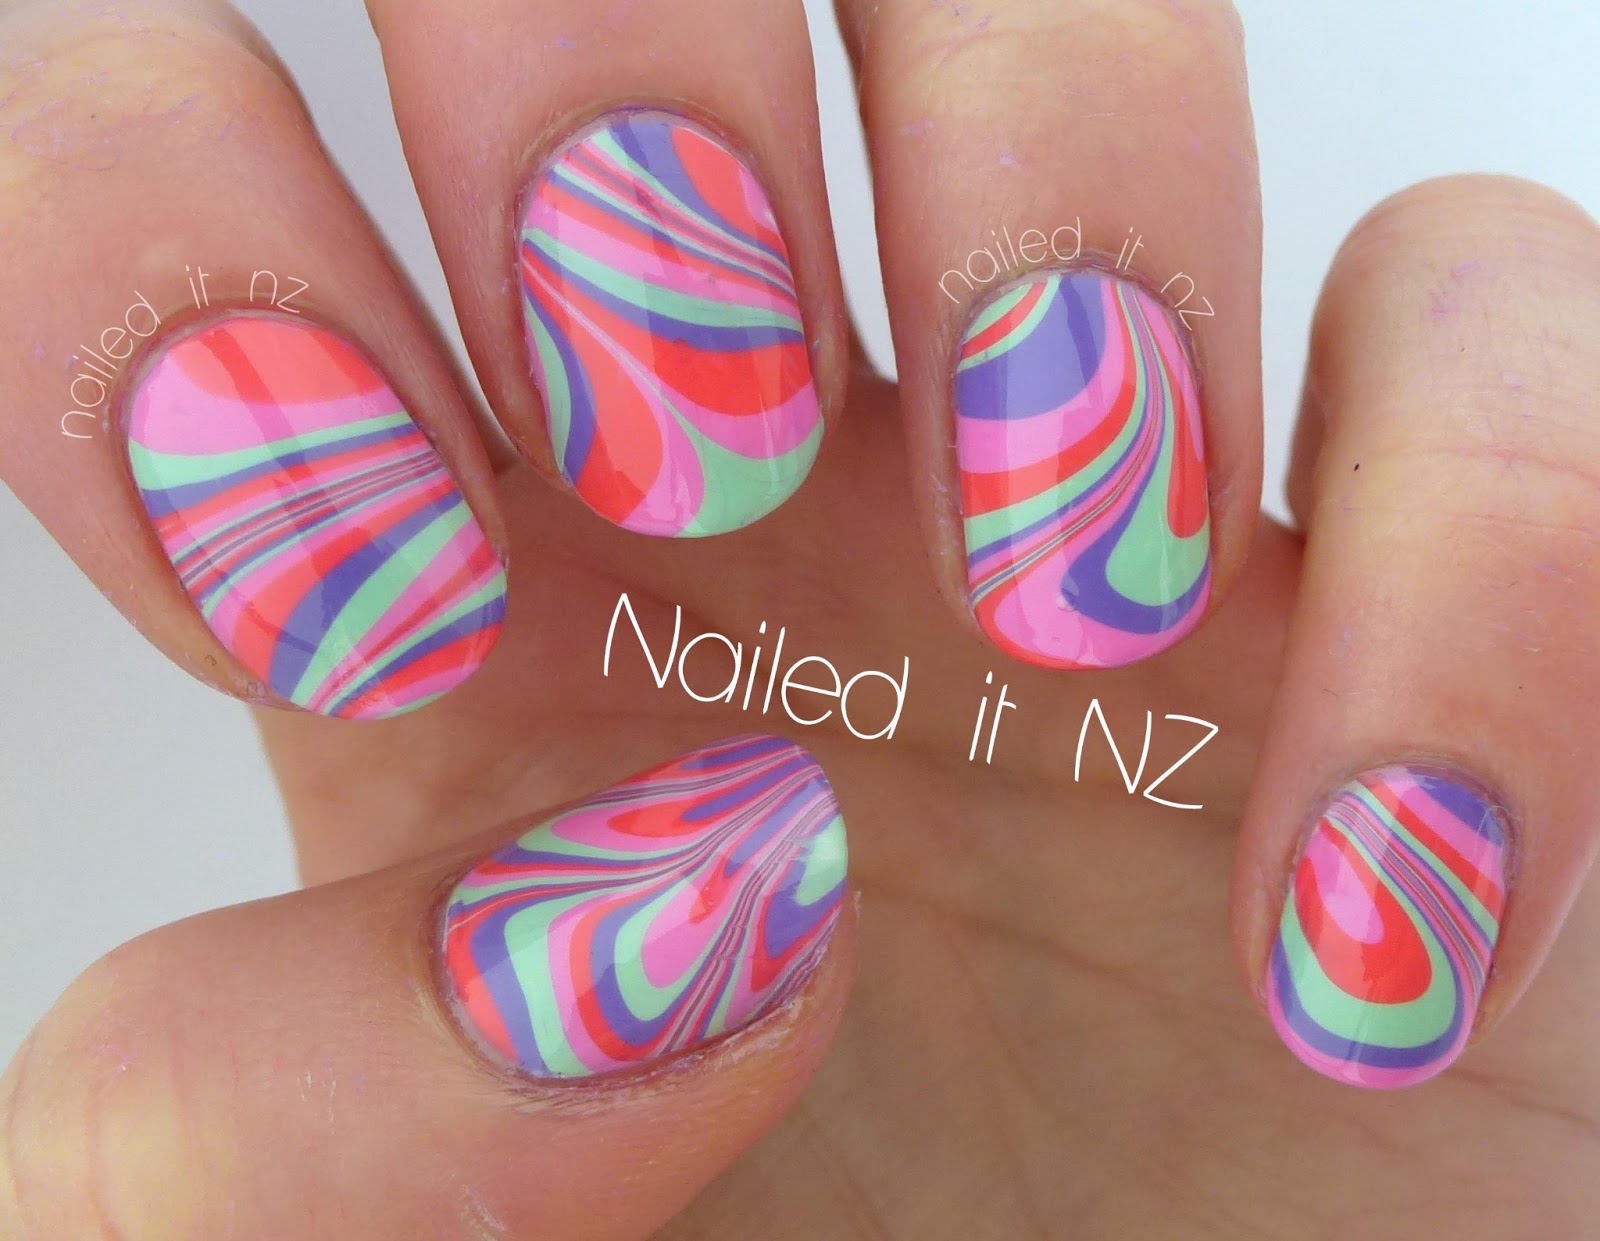
If you're a visual learner, this step-by-step water marble nail design tutorial is perfect for you. Follow along and create beautiful water marble nails in no time! Start by gathering your supplies: a bowl of room temperature water, nail polish remover, cotton swabs, tape, and your chosen nail polish colors. Make sure to have your base coat and top coat ready as well. Begin by applying a base coat to your nails and letting it dry completely. Then, apply a light colored nail polish as your base color. This will help the colors in your water marble design stand out. Take your first chosen color and drop a few drops into the water. Use a toothpick or pointed tool to swirl the colors together and create a marble effect. Keep adding drops of different colors and swirling until you're satisfied with the design. Before dipping your finger into the water, use a cotton swab to remove any excess polish floating on the surface. Then, use tape to protect the skin around your nails. Now, dip your finger into the water at an angle, making sure to fully submerge your nail. Use a toothpick or pointed tool to remove the excess polish from the surface of the water before pulling your finger out. Wait a few seconds for the polish to set before removing the tape and cleaning up any excess polish around your nail. Repeat this process for all your nails, changing the order of colors for each one to create a unique and abstract design. Finish off with a top coat to seal in your design and give your nails a glossy finish. With these easy steps, you'll have gorgeous water marble nails that are sure to turn heads.2. Step-by-Step Water Marble Nail Design Tutorial


2. Step-by-Step Water Marble Nail Design Tutorial
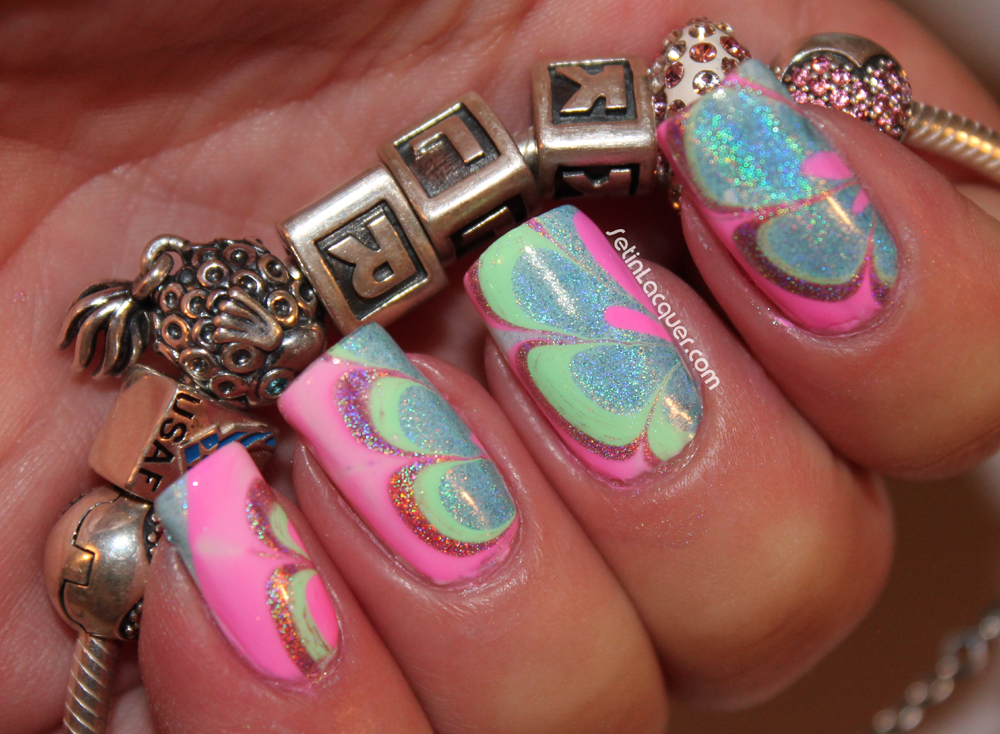
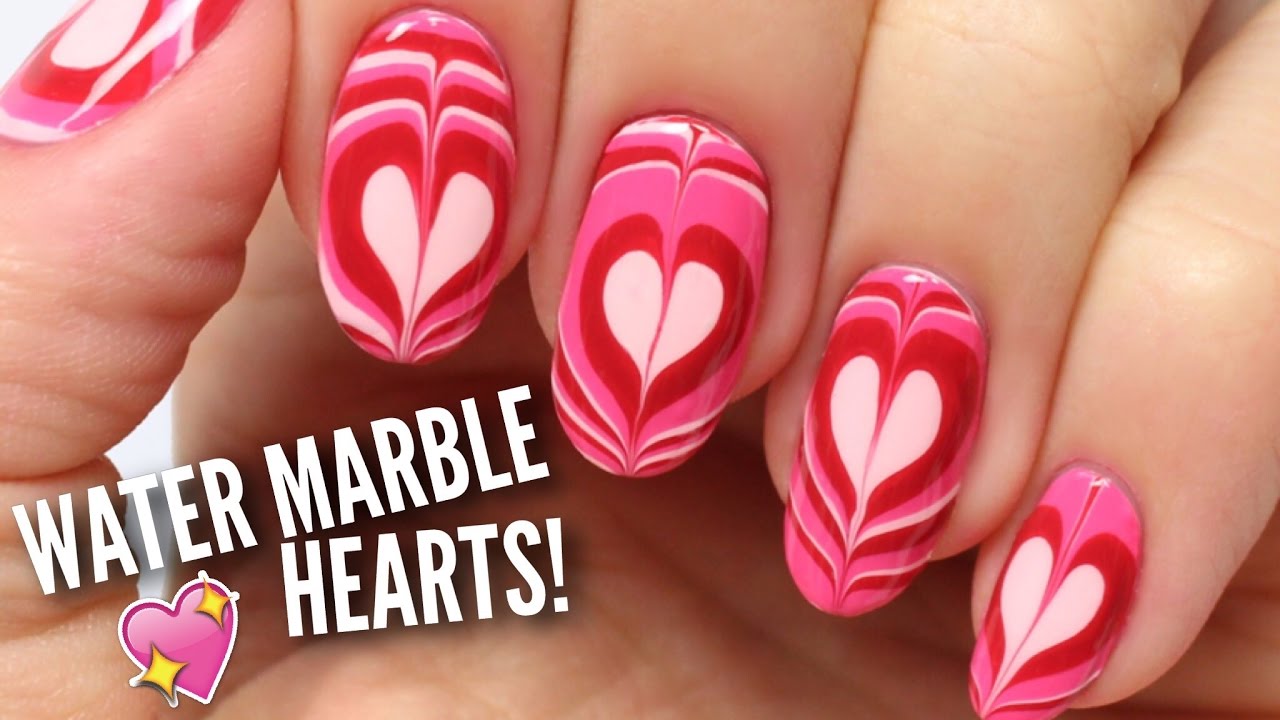
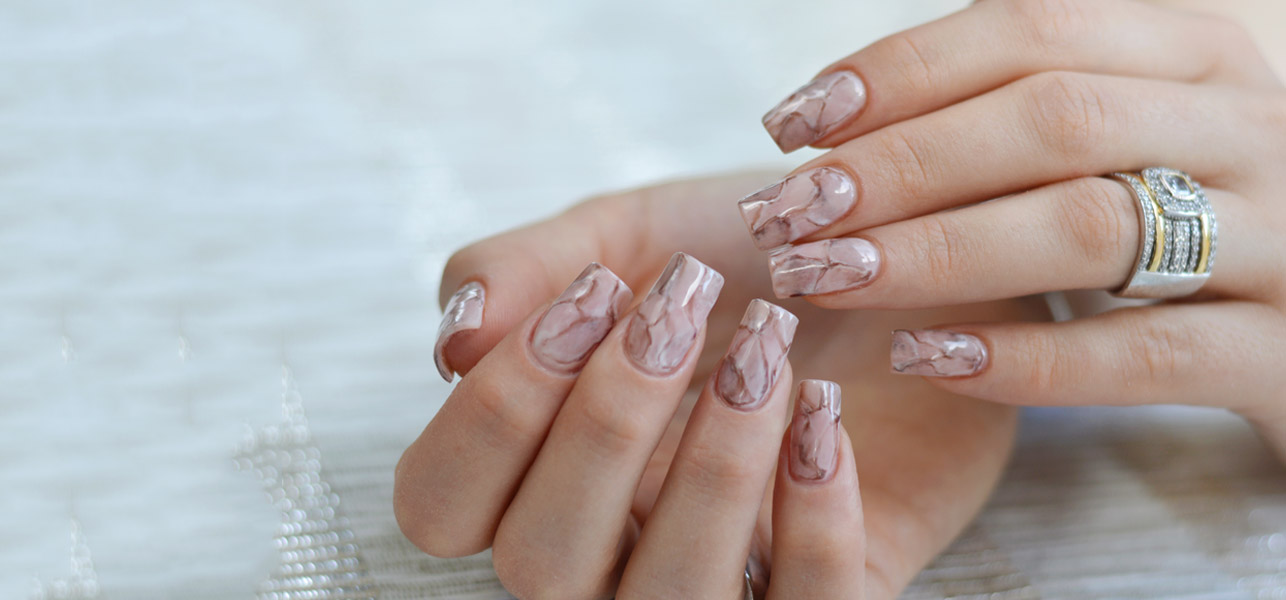
If you want to take your water marble nail game to the next level, follow this tutorial to create a stunning and intricate design that will wow everyone. Begin by gathering your supplies: a bowl of room temperature water, nail polish remover, cotton swabs, tape, your chosen nail polish colors, and a small pointed tool such as a toothpick or dotting tool. First, apply a base coat to your nails and let it dry completely. Then, use a light colored nail polish as your base. This will help the colors in your water marble design stand out. Now it's time to create your design. Drop a few drops of your first chosen color into the water and use your pointed tool to create a spiral in the polish. Then, use a contrasting color and do the same, creating another spiral on top of the first one. Continue this process with different colors until you have a design that covers the surface of the water. Before dipping your finger into the water, use a cotton swab to remove any excess polish floating on the surface. Then, use tape to protect the skin around your nails. Dip your finger into the water at an angle and fully submerge your nail. Use your pointed tool to remove the excess polish from the surface of the water before pulling your finger out. Wait a few seconds for the polish to set before removing the tape and cleaning up any excess polish around your nail. Repeat this process for all your nails, creating a unique design for each one. Finish off with a top coat to seal in your design and give your nails a glossy finish. This stunning water marble nail design is sure to make a statement and show off your nail art skills.3. How to Create a Stunning Water Marble Nail Design

3. How to Create a Stunning Water Marble Nail Design


If you're new to water marble nails, don't worry! This beginner-friendly tutorial will guide you through the process and help you achieve beautiful water marble nails with ease. Start by gathering your supplies: a bowl of room temperature water, nail polish remover, cotton swabs, tape, your chosen nail polish colors, and a small pointed tool such as a toothpick or dotting tool. Begin by applying a base coat to your nails and letting it dry completely. Then, use a light colored nail polish as your base. This will help the colors in your water marble design stand out. Next, drop a few drops of your first chosen color into the water. Use your pointed tool to create a spiral in the polish. Then, use a contrasting color and do the same, creating another spiral on top of the first one. Continue this process with different colors until you have a design that covers the surface of the water. Before dipping your finger into the water, use a cotton swab to remove any excess polish floating on the surface. Then, use tape to protect the skin around your nails. Dip your finger into the water at an angle and fully submerge your nail. Use your pointed tool to remove the excess polish from the surface of the water before pulling your finger out. Wait a few seconds for the polish to set before removing the tape and cleaning up any excess polish around your nail. Repeat this process for all your nails, creating a unique design for each one. Finish off with a top coat to seal in your design and give your nails a glossy finish. With this beginner-friendly tutorial, you'll be able to create stunning water marble nails in no time.4. Beginner-Friendly Water Marble Nail Tutorial

4. Beginner-Friendly Water Marble Nail Tutorial


Water marble nails can be tricky to master, but with these tips and tricks, you'll be able to create flawless and beautiful designs every time. First, make sure to use room temperature water. Cold water can cause the polish to thicken and not spread properly. You can also use distilled water to avoid any impurities that may affect the polish. When dropping the polish into the water, make sure to do so from a close distance and in a quick motion. This will help the colors spread and create a smoother design. Use a pointed tool to create your design. This will give you more control and precision compared to using a toothpick or the brush from the nail polish bottle. Don't be afraid to mix different colors and experiment with different designs. The beauty of water marble nails is that each one will be unique and one-of-a-kind. Lastly, don't forget to apply a top coat to seal in your design and give your nails a glossy finish. This will also help your water marble nails last longer.5. Tips and Tricks for Perfecting Water Marble Nails


5. Tips and Tricks for Perfecting Water Marble Nails

.jpg)


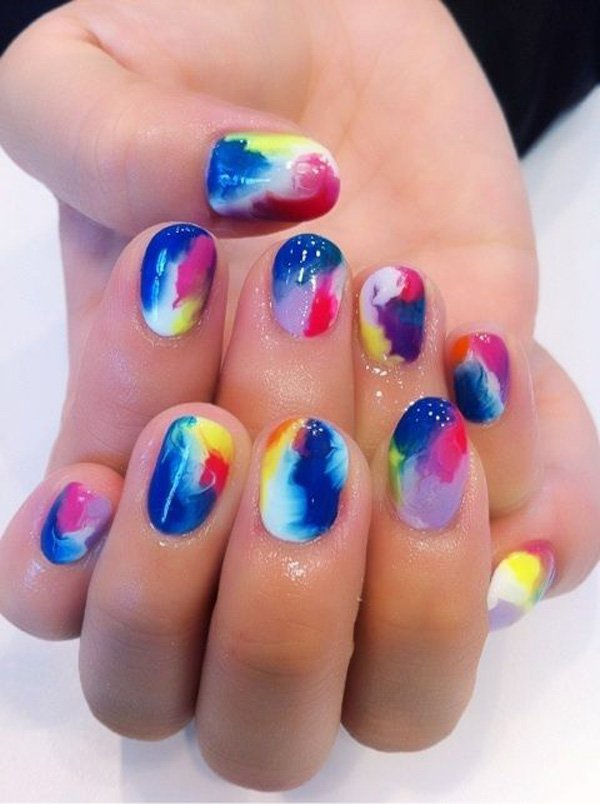
Short nails can be just as stunning as long nails when it comes to water marble designs. Follow this tutorial to create a gorgeous look for your short nails. Start by gathering your supplies: a bowl of room temperature water, nail polish remover, cotton swabs, tape, your chosen nail polish colors, and a small pointed tool such as a toothpick or dotting tool. Begin by applying a base coat to your nails and letting it dry completely. Then, use a light colored nail polish as your base. This will help the colors in your water marble design stand out. Next, drop a few drops of your first chosen color into the water. Use your pointed tool to create a spiral in the polish. Then, use a contrasting color and do the same, creating another spiral on top of the first one. Continue this process with different colors until you have a design that covers the surface of the water. Before dipping your finger into the water, use a cotton swab to remove any excess polish floating on the surface. Then, use tape to protect the skin around your nails. Dip your finger into the water at an angle and fully submerge your nail. Use your pointed tool to remove the excess polish from the surface of the water before pulling your finger out. Wait a few seconds for the polish to set before removing the tape and cleaning up any excess polish around your nail. Repeat this process for all your nails, creating a unique design for each one. Finish off with a top coat to seal in your design and give your nails a glossy finish. With these tips and tricks, you'll have stunning water marble nails on your short nails in no time.6. Water Marble Nail Design Tutorial for Short Nails


6. Water Marble Nail Design Tutorial for Short Nails


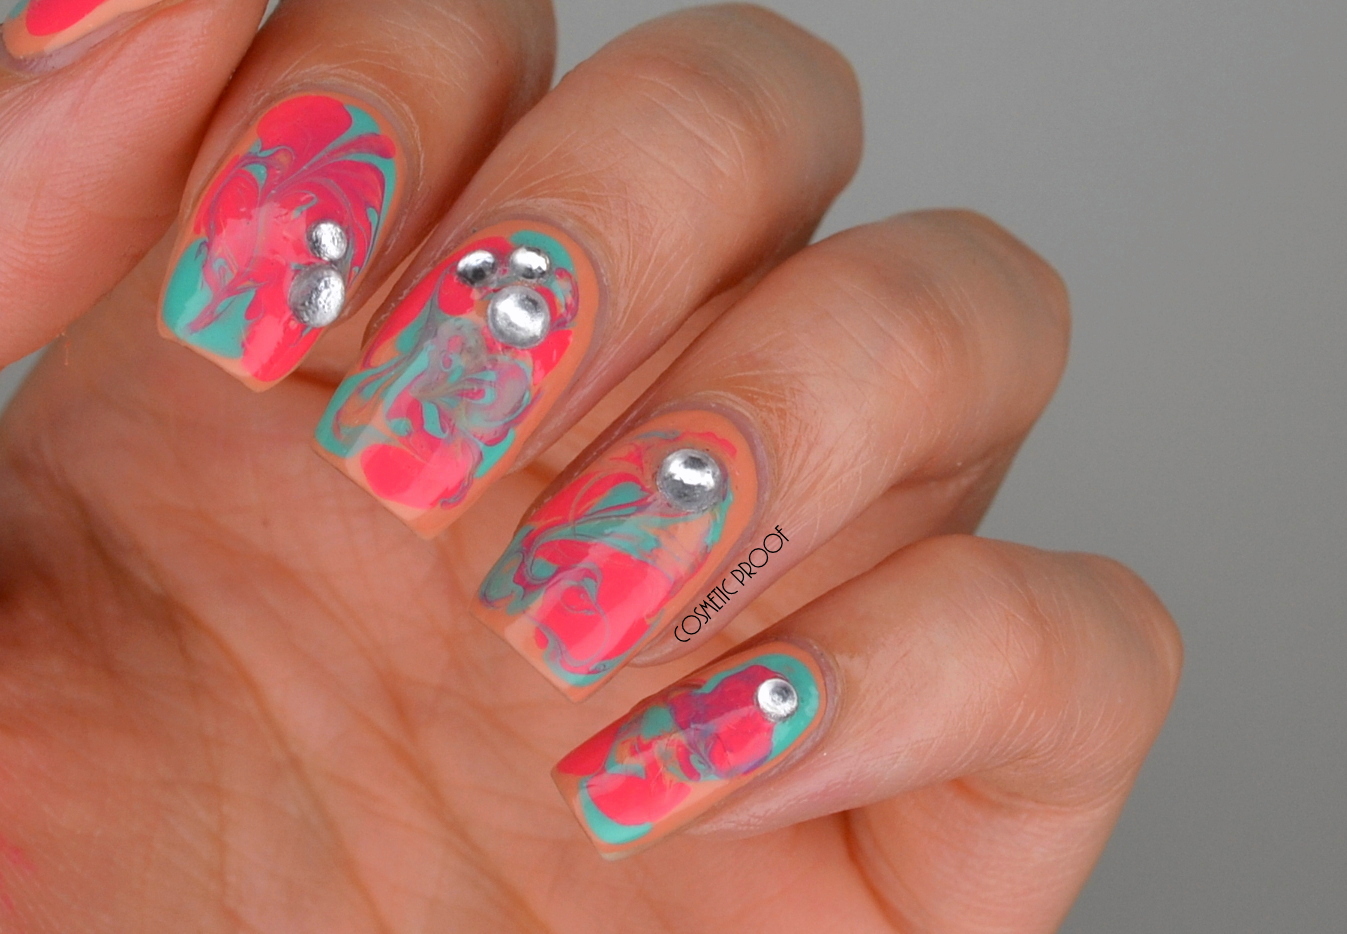
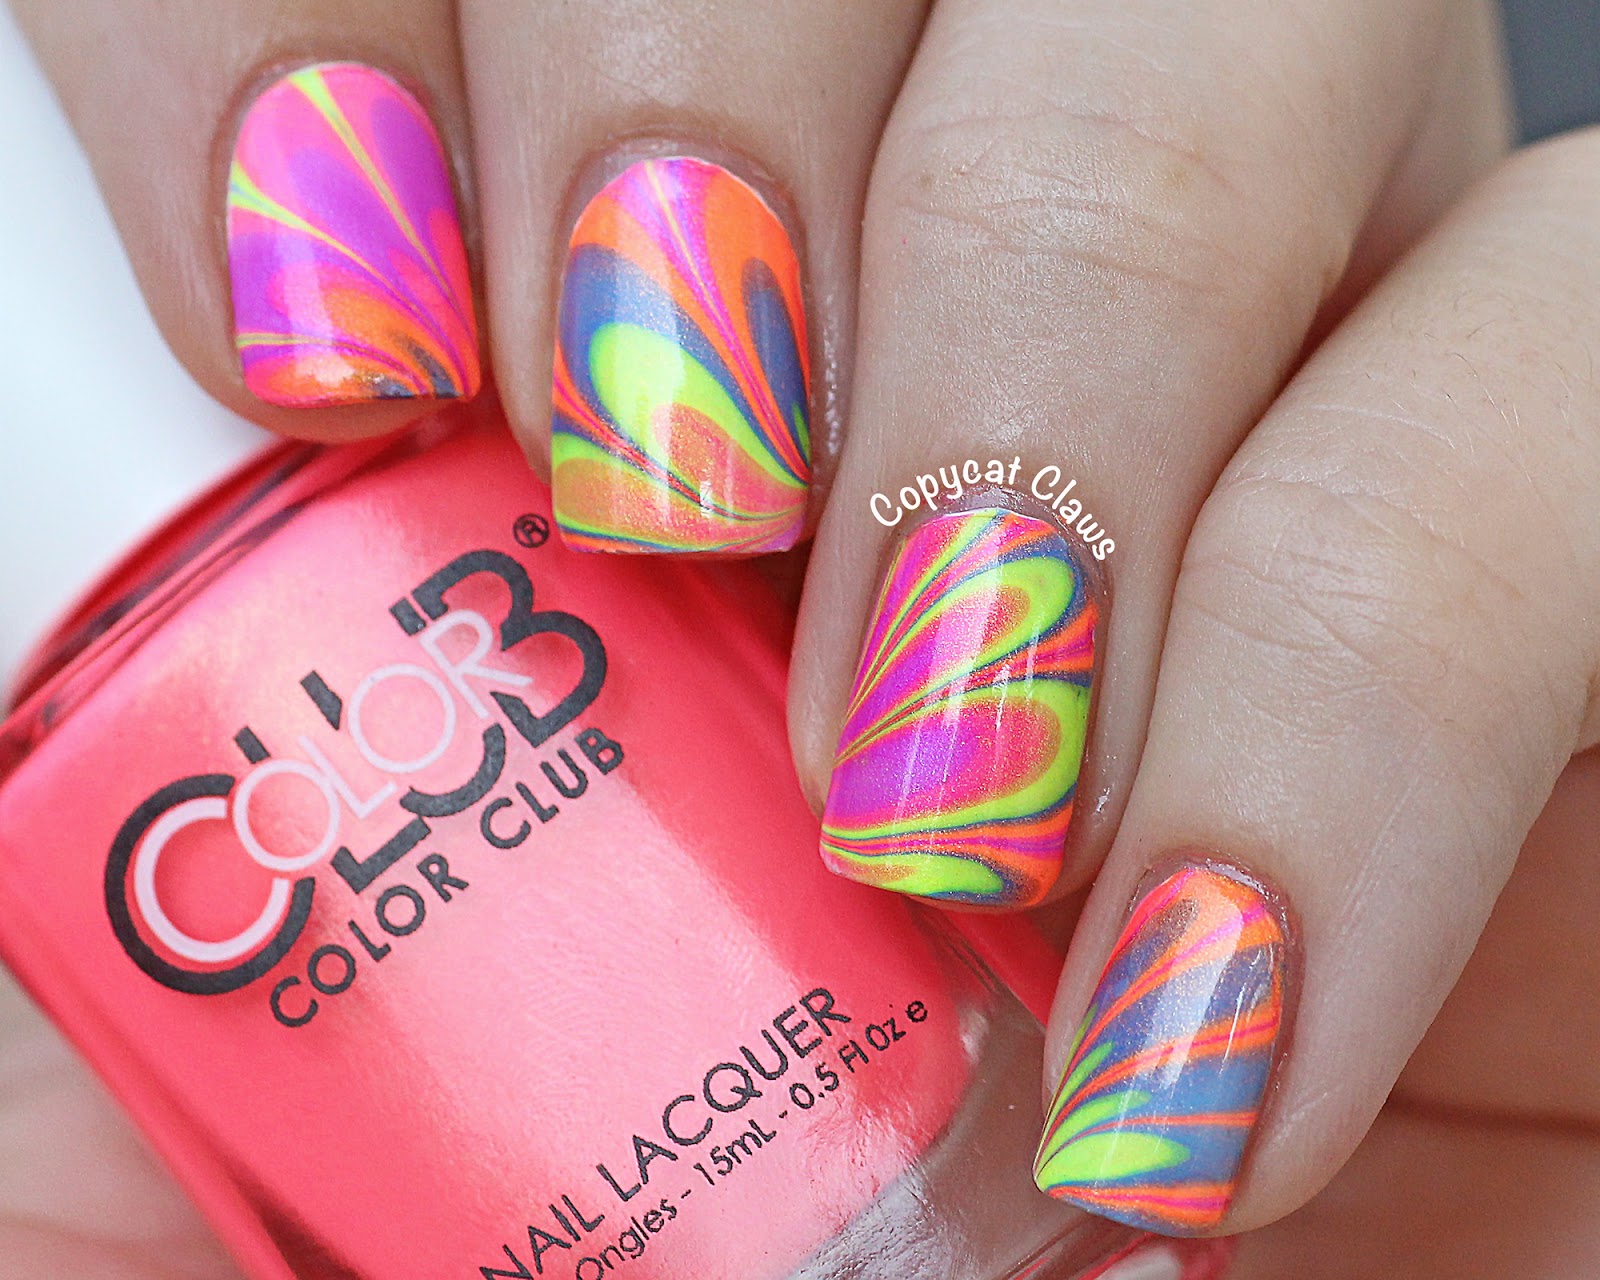
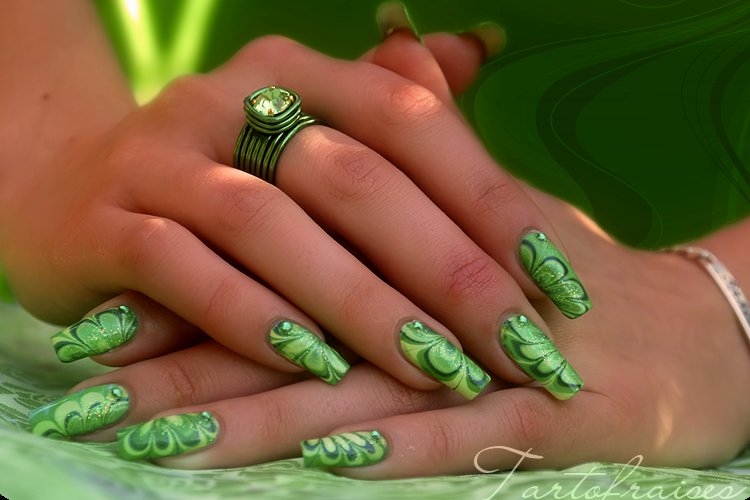
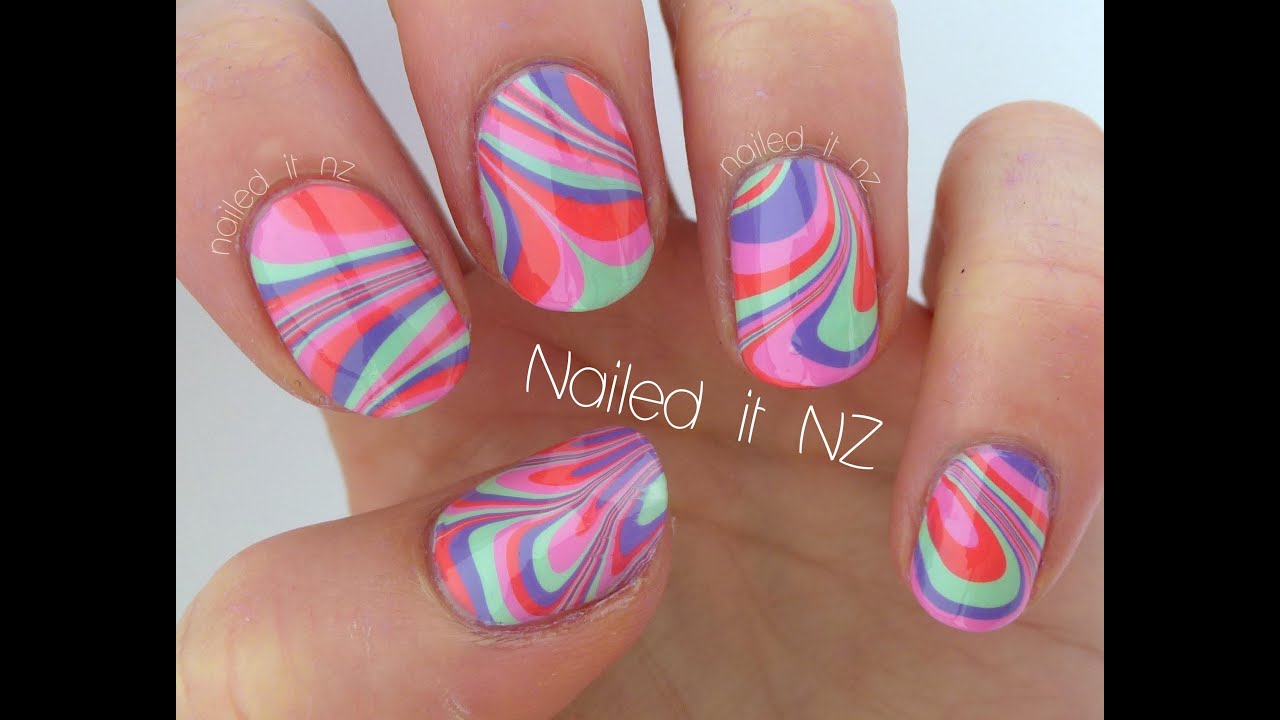
Water marble nails are the perfect way to add some fun and color to your nail game. Follow this tutorial and create a playful design that will make you smile every time you look at your nails. Start by gathering your supplies: a bowl of room temperature water, nail polish remover, cotton swabs, tape, and an array of nail polish colors in bright and bold shades. Begin by applying a base coat to your nails and letting it dry completely. Then, use a white nail polish as your base. This will help the colors in your water marble design stand out even more. Next, drop a few drops of your first chosen color into the water. Use a toothpick or pointed tool to swirl the colors together and create a marble effect. Keep adding drops of different colors and swirling until you're satisfied with the design. Before dipping your finger into the water, use a cotton swab to remove any excess polish floating on the surface. Then, use tape to protect the skin around your nails. Dip your finger into the water at an angle and fully submerge your nail. Use a toothpick or pointed tool to remove the excess polish from the surface of the water before pulling your finger out. Wait a few seconds for the polish to set before removing the tape and cleaning up any excess polish around your nail. Repeat this process for all your nails, changing the order of colors for each one to create a unique and playful design. Finish off with a top coat to seal in your design and give your nails a glossy finish.7. Fun and Colorful Water Marble Nail Art Tutorial


7. Fun and Colorful Water Marble Nail Art Tutorial
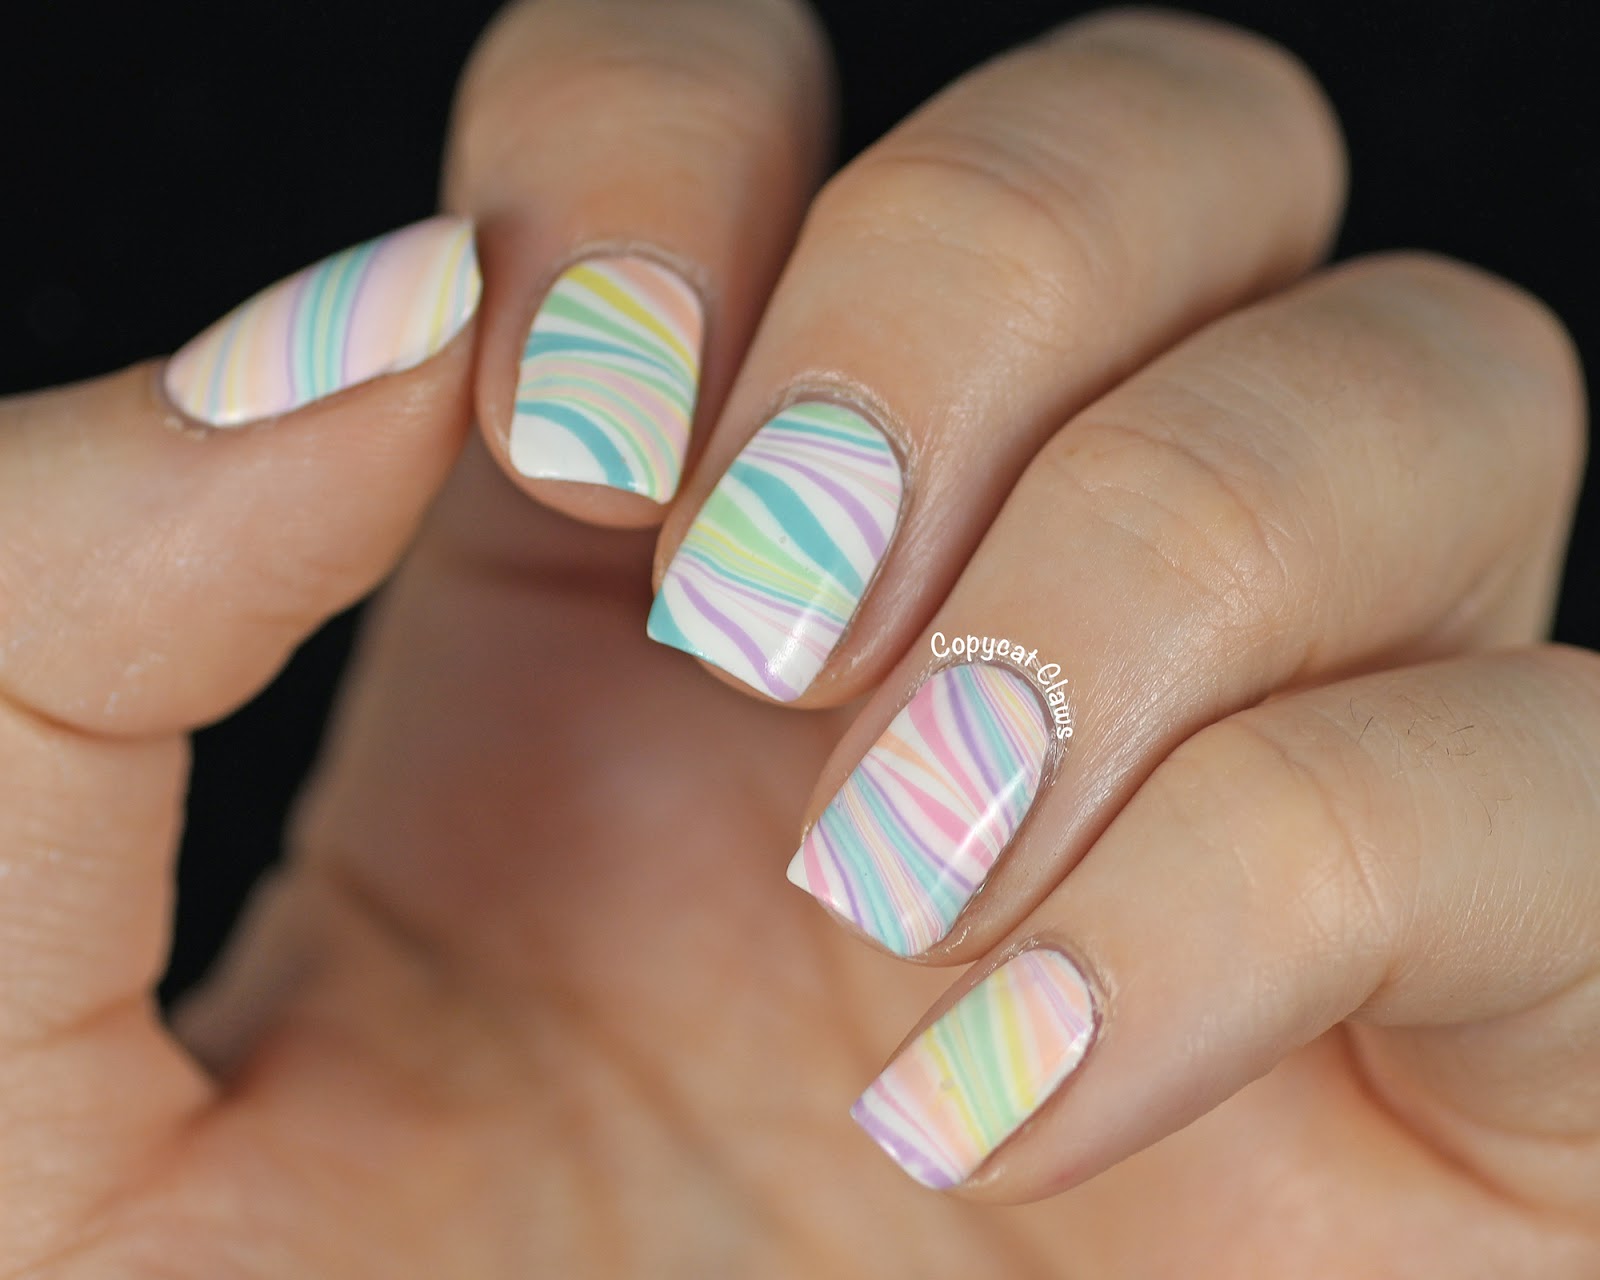
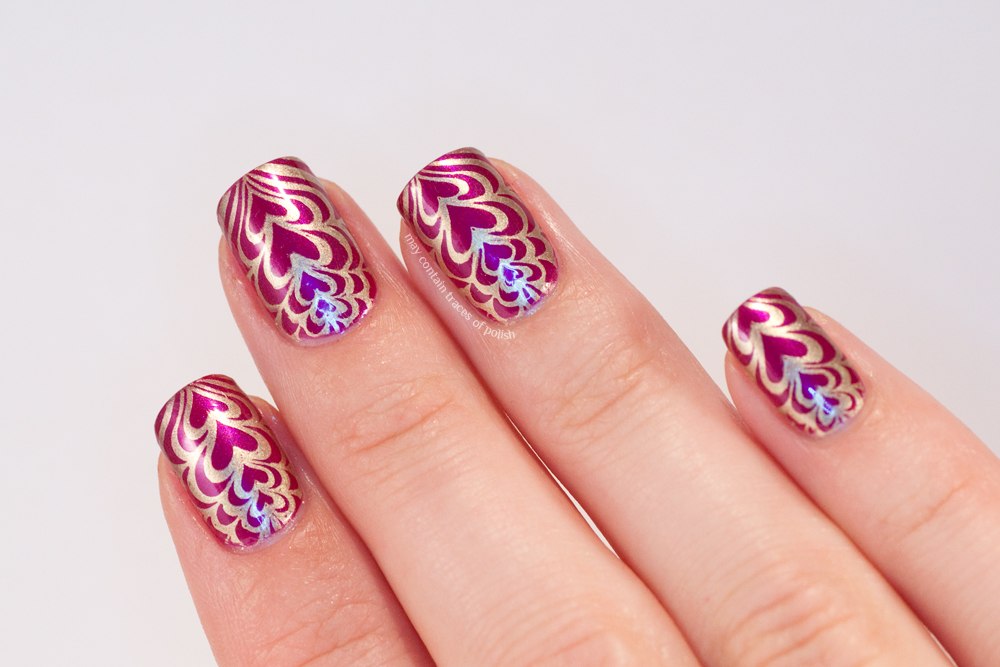
If you're a pro at water marble nails and want to take it to the next level, try this advanced tutorial to create intricate and mesmerizing designs. Start by gathering your supplies: a bowl of room temperature water, nail polish remover, cotton swabs, tape, your chosen nail polish colors, and a small pointed tool such as a toothpick or dotting tool. Begin by applying a base coat to your nails and letting it dry completely. Then, use a white nail polish as your base. This will help the colors in your water marble design stand out even more. Next, drop a few drops of your first chosen color into the water. Use your pointed tool to create a spiral in the polish. Then, use a contrasting color and do the same, creating another spiral on top of the first one. Continue this process with different colors until you have a design that covers the surface of the water. Before dipping your finger into the water, use a cotton swab to remove any excess polish floating on the surface. Then, use tape to protect the skin around your nails. Dip your finger into the water at an angle and fully submerge your nail. Use your pointed tool to remove the excess polish from the surface of the water before pulling your finger out. Wait a few seconds for the polish to set before removing the tape and cleaning up any excess polish around your nail. Repeat this process for all your nails, creating a unique and intricate design for each one. Finish off with a top coat to seal in your design and give your nails a glossy finish. With this advanced water marble nail design tutorial, you'll be able to create stunning and complex designs that will make your nails stand out.8. Advanced Water Marble Nail Design Tutorial

8. Advanced Water Marble Nail Design Tutorial


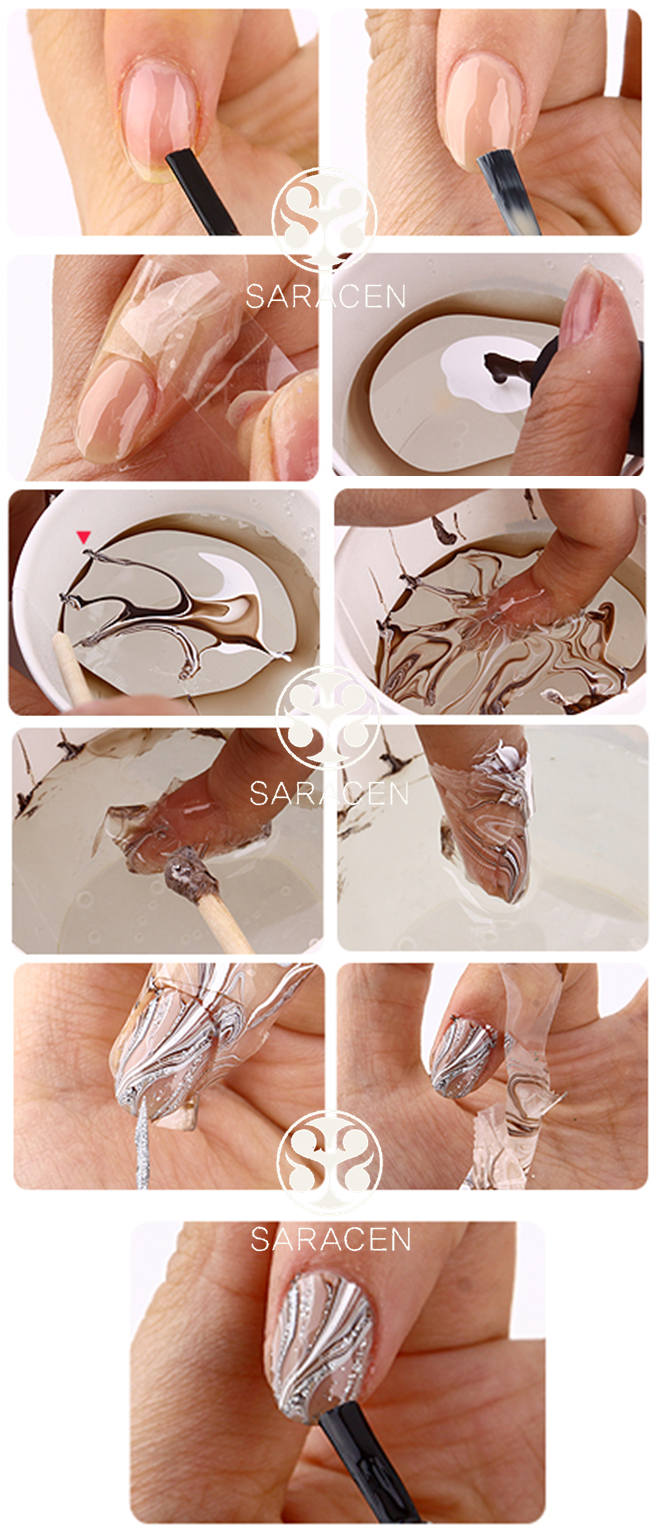
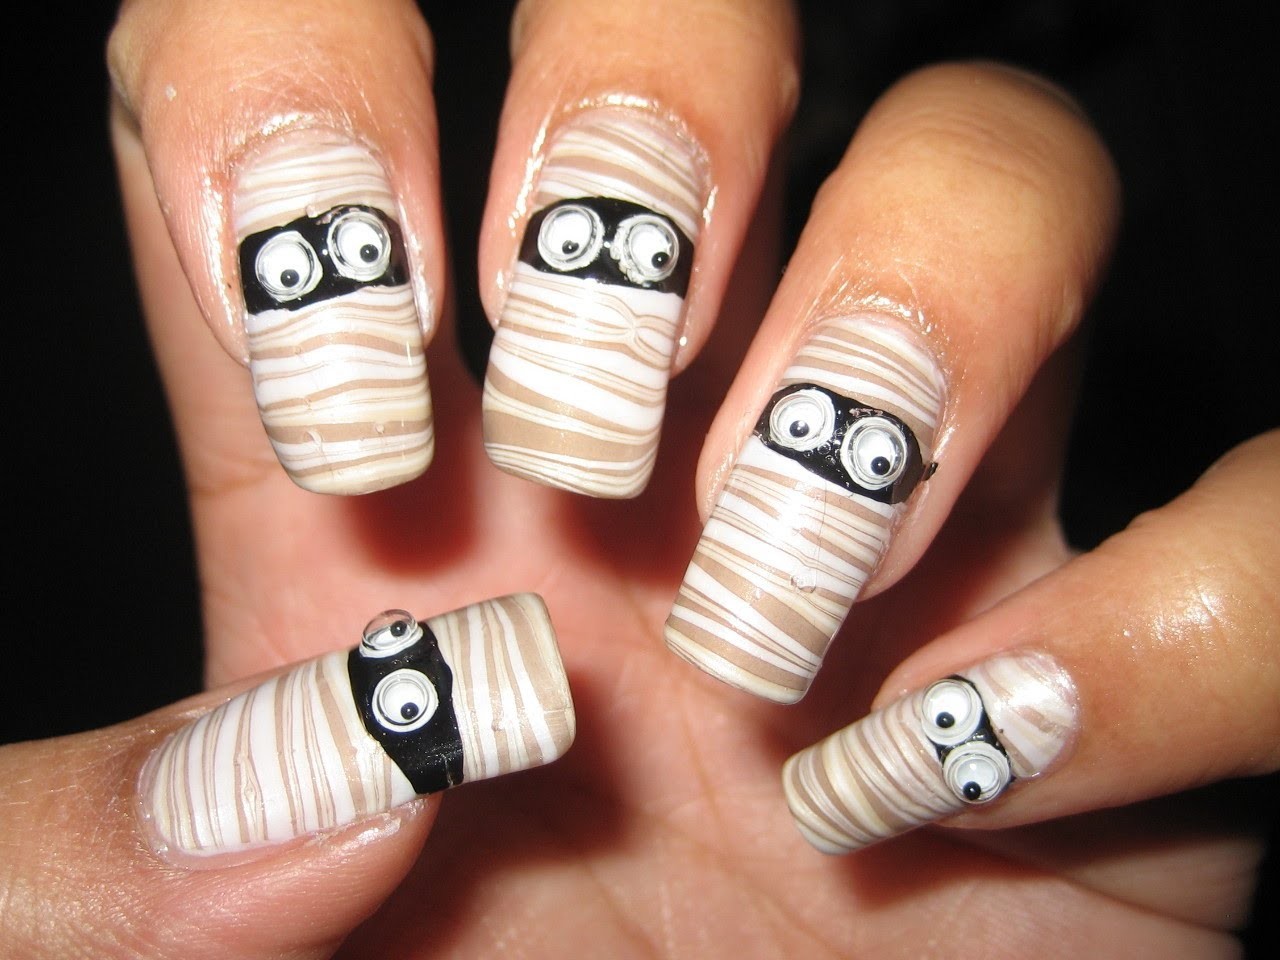
Don't have all the fancy nail art tools? No problem! With this tutorial, you can create beautiful water marble nails using household items.9. Water Marble Nail Tutorial with Household Items

9. Water Marble Nail Tutorial with Household Items

The Art of Water Marble Nail Design

Creating Unique and Eye-Catching Nails
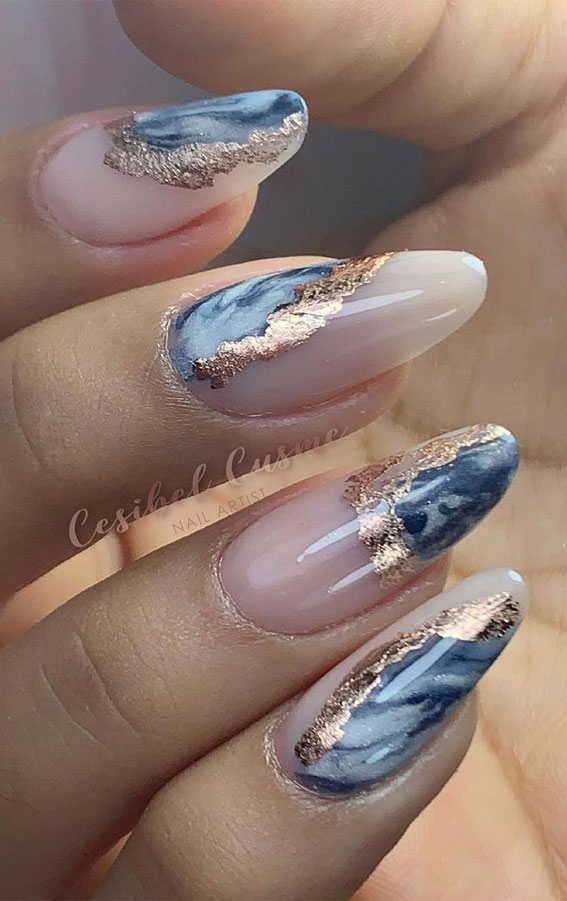
 If you're tired of the same old solid color nail polish or basic nail art designs, then it's time to try something new and exciting – water marble nail design. This technique involves swirling different colored nail polishes in water to create a unique and mesmerizing pattern. It's a fun and creative way to elevate your nail game and stand out from the crowd.
Water marble nail design
has been gaining popularity in the beauty world, and it's not hard to see why. The possibilities are endless with this technique, and you can create a one-of-a-kind design every time. Plus, it's easier than you think! All you need is some nail polish, a cup of water, and a toothpick or a small dotting tool.
If you're tired of the same old solid color nail polish or basic nail art designs, then it's time to try something new and exciting – water marble nail design. This technique involves swirling different colored nail polishes in water to create a unique and mesmerizing pattern. It's a fun and creative way to elevate your nail game and stand out from the crowd.
Water marble nail design
has been gaining popularity in the beauty world, and it's not hard to see why. The possibilities are endless with this technique, and you can create a one-of-a-kind design every time. Plus, it's easier than you think! All you need is some nail polish, a cup of water, and a toothpick or a small dotting tool.
Step-by-Step Tutorial
 To achieve the perfect water marble nails, follow these simple steps:
1. Prep your nails:
Start by removing any old nail polish and shaping your nails. Apply a base coat to protect your nails and help the polish adhere better.
2. Gather your supplies:
Choose your desired nail polish colors and have them ready to use. You can also use a white polish as a base to make the colors pop. Fill a cup or bowl with room temperature water, and make sure it's deep enough for your entire nail to be submerged.
3. Create the design:
One at a time, drop a few drops of your chosen nail polish into the water, creating a bullseye pattern. Use a toothpick or dotting tool to gently swirl the colors together, creating unique patterns.
4. Dip your nail:
Once you're happy with the design, carefully dip your nail into the water, making sure to submerge it completely. Hold it in for a few seconds, and then slowly remove it from the water.
5. Clean up:
Use a cotton swab dipped in nail polish remover to clean up any excess polish around your nail. Repeat the process for all your nails.
6. Seal the design:
Once your nails are dry, apply a top coat to seal the design and add shine.
To achieve the perfect water marble nails, follow these simple steps:
1. Prep your nails:
Start by removing any old nail polish and shaping your nails. Apply a base coat to protect your nails and help the polish adhere better.
2. Gather your supplies:
Choose your desired nail polish colors and have them ready to use. You can also use a white polish as a base to make the colors pop. Fill a cup or bowl with room temperature water, and make sure it's deep enough for your entire nail to be submerged.
3. Create the design:
One at a time, drop a few drops of your chosen nail polish into the water, creating a bullseye pattern. Use a toothpick or dotting tool to gently swirl the colors together, creating unique patterns.
4. Dip your nail:
Once you're happy with the design, carefully dip your nail into the water, making sure to submerge it completely. Hold it in for a few seconds, and then slowly remove it from the water.
5. Clean up:
Use a cotton swab dipped in nail polish remover to clean up any excess polish around your nail. Repeat the process for all your nails.
6. Seal the design:
Once your nails are dry, apply a top coat to seal the design and add shine.
Tips and Tricks
 - Use a white base coat to make the colors stand out more.
- Practice on a fake nail or a piece of paper before trying it on your nails.
- Experiment with different color combinations and patterns.
- Clean your toothpick or dotting tool after each dip to avoid smudging the design.
- Use scotch tape around your nails to make the clean-up process easier.
Final Thoughts
Water marble nail design is a fun and creative way to express yourself through your nails. With some practice and the right tools, you can achieve beautiful and unique designs that will make your nails the talk of the town. So next time you want to switch up your nail game, give water marble nail design a try and watch your nails transform into a work of art.
- Use a white base coat to make the colors stand out more.
- Practice on a fake nail or a piece of paper before trying it on your nails.
- Experiment with different color combinations and patterns.
- Clean your toothpick or dotting tool after each dip to avoid smudging the design.
- Use scotch tape around your nails to make the clean-up process easier.
Final Thoughts
Water marble nail design is a fun and creative way to express yourself through your nails. With some practice and the right tools, you can achieve beautiful and unique designs that will make your nails the talk of the town. So next time you want to switch up your nail game, give water marble nail design a try and watch your nails transform into a work of art.


