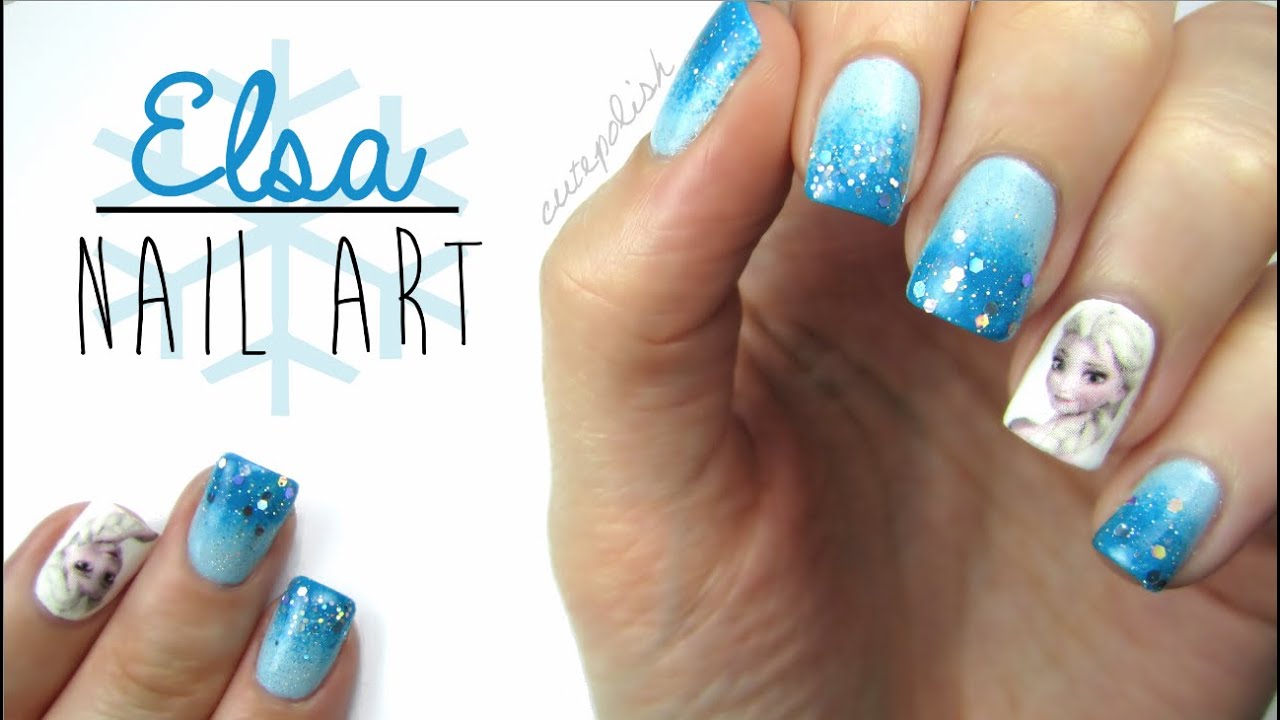
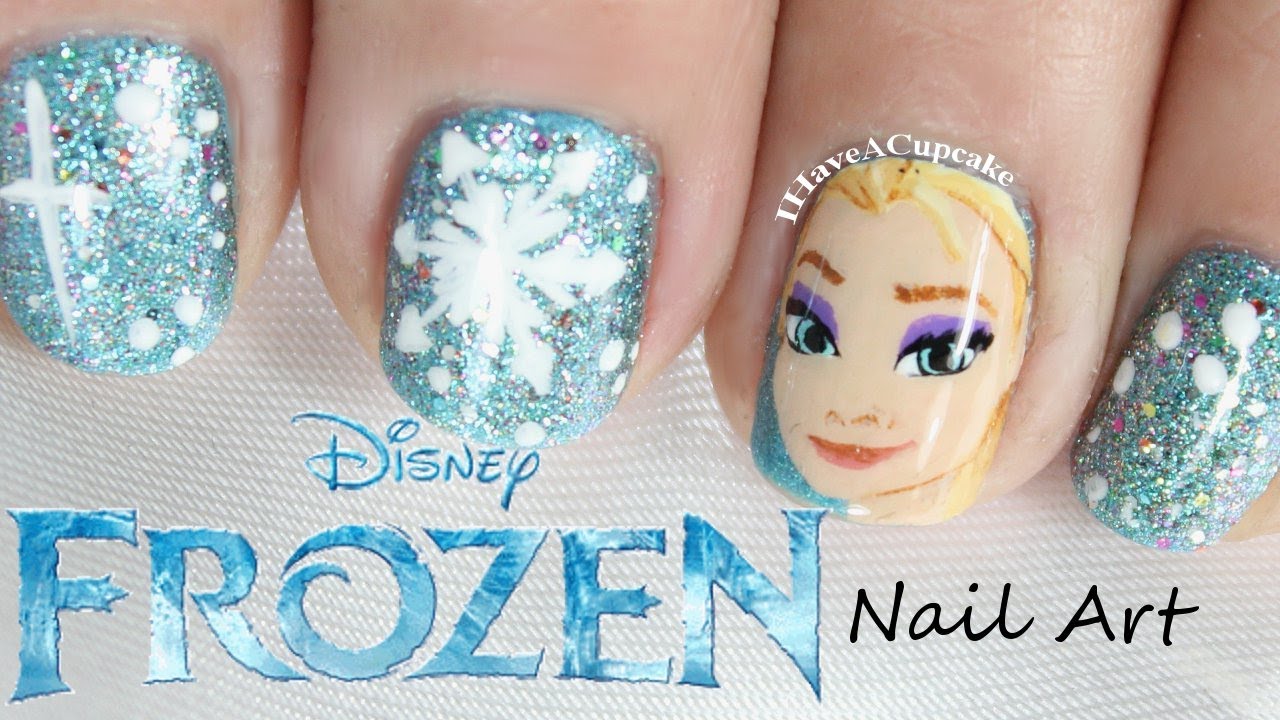
If you're a fan of Disney's hit movie Frozen and the iconic ice queen Elsa, then you'll love this nail art tutorial that will have your nails looking like a winter wonderland. Elsa nail art is a popular trend among nail enthusiasts and it's easy to see why - it's fun, creative, and perfect for any occasion. Whether you're getting ready for a Disney-themed party or just want to add a touch of magic to your everyday look, this tutorial will guide you through the steps to achieve the perfect Elsa-inspired nails. To start off, gather all the necessary materials including a base coat, white and light blue nail polish, a top coat, a small brush, and a dotting tool. Begin by applying a base coat to protect your nails and help the polish last longer. Then, apply two coats of white nail polish to all your nails and let it dry completely. Next, take the light blue nail polish and use the small brush to create a diagonal line across your nail, starting from the top left corner to the bottom right corner. This will create the base for Elsa's iconic icy dress. Use the same brush to add some swirls and lines to the blue section to give it a more textured look. Now comes the fun part - creating the snowflakes! Take the dotting tool and dip it into the white nail polish. Place a dot in the center of the blue section and then add six more dots around it, creating a circle. Use the small brush to connect the dots with thin lines, similar to how a snowflake looks. Repeat this step on all your nails, creating different sized snowflakes for a more realistic effect. Once all the snowflakes are dry, use the small brush to add some glitter to the tips of your nails. This will add a touch of sparkle, just like how Elsa's dress glitters in the movie. Finish off with a layer of top coat to protect your design and add shine. And there you have it, your very own Elsa Frozen nail art! This design is perfect for any occasion - from a day at the office to a themed party or even a day out with friends. Plus, it's easy to recreate and can be done in just a few simple steps. So go ahead and channel your inner ice queen with this beautiful Elsa-inspired nail art.1. Elsa Frozen Nail Art Tutorial


1. Elsa Frozen Nail Art Tutorial


If you're looking for a quick and easy Elsa nail art design, then this tutorial is perfect for you! With just a few simple steps, you can achieve a stunning Frozen-inspired look that will have everyone asking where you got your nails done. To start off, gather all the necessary materials including a base coat, light blue and silver nail polish, a top coat, and a small brush. Begin by applying a base coat to protect your nails and help the polish last longer. Then, apply two coats of light blue nail polish to all your nails and let it dry completely. Next, take the silver nail polish and use the small brush to create a diagonal line across your nail, starting from the bottom left corner to the top right corner. This will create the base for Elsa's beautiful ice castle. Use the same brush to add some swirls and lines to the silver section to give it a more textured look. Now, using the small brush, create a small snowflake at the tip of your nail, near the silver section. This will add a touch of Elsa's icy magic to your design. Repeat this step on all your nails, creating different snowflakes for a more whimsical effect. Once all the snowflakes are dry, add some glitter to the tips of your nails with the small brush. This will add a touch of sparkle, just like how Elsa's castle glitters in the movie. Finish off with a layer of top coat to protect your design and add shine. And there you have it, a simple yet stunning Elsa nail art design that is perfect for any occasion. Whether you're a beginner or a pro at nail art, this tutorial is easy to follow and will have you rocking Elsa's signature style in no time.2. Easy Elsa Nail Art Design


https://www.youtube.com/watch?v=JZJXZJZ1jZI


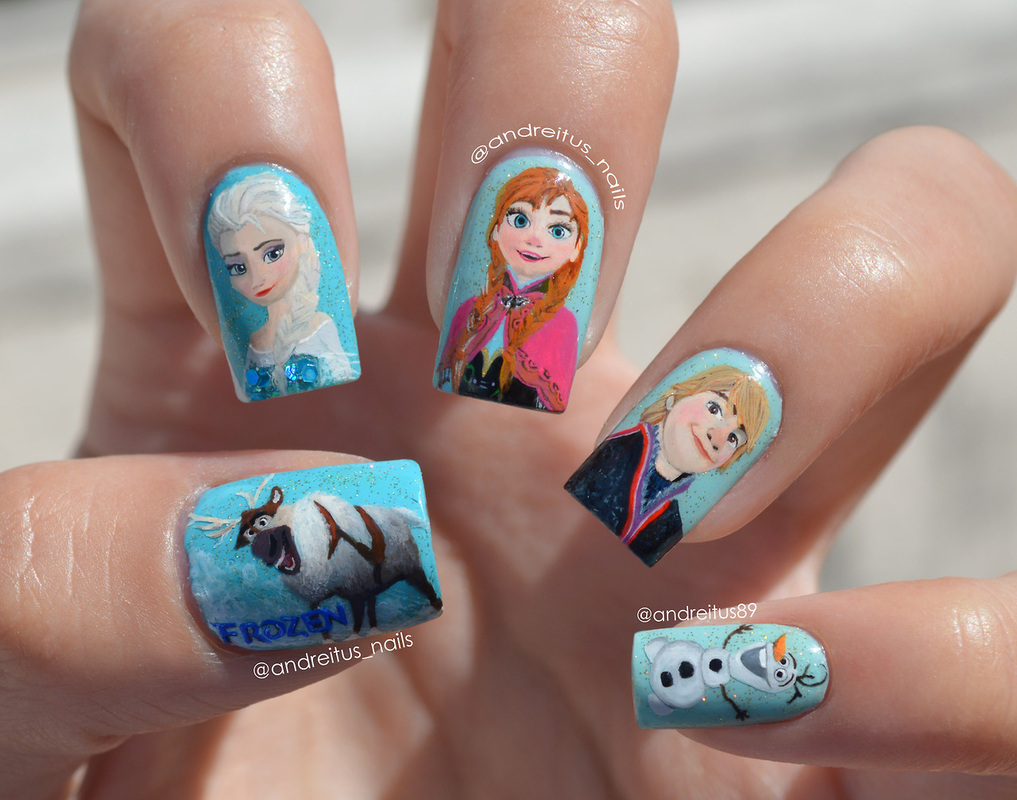
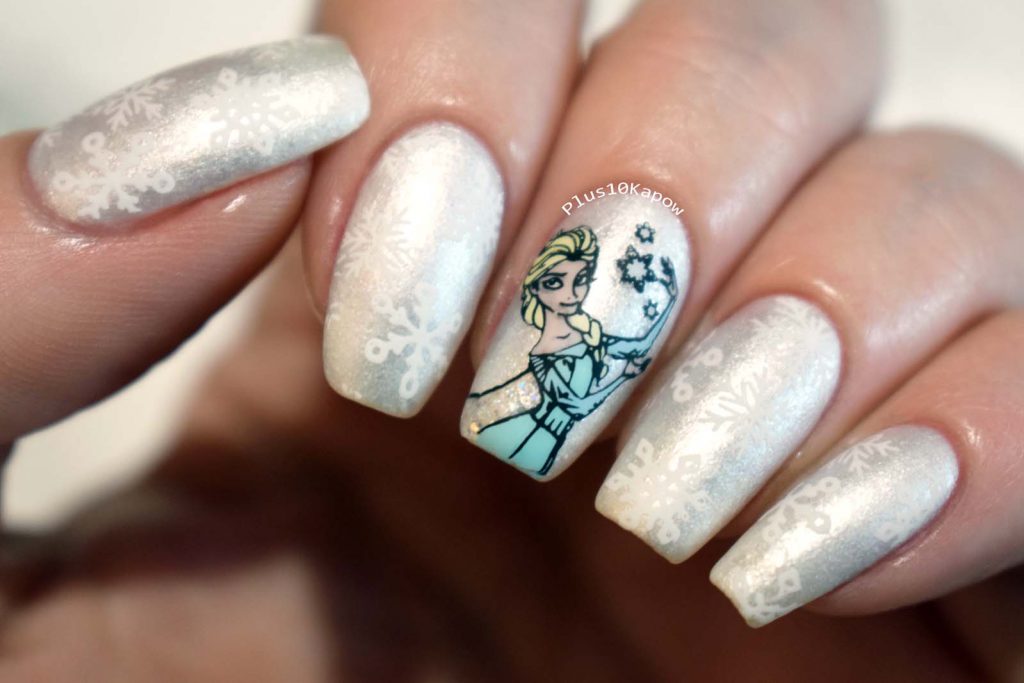
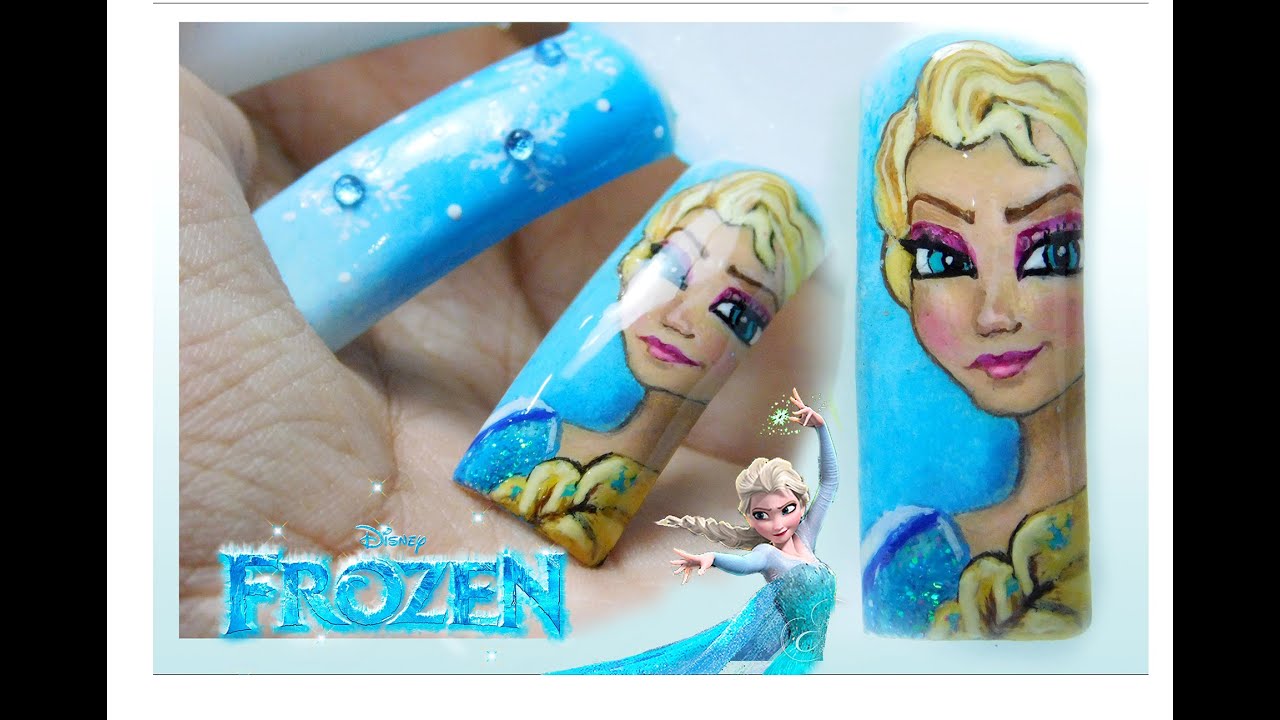
If you're a fan of the movie Frozen and want to add a touch of Elsa's magic to your nails, then this tutorial is perfect for you. With a few simple steps, you can achieve a stunning Frozen-inspired design that will have everyone asking how you did it. Start by gathering all the necessary materials including a base coat, light blue, white, and silver nail polish, a top coat, a small brush, and a dotting tool. Begin by applying a base coat to protect your nails and help the polish last longer. Then, apply two coats of light blue nail polish to all your nails and let it dry completely. Next, take the white nail polish and use the small brush to create a diagonal line across your nail, starting from the bottom left corner to the top right corner. This will create the base for Elsa's iconic ice dress. Use the same brush to add some swirls and lines to the white section to give it a more textured look. Now comes the fun part - creating the snowflakes! Take the dotting tool and dip it into the silver nail polish. Place a dot in the center of the white section and then add six more dots around it, creating a circle. Use the small brush to connect the dots with thin lines, similar to how a snowflake looks. Repeat this step on all your nails, creating different sized snowflakes for a more realistic effect. Once all the snowflakes are dry, add some glitter to the tips of your nails with the small brush. This will add a touch of sparkle, just like how Elsa's dress glitters in the movie. Finish off with a layer of top coat to protect your design and add shine. And there you have it, a beautiful Frozen Elsa nail art that is perfect for any occasion. This design is easy to recreate and will have you feeling like the ice queen herself. So go ahead and show off your Elsa-inspired nails with pride!3. Frozen Elsa Nail Art Tutorial


2. Easy Elsa Nail Art Design


If you're new to nail art or just looking for an easy Elsa nail art design, then this tutorial is perfect for you. With just a few simple steps, you can achieve a beautiful Frozen-inspired look that will have everyone impressed. To start off, gather all the necessary materials including a base coat, light blue and white nail polish, a top coat, and a small brush. Begin by applying a base coat to protect your nails and help the polish last longer. Then, apply two coats of light blue nail polish to all your nails and let it dry completely. Next, take the white nail polish and use the small brush to create a diagonal line across your nail, starting from the bottom left corner to the top right corner. This will create the base for Elsa's iconic ice dress. Use the same brush to add some swirls and lines to the white section to give it a more textured look. Now, using the small brush, create a small snowflake at the tip of your nail, near the white section. This will add a touch of Elsa's icy magic to your design. Repeat this step on all your nails, creating different snowflakes for a more whimsical effect. Once all the snowflakes are dry, add some glitter to the tips of your nails with the small brush. This will add a touch of sparkle, just like how Elsa's dress glitters in the movie. Finish off with a layer of top coat to protect your design and add shine. And there you have it, a simple yet stunning Elsa nail art design that is perfect for beginners. This tutorial is easy to follow and will have you showing off your Elsa-inspired nails in no time.4. Easy Elsa Nail Art for Beginners


https://www.youtube.com/watch?v=JZJXZJZ1jZI
If you're someone who likes to follow a step-by-step guide, then this tutorial is perfect for you. With detailed instructions, you can achieve a stunning Elsa nail art design that will have everyone asking for your secrets. Start by gathering all the necessary materials including a base coat, light blue, white, and silver nail polish, a top coat, a small brush, and a dotting tool. Begin by applying a base coat to protect your nails and help the polish last longer. Then, apply two coats of light blue nail polish to all your nails and let it dry completely. Next, take the white nail polish and use the small brush to create a diagonal line across your nail, starting from the bottom left corner to the top right corner. This will create the base for Elsa's iconic ice dress. Use the same brush to add some swirls and lines to the white section to give it a more textured look. Now comes the fun part - creating the snowflakes! Take the dotting tool and dip it into the silver nail polish. Place a dot in the center of the white section and then add six more dots around it, creating a circle. Use the small brush to connect the dots with thin lines, similar to how a snowflake looks. Repeat this step on all your nails, creating different sized snowflakes for a more realistic effect. Once all the snowflakes are dry, add some glitter to the tips of your nails with the small brush. This will add a touch of sparkle, just like how Elsa's dress glitters in the movie. Finish off with a layer of top coat to protect your design and add shine. And there you have it, a beautiful Frozen Elsa nail art that is perfect for any occasion. This design is easy to recreate and will have you feeling like the ice queen herself. So go ahead and show off your Elsa-inspired nails with pride!5. Elsa Nail Art Step by Step


3. Frozen Elsa Nail Art Tutorial

If you want to add a cute and fun element to your Elsa nail art, this tutorial is perfect for you. With just a few simple steps, you can achieve a beautiful Frozen-inspired look that is perfect for any occasion. To start off, gather all the necessary materials including a base coat, light blue and white nail polish, a top coat, and a small brush. Begin by applying a base coat to protect your nails and help the polish last longer. Then, apply two coats of light blue nail polish to all your nails and let it dry completely. Next, take the white nail polish and use the small brush to create a diagonal line across your nail, starting from the bottom left corner to the top right corner. This will create the base for Elsa's iconic ice dress. Use the same brush to add some swirls and lines to the white section to give it a more textured look. Now, using the small brush, create a small snowflake at the tip of your nail, near the white section. This will add a touch of Elsa's icy magic to your design. Repeat this step on all your nails, creating different snowflakes for a more whimsical effect. Once all the snowflakes are dry, add some glitter to the tips of your nails with the small brush. This will add a touch of sparkle, just like how Elsa's dress glitters in the movie. Finish off with a layer of top coat to protect your design and add shine. And there you have it, a cute and easy Elsa nail art design that is perfect for any occasion. This tutorial is perfect for those who want to add a touch of Elsa's magic to their nails without too much effort. So go ahead and give it a try!6. Cute and Easy Elsa Nail Art
https://www.youtube.com/watch?v=JZJXZJZ1jZI


If you want to get your kids in on the fun, this Elsa nail art tutorial is perfect for you. With simple steps and a fun design, your little ones will love recreating this Frozen-inspired look on their nails. To start off, gather all the necessary materials including a base coat, light blue and white nail polish, a top coat, and a small brush. Begin by applying a base coat to protect your nails and help the polish last longer. Then, apply two coats of light blue nail polish to all your nails and let it dry completely. Next, take the white nail polish and use the small brush to create a diagonal line across your nail, starting from the bottom left corner to the top right corner. This will create the base for Elsa's iconic ice dress. Use the same brush to add some swirls and lines to the white section to give it a more textured look. Now, using the small brush, create a small snowflake at the tip of your nail, near the white section. This will add a touch of Elsa's icy magic to your design. Repeat this step on all your nails, creating different snowflakes for a more whimsical effect. Once all the snowflakes are dry, add some glitter to the tips of your nails with the small brush. This will add a touch of sparkle, just like how Elsa's dress glitters in the movie. Finish off with a layer of top coat to protect your design and add shine. And there you have it, a fun and easy Elsa nail art design that is perfect for kids. This tutorial is not only a great activity for kids to do, but it also allows them to show off their Frozen-inspired nails with pride.7. Elsa Nail Art Designs for Kids


4. Easy Elsa Nail Art for Beginners


8. Simple Elsa Nail Art Tutorial
https://www.youtube.com/watch?v=JZJXZJZ1jZI
Elsa Nail Art: The Perfect Addition to Your House Design

Elevate Your Home's Aesthetic with Elsa Nail Art
 When it comes to house design, every detail matters. From the furniture to the wall colors, each element plays a crucial role in creating a beautiful and inviting space. However, there is one aspect of home decor that often gets overlooked – nails. Yes, you read that right, nails. But not just any nails, we're talking about
Elsa nail art
.
This popular nail art design is inspired by the beloved Disney character, Elsa from the movie Frozen. It features a stunning mix of icy blue and white shades, glitter accents, and delicate snowflake designs.
Elsa nail art
is not only a fun and creative way to express your love for the movie, but it also adds a touch of elegance and sophistication to your house design.
When it comes to house design, every detail matters. From the furniture to the wall colors, each element plays a crucial role in creating a beautiful and inviting space. However, there is one aspect of home decor that often gets overlooked – nails. Yes, you read that right, nails. But not just any nails, we're talking about
Elsa nail art
.
This popular nail art design is inspired by the beloved Disney character, Elsa from the movie Frozen. It features a stunning mix of icy blue and white shades, glitter accents, and delicate snowflake designs.
Elsa nail art
is not only a fun and creative way to express your love for the movie, but it also adds a touch of elegance and sophistication to your house design.
Simple Yet Striking: How to Achieve Elsa Nail Art at Home
 You may be thinking, "I'm not a nail artist, how can I possibly achieve this look?" Well, fear not, because
Elsa nail art
is surprisingly easy to do at home. All you need are a few basic nail polish colors and some nail tools, and you're ready to transform your nails into a winter wonderland.
Start by painting your nails with a light blue base color, leaving one nail on each hand as an accent nail. Then, using a white nail polish and a thin brush, create snowflake designs on the blue nails. You can also add some extra sparkle by using a glitter top coat. For the accent nails, paint them with a sparkly silver polish and top it off with a snowflake decal. And just like that, you have stunning
Elsa nail art
on your fingertips.
You may be thinking, "I'm not a nail artist, how can I possibly achieve this look?" Well, fear not, because
Elsa nail art
is surprisingly easy to do at home. All you need are a few basic nail polish colors and some nail tools, and you're ready to transform your nails into a winter wonderland.
Start by painting your nails with a light blue base color, leaving one nail on each hand as an accent nail. Then, using a white nail polish and a thin brush, create snowflake designs on the blue nails. You can also add some extra sparkle by using a glitter top coat. For the accent nails, paint them with a sparkly silver polish and top it off with a snowflake decal. And just like that, you have stunning
Elsa nail art
on your fingertips.
Add a Touch of Magic to Your House Design with Elsa Nail Art
 Now that you have mastered the art of
Elsa nail art
, it's time to incorporate it into your house design. This nail art design can add a pop of color and whimsy to any room. You can display your
Elsa nails
in a frame as a unique piece of art, or use them as coasters for your coffee table. You can even incorporate the color scheme of
Elsa nail art
into your home decor by adding blue and white accents throughout your space.
Not only is
Elsa nail art
a fun and creative way to spruce up your house design, but it also serves as a reminder to never stop believing in the magic of Disney. So why not give it a try and add a touch of enchantment to your home with this beautiful and easy nail art design?
Now that you have mastered the art of
Elsa nail art
, it's time to incorporate it into your house design. This nail art design can add a pop of color and whimsy to any room. You can display your
Elsa nails
in a frame as a unique piece of art, or use them as coasters for your coffee table. You can even incorporate the color scheme of
Elsa nail art
into your home decor by adding blue and white accents throughout your space.
Not only is
Elsa nail art
a fun and creative way to spruce up your house design, but it also serves as a reminder to never stop believing in the magic of Disney. So why not give it a try and add a touch of enchantment to your home with this beautiful and easy nail art design?


