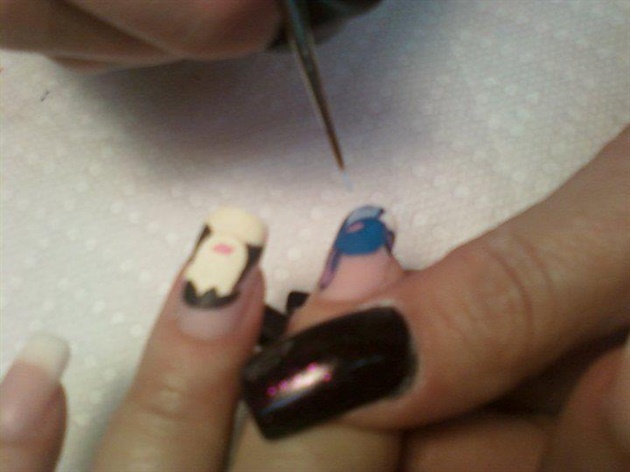
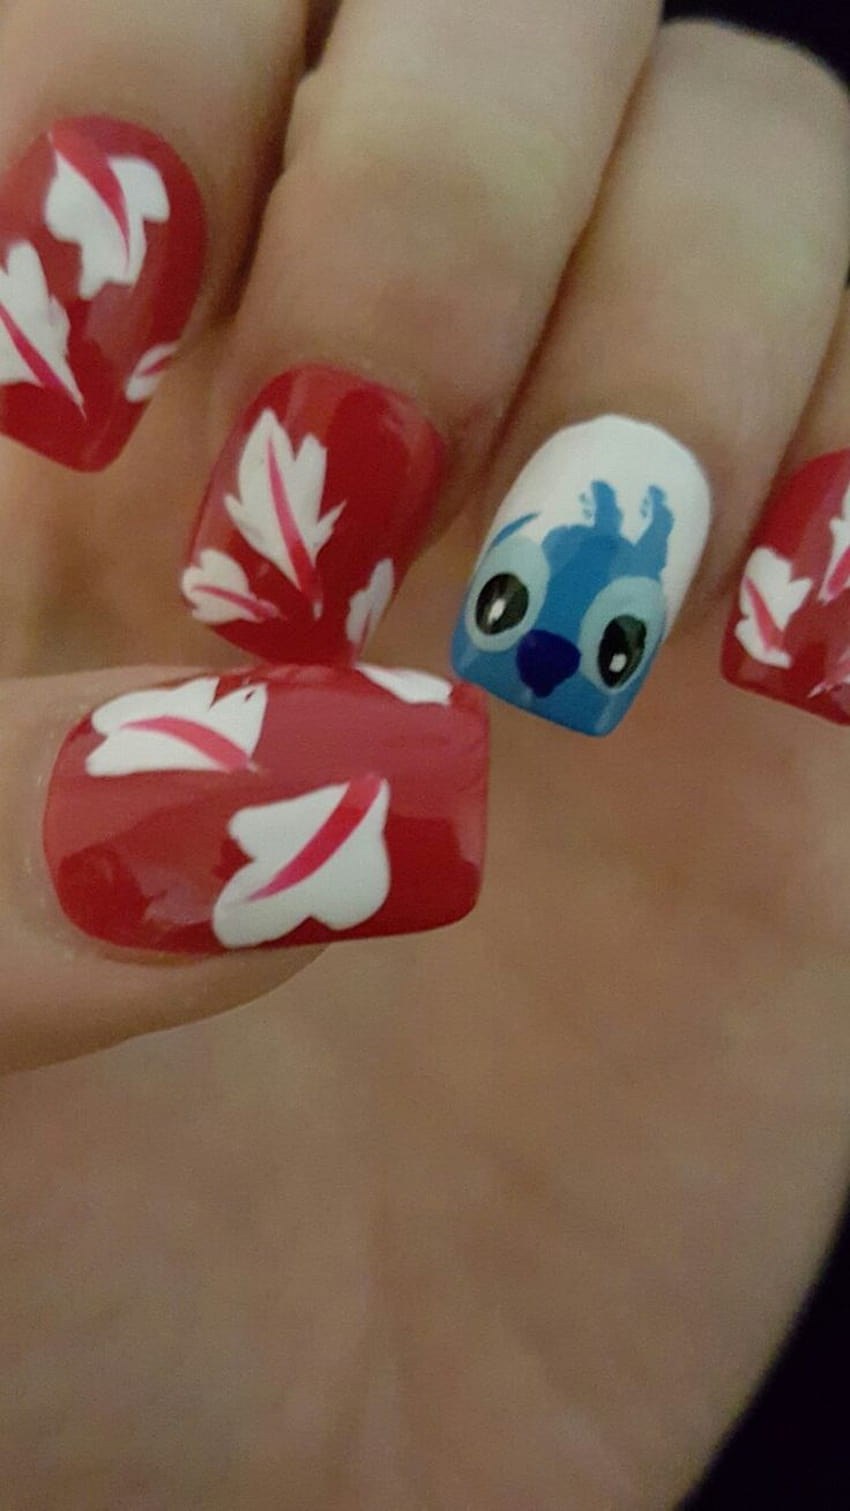
If you're a fan of the beloved Disney movie Lilo and Stitch, why not show your love through your nail art? With just a few simple steps, you can create your own Lilo and Stitch inspired nails that will have everyone asking for your tutorial. To start, gather your materials. You will need a base coat, a light blue nail polish, a white nail polish, a red nail polish, a black nail polish, a thin nail art brush, and a top coat. You can also add any additional colors or accents to make the design your own. Begin by applying a base coat to protect your nails. Once it has dried, apply two coats of the light blue polish for the background color. Let it dry completely before moving on to the next step. Next, using the thin nail art brush, create a large red heart on one of your nails. This will represent Stitch's red nose. Make sure to leave enough space on either side of the heart for the white and black details. Using the white polish, carefully fill in the space on either side of the heart to create Stitch's face. You can also use a dotting tool or toothpick to create the white eyes. After the white polish has dried, use the black polish to create Stitch's eyes and mouth. You can also use a toothpick to create the small details. Finally, add a top coat to seal in your design and add shine. You can also add any additional accents such as glitter or 3D embellishments to make your Lilo and Stitch nails stand out even more. With just a few simple steps, you now have adorable Lilo and Stitch inspired nails that are perfect for any Disney fan. Make sure to tag us in your recreations on social media!1. Lilo and Stitch Nail Art Tutorial


1. Lilo and Stitch Nail Art Tutorial

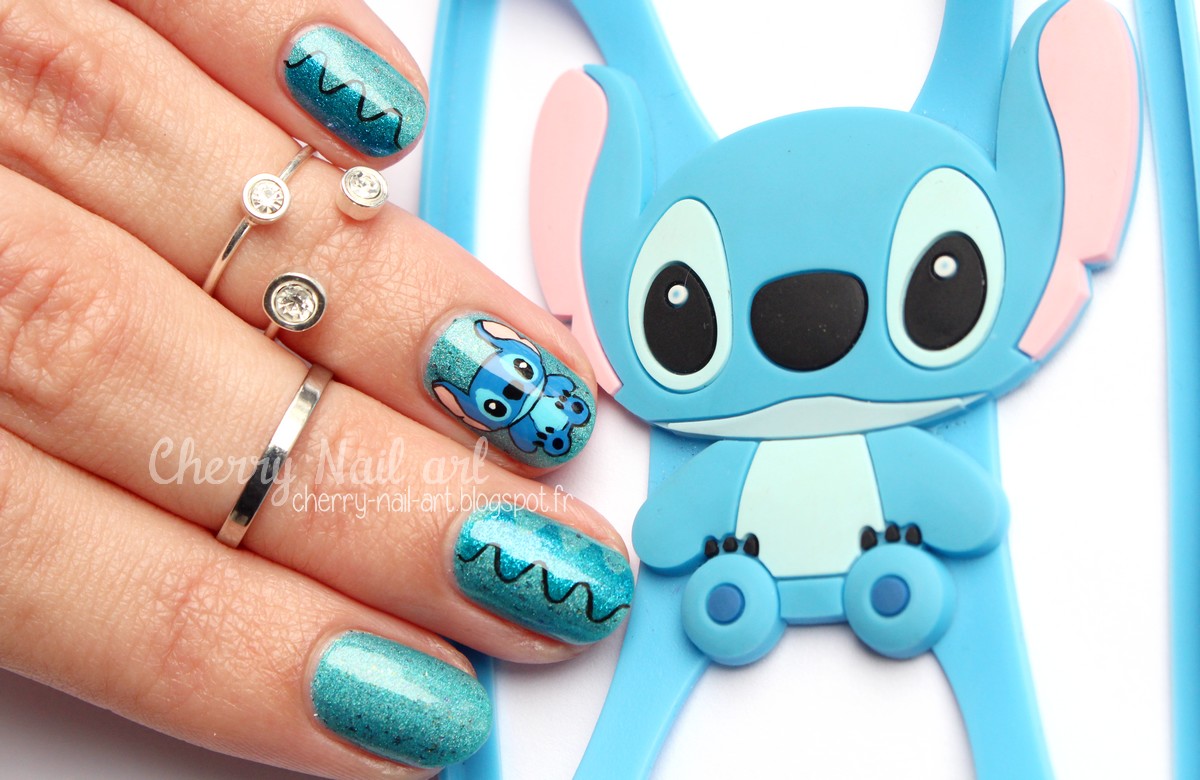


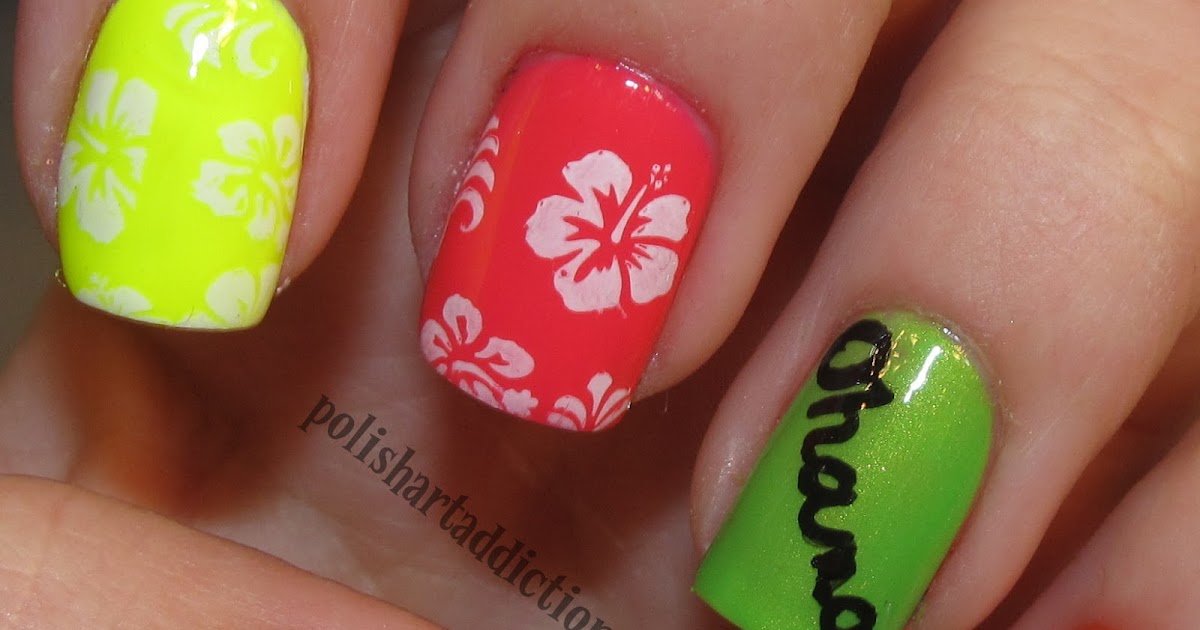
Looking for some cute and creative Lilo and Stitch nail designs? Look no further! We've gathered some of the most adorable and unique designs to inspire your next manicure. One option is to create a simple yet eye-catching design by painting your nails with a light blue base color and adding a small red heart on one nail. Then, use a thin nail art brush to create Stitch's face on the remaining nails. This design is great for beginners and can be easily customized with different colors and accents. If you want to take your design to the next level, try adding 3D elements like small Stitch figures or flowers to your nails. You can also create a full scene by painting Stitch, Lilo, and other characters on different nails. For a more subtle look, try a negative space design where the background color is used to create the shape of Stitch's head and the details are added with black and white polish. This design is perfect for those who want a more understated nod to their favorite Disney movie. Get creative with your Lilo and Stitch nail design by incorporating tropical elements like palm trees, pineapples, and flowers. These elements will not only add a pop of color to your nails, but also tie in with the Hawaiian theme of the movie. Remember, the possibilities are endless when it comes to Lilo and Stitch nail designs. Have fun and don't be afraid to try new techniques and add your own personal touch to your nails.2. Cute Lilo and Stitch Nail Designs


2. Cute Lilo and Stitch Nail Designs


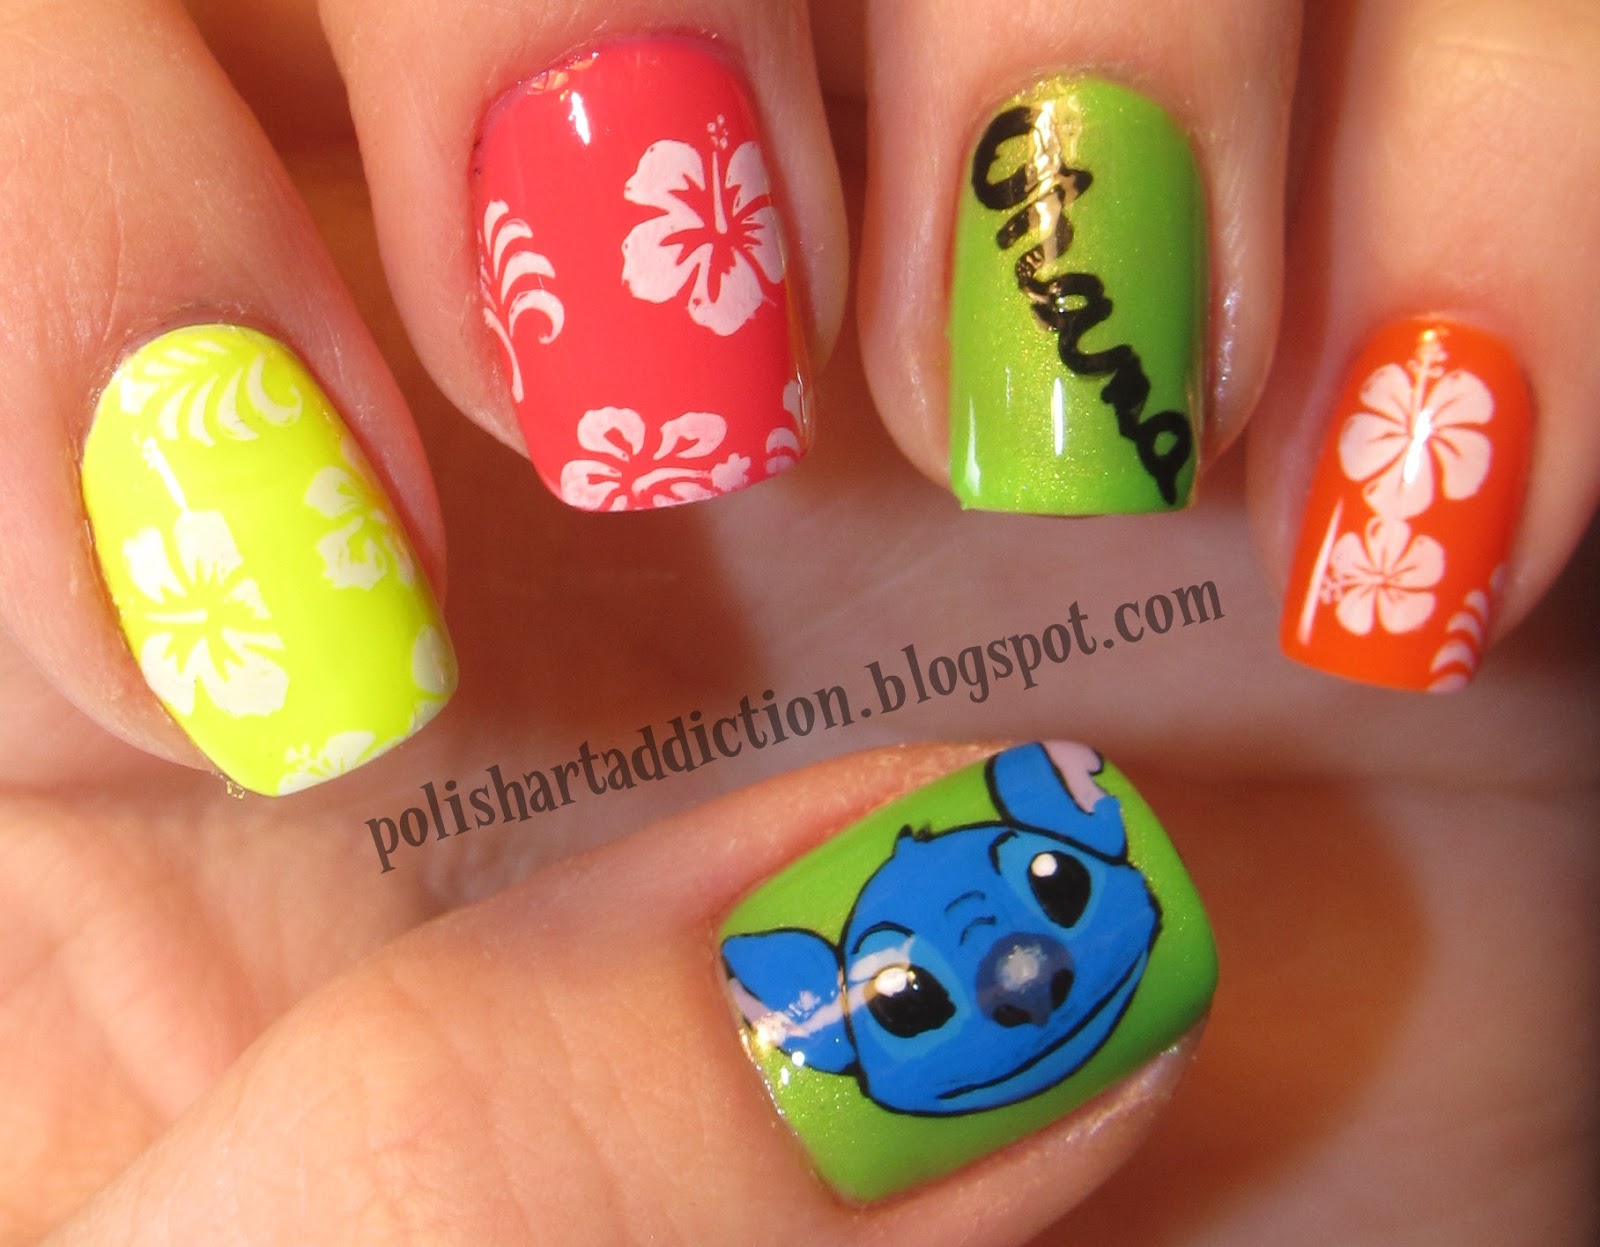
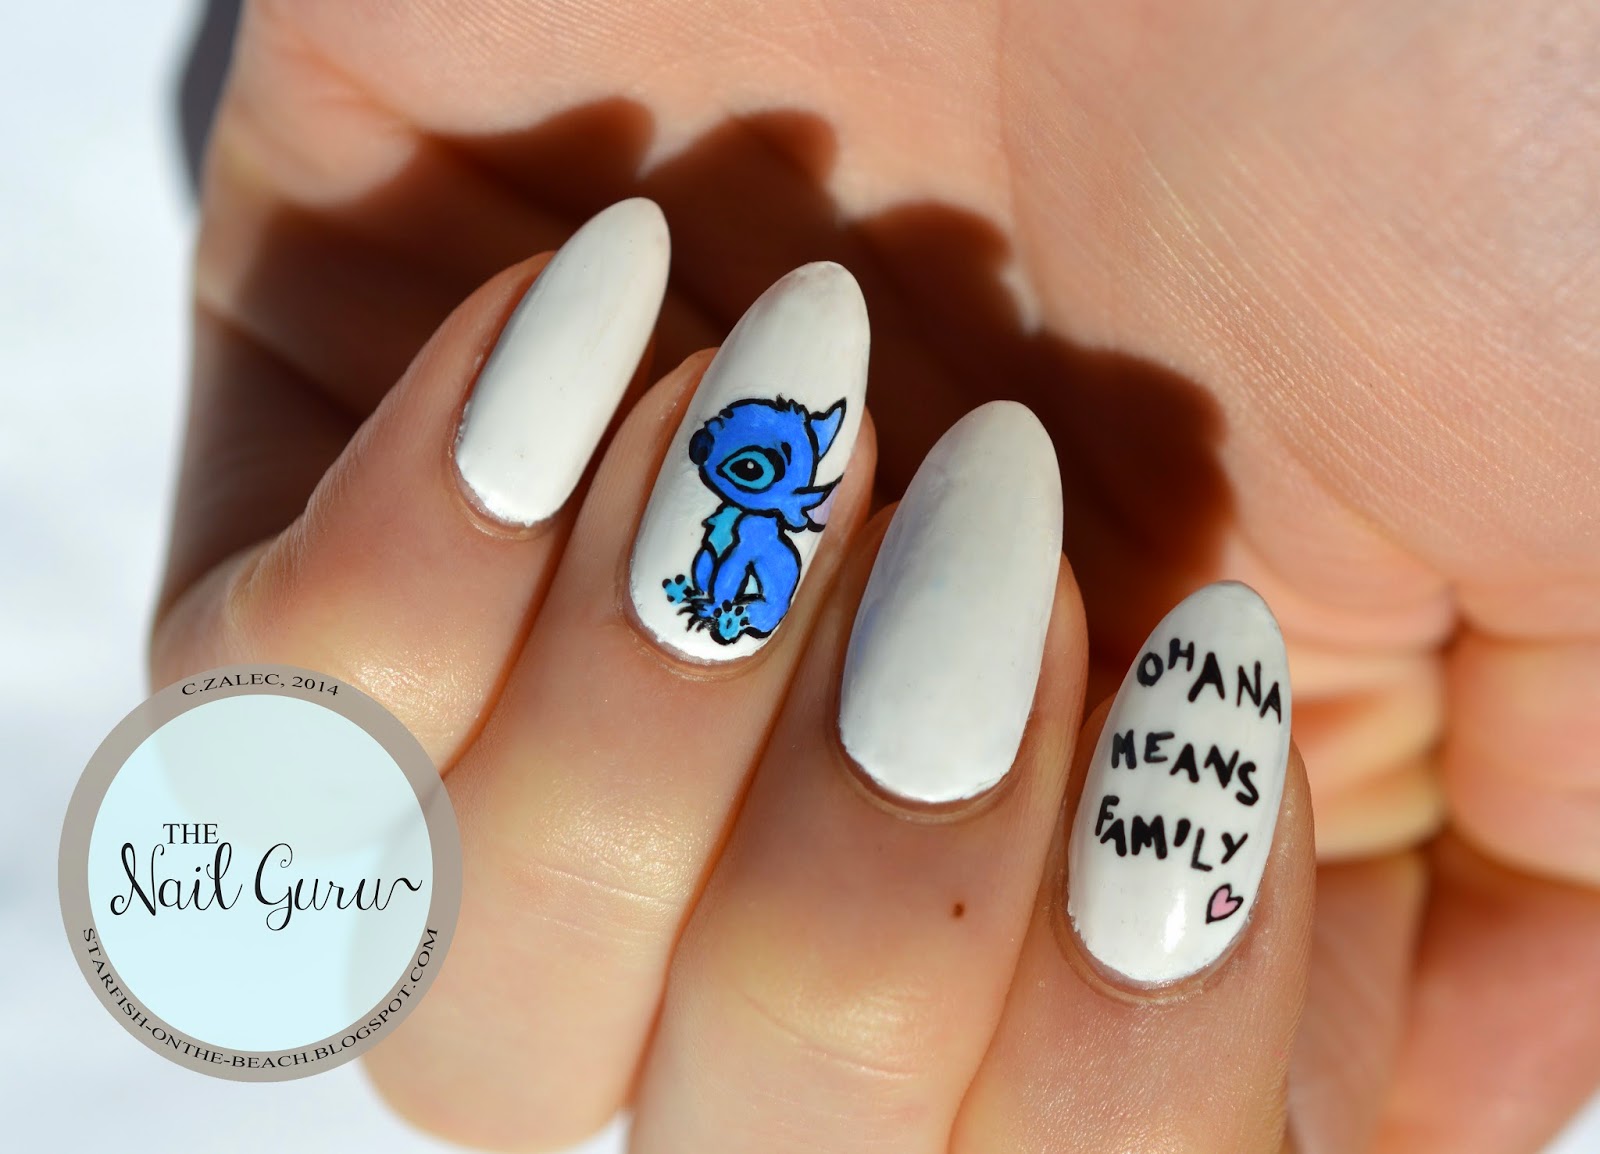
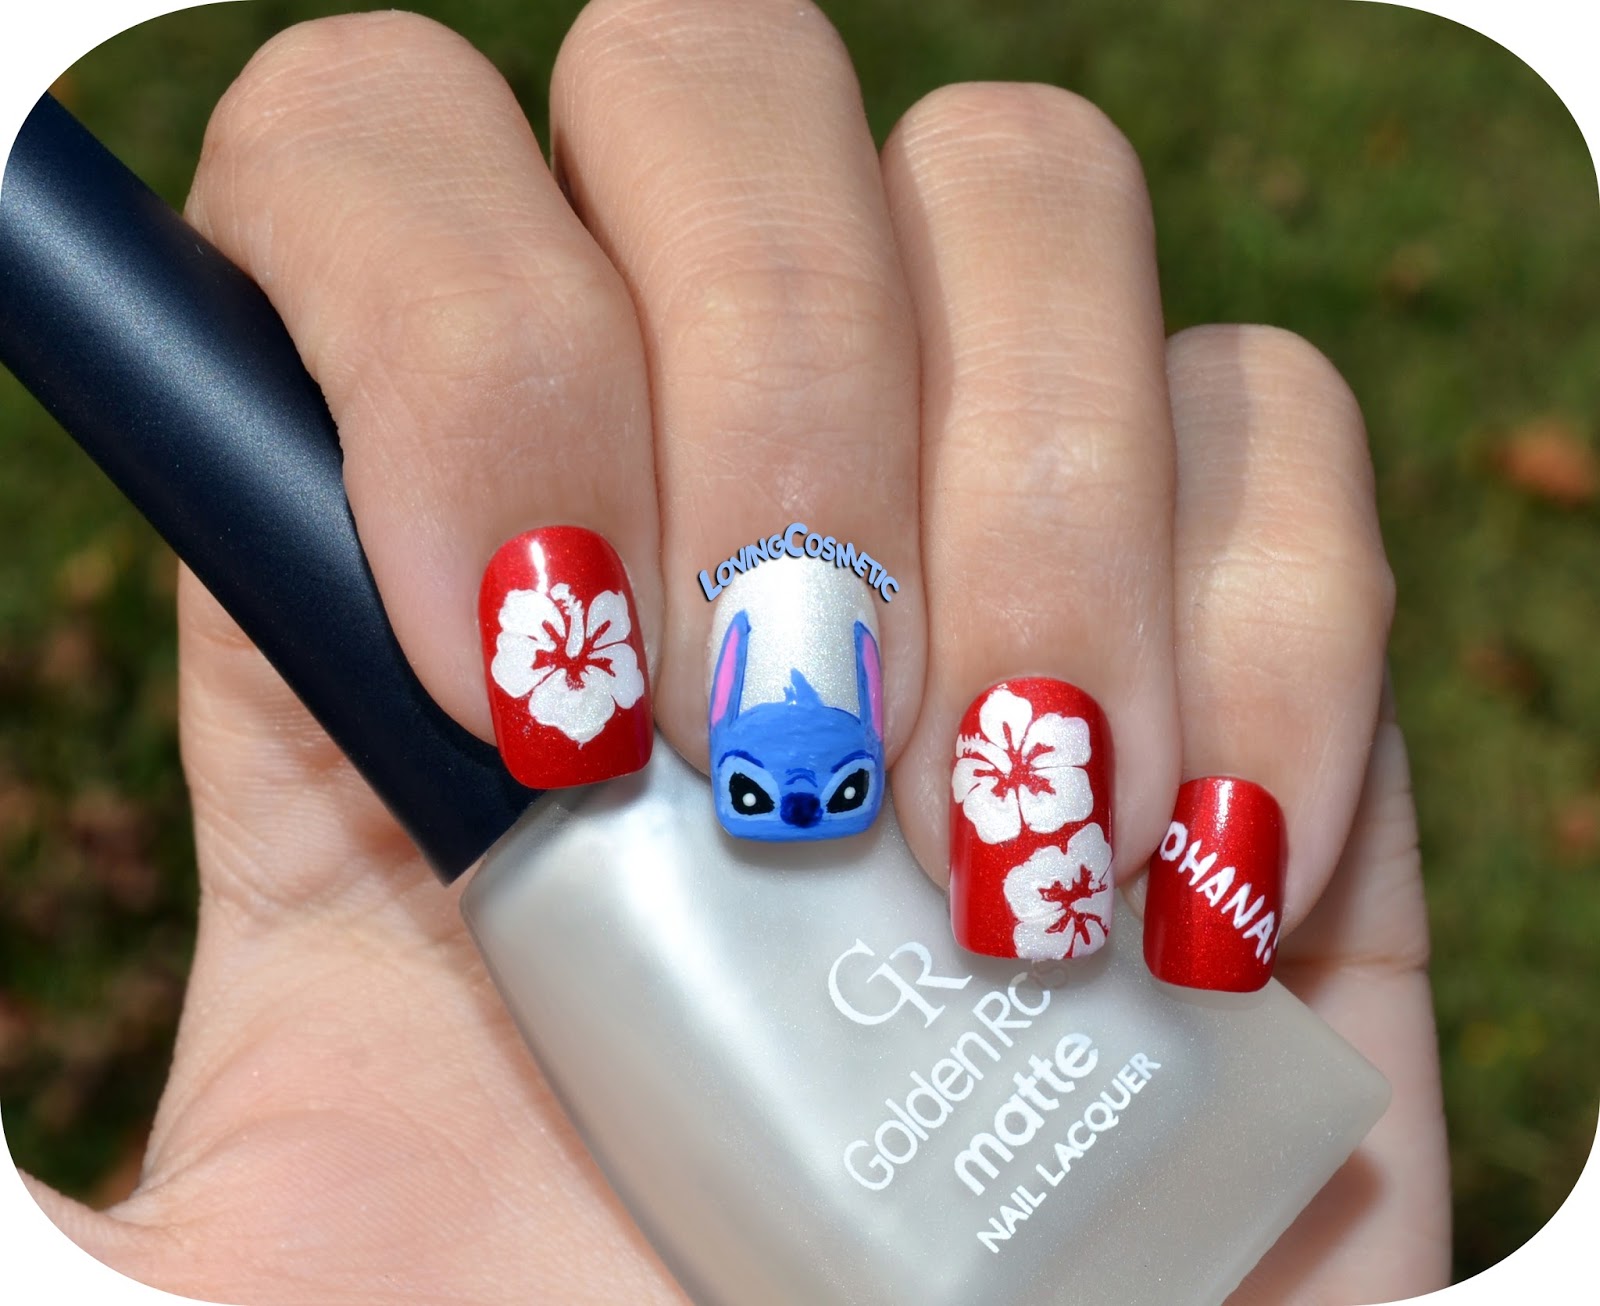
Looking for some nail art inspiration that will make you say "Ohana means family"? Look no further than these Lilo and Stitch inspired nail designs. One option is to create a full scene on your nails with Lilo, Stitch, and other beloved characters. This design may take a bit more time and skill, but the end result will be worth it. You can also add 3D elements like flowers and palm trees to make your nails stand out even more. For a more subtle design, try incorporating Hawaiian elements like hibiscus flowers, waves, and tropical leaves into your nail art. You can also add a pop of color with a bright blue or pink background to represent the beautiful landscape of Hawaii. Another idea is to create a minimalist design by using just a few colors and simple shapes to represent Lilo and Stitch. This design is perfect for those who prefer a more understated look. If you're feeling extra creative, try incorporating quotes from the movie like "Ohana means family" or "Nobody gets left behind" into your nail design. This will not only add a unique element to your nails, but also remind you of the heartwarming messages of the movie. No matter what design you choose, your Lilo and Stitch inspired nails are sure to make a statement and show your love for this heartwarming Disney movie.3. Lilo and Stitch Inspired Nail Art


3. Lilo and Stitch Inspired Nail Art


Want to rock some Lilo and Stitch nail art but not sure where to start? These easy ideas will have you creating adorable designs in no time. One simple design is to create a gradient effect on your nails using blue and pink polish. Then, use a thin nail art brush to create Stitch's face on one nail and a small red heart on another. This design is perfect for those who want a subtle nod to the movie without spending too much time on their nails. If you want to take your design a step further, try adding some 3D elements like flowers or palm trees to your nails. You can also create a full scene by painting Lilo and Stitch on different nails. For a quick and easy design, try using nail wraps or stickers that feature Lilo and Stitch. This is a great option for those who may not have the time or skill to create intricate designs on their own. Another simple yet effective design is to paint your nails with a light blue base color and add a small red heart on one nail. Then, use a toothpick to create the white and black details of Stitch's face on the remaining nails. No matter which design you choose, these easy Lilo and Stitch nail art ideas are perfect for beginners and Disney lovers alike.4. Easy Lilo and Stitch Nail Art Ideas


4. Easy Lilo and Stitch Nail Art Ideas


Are you new to the world of nail art but still want to show your love for Lilo and Stitch? These beginner-friendly designs are perfect for those who are just starting out. One simple design is to create a gradient effect on your nails using a light blue and pink polish. Then, use a toothpick or small brush to create Stitch's face on one nail and a small red heart on another. This design is perfect for those who want a subtle nod to the movie without too much difficulty. If you want to take your design up a notch, try incorporating 3D elements like flowers or palm trees into your design. This will add an extra dimension to your nails and make them stand out even more. Another beginner-friendly design is to use nail wraps or stickers that feature Lilo and Stitch. This is a great option for those who may not have the time or skill to create intricate designs on their own. You can also try a negative space design where the background color is used to create the shape of Stitch's head and the details are added with black and white polish. This is a simple yet effective way to show your love for the movie. Remember, practice makes perfect and don't be afraid to experiment with different techniques and designs to find what works best for you as a beginner.5. Lilo and Stitch Nail Art Designs for Beginners
5. Lilo and Stitch Nail Art Designs for Beginners


Are you planning a trip to Hawaii or just love all things tropical? These Lilo and Stitch themed nail art designs will have you feeling like you're on a Hawaiian vacation. One option is to create a full scene on your nails with Lilo, Stitch, and other beloved characters. This design may take a bit more time and skill, but the end result will be worth it. You can also add 3D elements like flowers and palm trees to make your nails stand out even more. For a more subtle design, try incorporating Hawaiian elements like hibiscus flowers, waves, and tropical leaves into your nail art. You can also add a pop of color with a bright blue or pink background to represent the beautiful landscape of Hawaii. Another idea is to create a minimalist design by using just a few colors and simple shapes to represent Lilo and Stitch. This design is perfect for those who prefer a more understated look. If you're feeling extra creative, try incorporating quotes from the movie like "Ohana means family" or "Nobody gets left behind" into your nail design. This will not only add a unique element to your nails, but also remind you of the heartwarming messages of the movie. No matter what design you choose, your Lilo and Stitch themed nails are sure to transport you to the beautiful and tropical world of Hawaii.6. Lilo and Stitch Themed Nail Art


6. Lilo and Stitch Themed Nail Art
Want to recreate a specific Lilo and Stitch nail design but not sure where to start? Follow these step by step instructions to achieve your desired look. Step 1: Gather your materials. You will need a base coat, light blue, white, red, and black nail polish, a thin nail art brush, and a top coat. You can also add any additional colors or accents to make the design your own. Step 2: Apply a base coat to protect your nails. Let it dry completely. Step 3: Apply two coats of light blue polish for the background color. Let it dry completely. Step 4: Using a thin nail art brush, create a large red heart on one of your nails. Leave enough space on either side for the white and black details. Step 5: Use the white polish to carefully fill in the remaining space on either side of the heart to create Stitch's face. You can also use a dotting tool or toothpick to create the white eyes. Step 6: After the white polish has dried, use the black polish to create Stitch's eyes and mouth. You can also use a toothpick to create the smaller details. Step 7: Add a top coat to seal in your design and add shine. You can also add any additional accents like glitter or 3D embellishments. With these simple steps, you now have adorable Lilo and Stitch inspired nails that are perfect for any Disney fan. Don't forget to tag us in your recreations on social media!7. Lilo and Stitch Nail Art Step by Step

7. Lilo and Stitch Nail Art Step by Step


Have short nails but still want to rock some Lilo and Stitch inspired designs? These nail art ideas are perfect for shorter nails. One option is to focus on one nail and create a simple yet eye-catching design using a light blue base color and a small red heart. Then, use a thin nail art brush to create Stitch's face on the remaining nails. This design is great for beginners and can be easily customized with different colors and accents. If you want to take your design to the next level, try adding 3D elements like small Stitch figures or flowers to your nails. You can also create a full scene by painting Stitch, Lilo, and other characters on different nails. For a more subtle look, try a negative space design where the background color is used to create the shape of Stitch's head and the details are added with black and white polish. This design is perfect for those who want a more understated nod to their favorite Disney movie. Get creative with your Lilo and Stitch nail design by incorporating tropical elements like palm trees, pineapples, and flowers. These elements will not only add a pop of color to your nails, but also tie in with the Hawaiian theme of the movie. Remember, the possibilities are endless when it comes to Lilo and Stitch nail designs for short nails. Have fun and don't be afraid to try new techniques and add your own personal touch to your nails.8. Lilo and Stitch Nail Art for Short Nails

8. Lilo and Stitch Nail Art for Short Nails


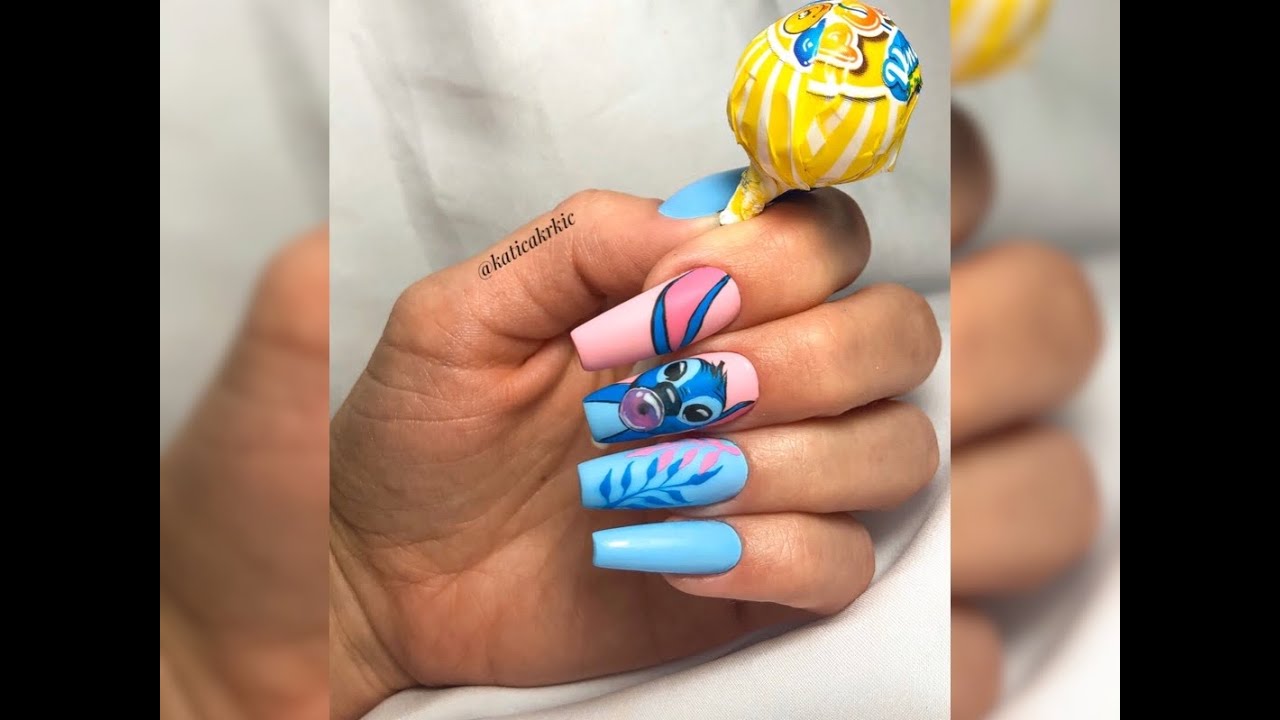
Have long nails and want to show them off with some adorable Lilo and Stitch nail art? These designs are perfect for longer nails. One option is to create a full scene on your nails with Lilo, Stitch, and other beloved characters. This design may take a bit more time and skill, but the end result will be worth it. You can also add 3D elements like flowers and palm trees to make your nails stand out even more. For a more subtle design, try incorporating Hawaiian elements like hibiscus flowers, waves, and tropical leaves into your nail art. You can also add a pop of color with a bright blue or pink background to represent the beautiful landscape of Hawaii. Another idea is to create a minimalist design by using just a few colors and simple shapes to represent Lilo and Stitch. This design is perfect for those who prefer a more understated look. If you're feeling extra creative, try incorporating quotes from the movie like "Ohana means family" or "Nobody gets left behind" into your nail design. This will not only add a unique element to your nails, but also remind you of the heartwarming messages of the movie. No matter what design you choose, your long nails will make the perfect canvas for these adorable Lilo and Stitch nail art designs.9. Lilo and Stitch Nail Art for Long Nails

9. Lilo and Stitch Nail Art for Long Nails


Want to take your Lilo and Stitch nail art to the next level? Add some 3D elements to make your nails stand out even more. One option is to create a full scene on your nails with Lilo, Stitch, and other beloved characters. This design may take a bit more time and skill, but the end result will be worth it. You can also add 3D elements like flowers and palm trees to make your nails stand out even more. For a more subtle design, try incorporating Hawaiian elements like hibiscus flowers, waves, and tropical leaves into your nail art. You can also add a pop of color with a bright blue or pink background to represent the beautiful landscape of Hawaii. Another idea is to create a minimalist design by using just a few colors and simple shapes to represent Lilo and Stitch. This design is perfect for those who prefer a more understated look.10. Lilo and Stitch Nail Art with 3D Accents

10. Lilo and Stitch Nail Art with 3D Accents

Create Adorable Disney Nails with Lilo and Stitch Nail Art

The Magic of Lilo and Stitch
 Who doesn't love the heartwarming story of Lilo and Stitch? This beloved Disney animated film has captured the hearts of both children and adults alike with its messages of friendship, family, and acceptance. And what better way to show your love for this lovable duo than through
Lilo and Stitch nail art
?
Who doesn't love the heartwarming story of Lilo and Stitch? This beloved Disney animated film has captured the hearts of both children and adults alike with its messages of friendship, family, and acceptance. And what better way to show your love for this lovable duo than through
Lilo and Stitch nail art
?
Why Nail Art?
 Nail art has become a popular form of self-expression, allowing individuals to showcase their creativity and personality through their nails. From simple designs to intricate masterpieces, there are endless possibilities when it comes to nail art. And with Disney being a huge part of our childhood memories, it's no surprise that
Disney-inspired nail art
has become a trend in recent years.
Nail art has become a popular form of self-expression, allowing individuals to showcase their creativity and personality through their nails. From simple designs to intricate masterpieces, there are endless possibilities when it comes to nail art. And with Disney being a huge part of our childhood memories, it's no surprise that
Disney-inspired nail art
has become a trend in recent years.
The Perfect Nail Art for Disney Fans
 If you're a fan of Disney and nail art, then
Lilo and Stitch nail art
is a match made in heaven. With its vibrant colors and cute characters, it's the perfect way to add a touch of magic to your nails. Whether you're headed to a Disney-themed party or just want to show your love for the film, this nail art is guaranteed to make you stand out.
If you're a fan of Disney and nail art, then
Lilo and Stitch nail art
is a match made in heaven. With its vibrant colors and cute characters, it's the perfect way to add a touch of magic to your nails. Whether you're headed to a Disney-themed party or just want to show your love for the film, this nail art is guaranteed to make you stand out.
How to Achieve Lilo and Stitch Nail Art
 Creating your own
Lilo and Stitch nail art
is easier than you think. Start by choosing a base color that represents the blue ocean, like a light blue or teal. Then, using a thin brush or a dotting tool, draw a small Stitch on one nail and a small Lilo on another. You can also add other elements from the film, such as a surfboard, a hibiscus flower, or even a little pineapple. Finish off with a clear top coat to seal in your design and voila! You now have adorable Lilo and Stitch nails.
Creating your own
Lilo and Stitch nail art
is easier than you think. Start by choosing a base color that represents the blue ocean, like a light blue or teal. Then, using a thin brush or a dotting tool, draw a small Stitch on one nail and a small Lilo on another. You can also add other elements from the film, such as a surfboard, a hibiscus flower, or even a little pineapple. Finish off with a clear top coat to seal in your design and voila! You now have adorable Lilo and Stitch nails.
Take Your Nail Art to the Next Level
 If you want to take your
Lilo and Stitch nail art
to the next level, you can also opt for 3D nail art. There are many cute and creative nail charms and stickers available online that you can use to enhance your design. You can even add a sparkly touch with glitter or rhinestones. The possibilities are endless, so let your creativity run wild.
In conclusion,
Lilo and Stitch nail art
is a fun and creative way to show your love for this beloved Disney film. With its bright colors and adorable characters, it's the perfect nail art for any Disney fan. So go ahead and channel your inner Lilo and experiment with this cute and magical nail art.
If you want to take your
Lilo and Stitch nail art
to the next level, you can also opt for 3D nail art. There are many cute and creative nail charms and stickers available online that you can use to enhance your design. You can even add a sparkly touch with glitter or rhinestones. The possibilities are endless, so let your creativity run wild.
In conclusion,
Lilo and Stitch nail art
is a fun and creative way to show your love for this beloved Disney film. With its bright colors and adorable characters, it's the perfect nail art for any Disney fan. So go ahead and channel your inner Lilo and experiment with this cute and magical nail art.


