If you're a fan of My Little Pony, why not show your love for the colorful and magical world of Equestria on your nails? With these 10 easy nail art designs, even beginners can create fun and adorable manicures inspired by their favorite characters. 1. Rainbow Dash Nail Art Design - Start with a white base coat and use striping tape to create a rainbow on each nail. Remove the tape and use a thin brush to add clouds in white and blue. Finish with a top coat for a shiny finish. 2. Pinkie Pie Nail Art Design - This design is all about bright colors and sprinkles! Use a light pink base coat and add colorful dots in different sizes using a dotting tool or bobby pin. Finish with a top coat and add a sprinkle of glitter for extra sparkle. 3. Twilight Sparkle Nail Art Design - Paint each nail in a different pastel color and use a thin brush to create a gradient effect with a darker shade of the same color. Add a silver star decal on each nail and finish with a top coat. 4. Fluttershy Nail Art Design - For this delicate and sweet design, start with a light yellow base coat and add a watercolor effect using light pink, purple, and blue polishes. Add a small butterfly decal on each nail and finish with a top coat. 5. Rarity Nail Art Design - This design is all about the glitz and glam! Start with a glitter base coat and use a thin brush to create a diamond pattern in silver or gold. Finish with a top coat and add a jewel decal on each nail. 6. Applejack Nail Art Design - For this design, start with a light green base coat and use a thin brush to create a plaid pattern in darker green and white. Add a small apple decal on each nail and finish with a top coat. 7. Spike Nail Art Design - Start with a purple base coat and use a thin brush to create a spiky pattern in green and yellow. Add a small dragon decal on each nail and finish with a top coat. 8. Mane 6 Nail Art Designs - Want to show love for all the Mane 6 characters? Paint each nail in a different color inspired by a character and use a thin brush to add their cutie mark in the corresponding color. Finish with a top coat for a colorful and fun manicure. 9. My Little Pony Silhouette Nail Art - This design is perfect for those who prefer a more subtle and minimalist look. Paint each nail in a different pastel color and use a nail art pen to draw a black silhouette of a pony on each nail. Finish with a top coat. 10. My Little Pony Accent Nail Art - If you want to keep your nails simple but still show your love for My Little Pony, try this accent nail art design. Paint each nail in a different pastel color and use a thin brush to add a small accent design on one nail, such as a rainbow, a star, or a heart. Finish with a top coat.My Little Pony Nail Art Tutorial | 10 Easy Nail Art Designs for Beginners


My Little Pony Nail Art Tutorial


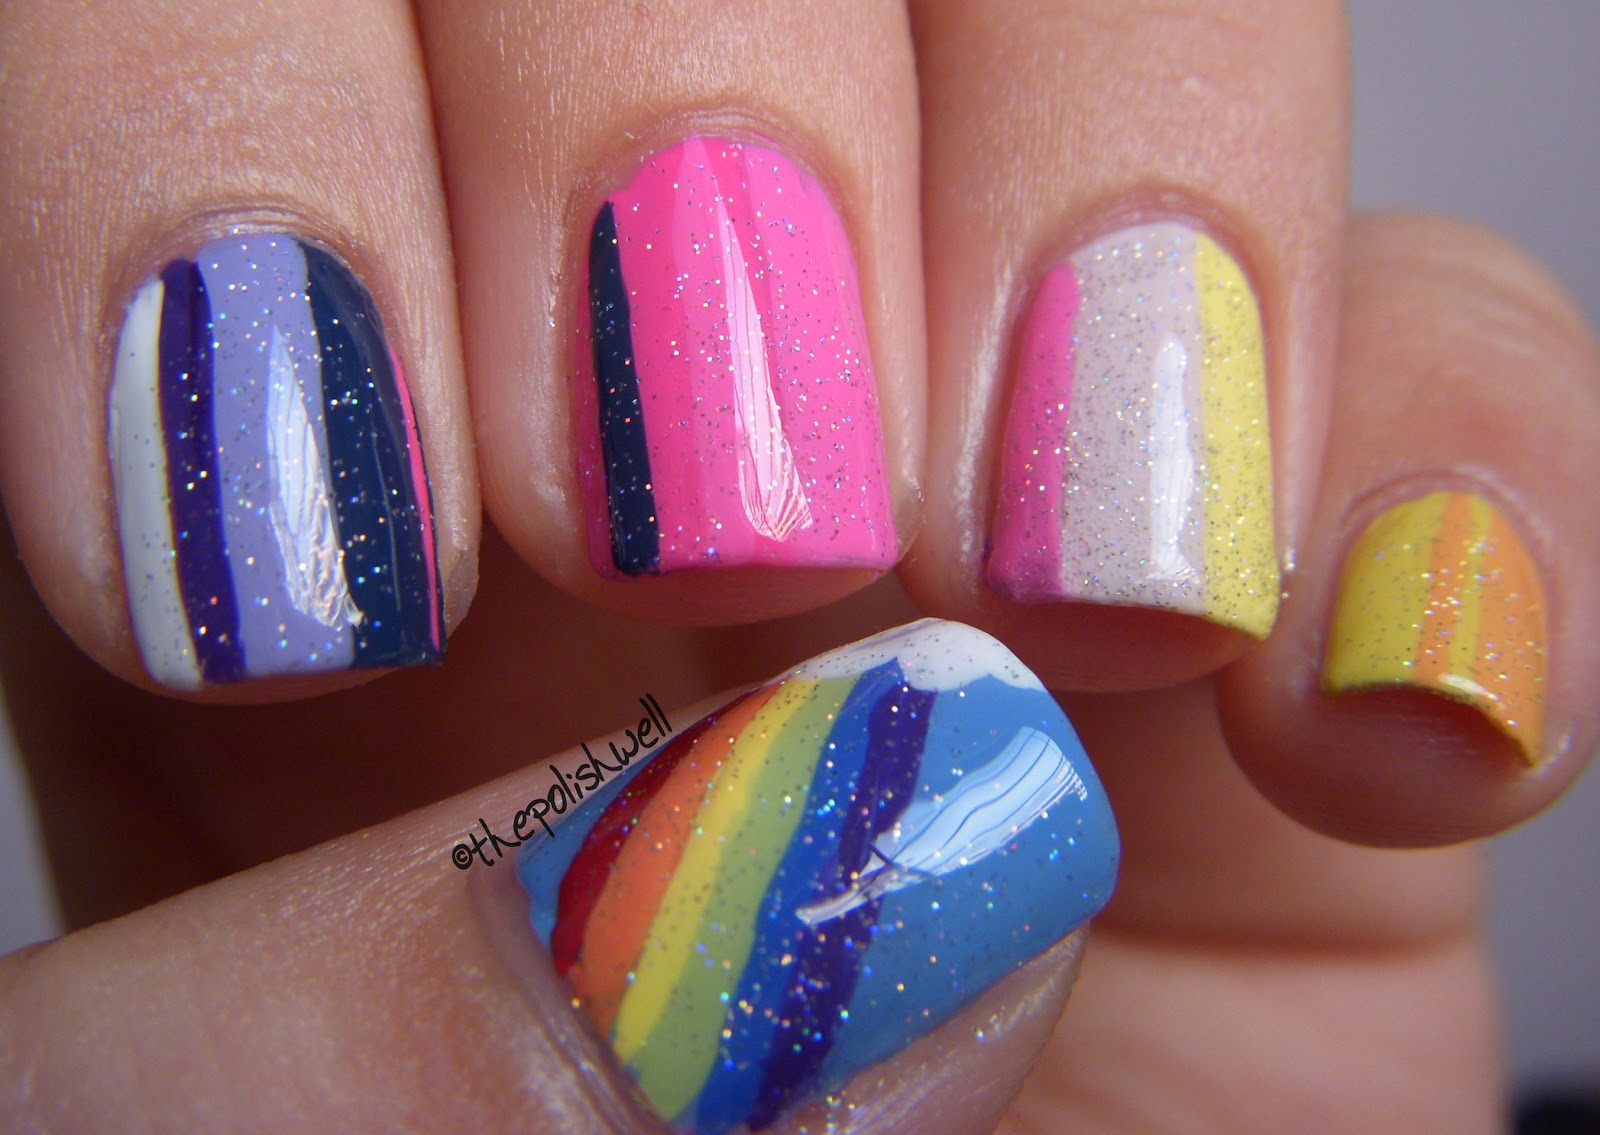
Can't get enough of My Little Pony nail art? Here are five more cute and easy designs to try out. 1. Pony Power Nail Art - Start with a light blue base coat and use a thin brush to create a cloud design in white. Add a small pony decal on each nail and finish with a top coat. 2. My Little Pony French Tips - For a subtle and elegant pony-inspired look, try this French tip design. Use a stamping plate to add a small My Little Pony design in white on the tips of your nails. Finish with a top coat. 3. Floral Pony Nail Art - Start with a light pink base coat and use a thin brush to create a flower design in different colors on each nail. Add a small pony decal on each nail and finish with a top coat. 4. My Little Pony Ombre Nails - For a trendy and colorful look, try this ombre nail art design. Paint each nail in a different pastel color and use a sponge to create a gradient effect. Add a small pony decal on one nail and finish with a top coat. 5. Rainbow Pony Nail Art - For this fun and colorful design, start with a white base coat and use a thin brush to create a rainbow design on each nail. Add a small pony decal on one nail and finish with a top coat.My Little Pony Nail Art Tutorial | 5 Cute and Easy Designs


10 Easy Nail Art Designs for Beginners


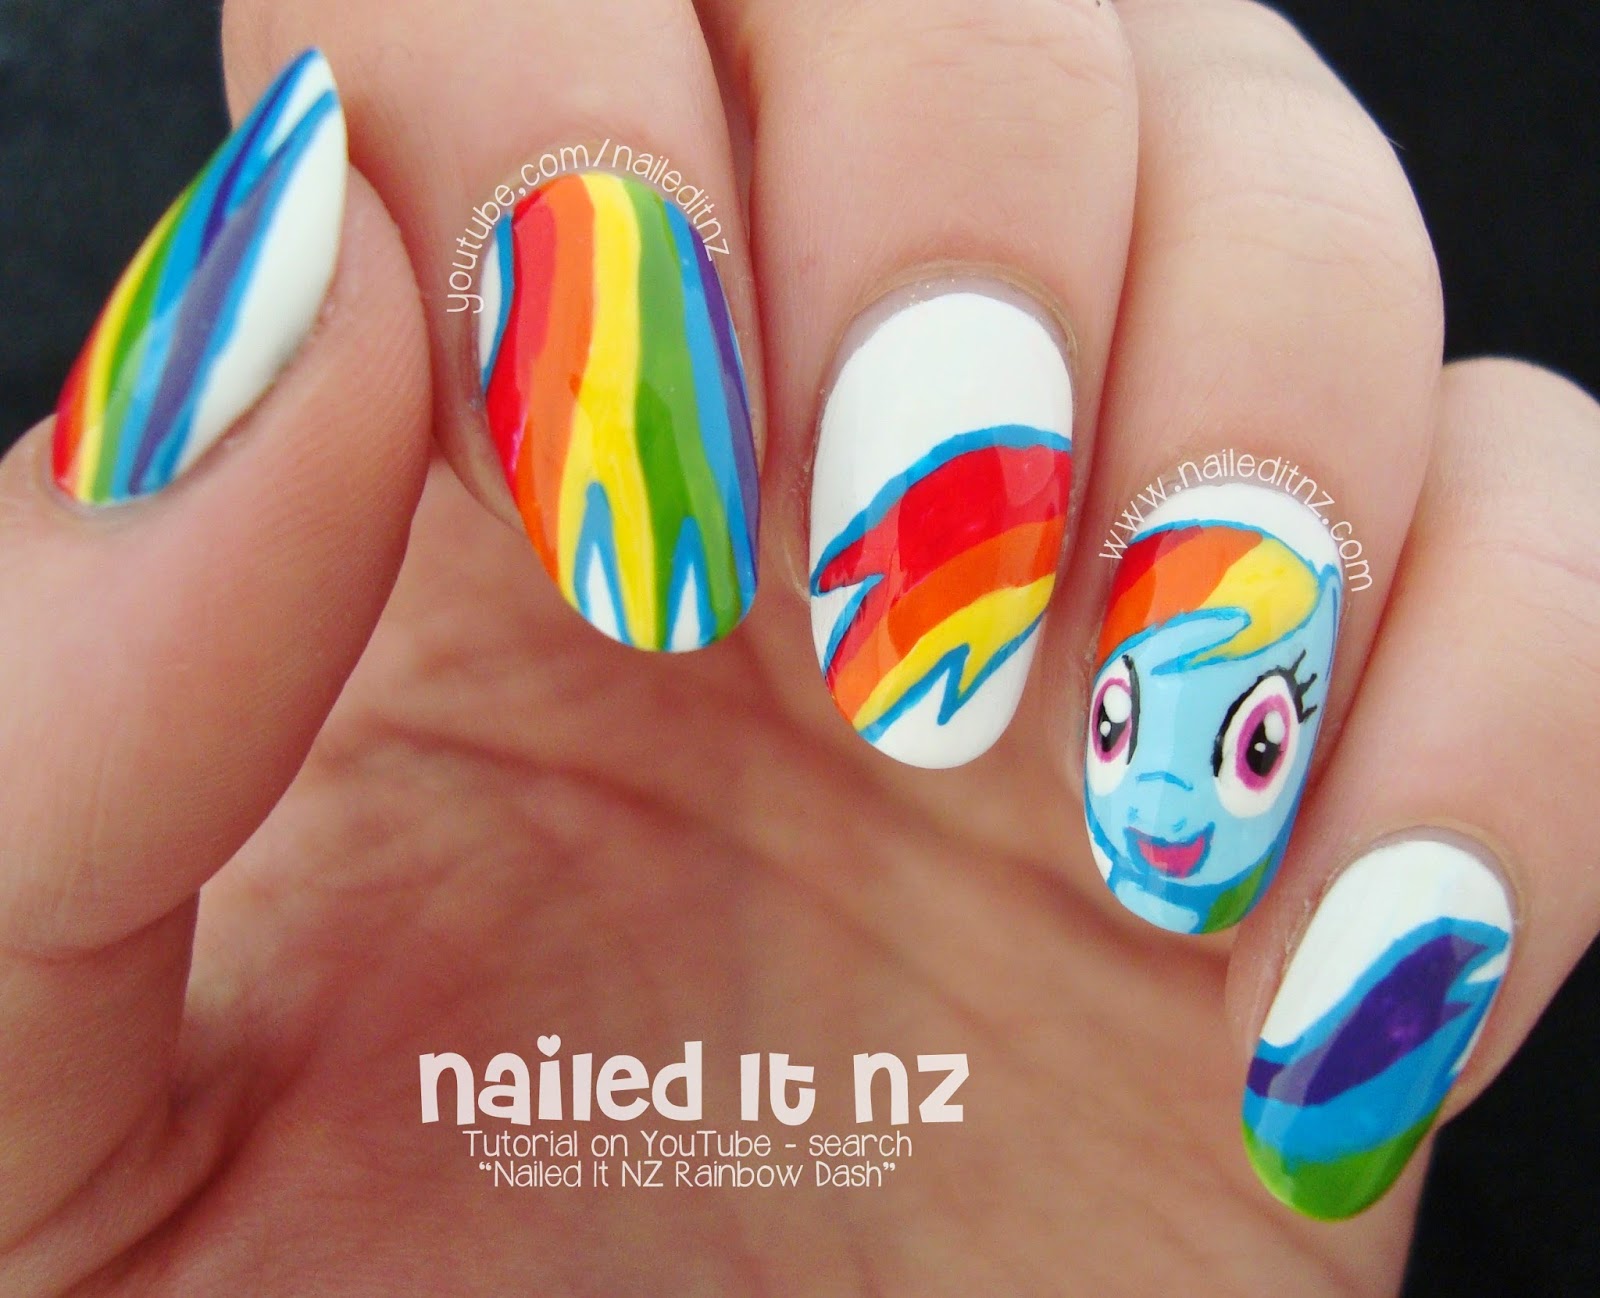
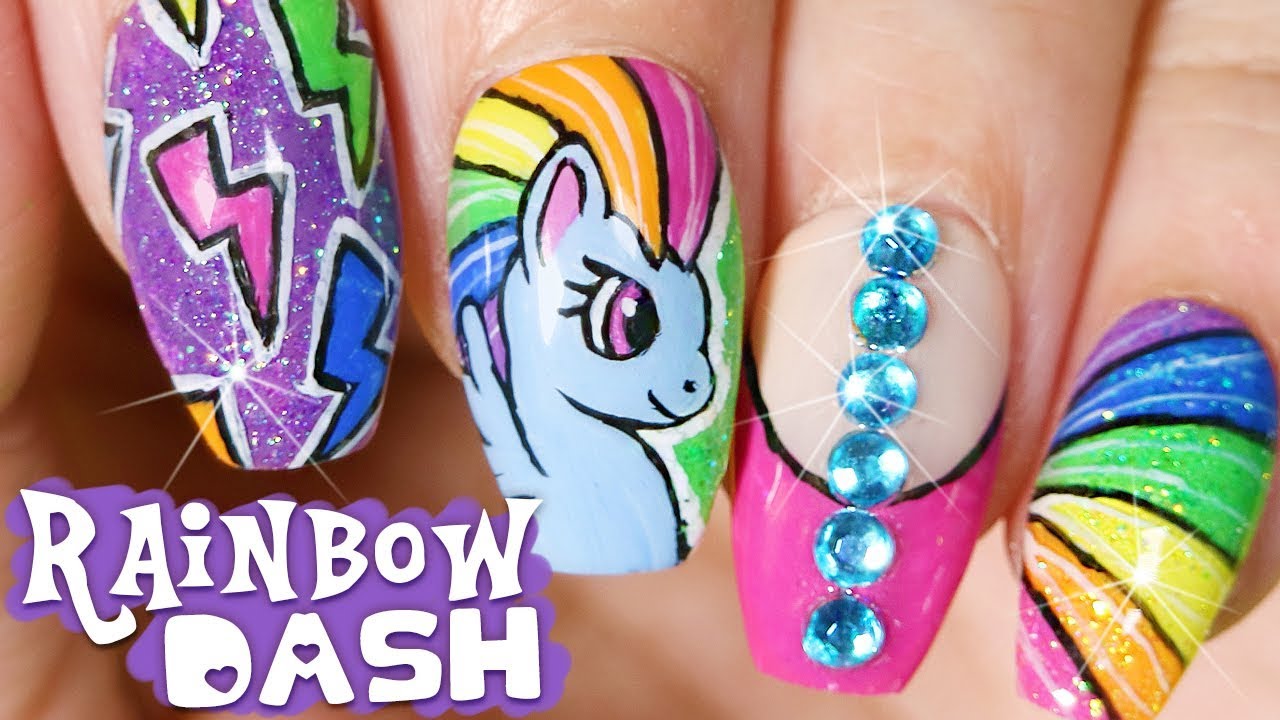
Rainbow Dash is the loyal and adventurous pony with a colorful mane and tail. Here's how to recreate her signature look on your nails. Start with a white base coat and use striping tape to create a rainbow on each nail, starting from the base of the nail. Remove the tape and use a thin brush to add clouds in white and blue. Finish with a top coat for a shiny finish.My Little Pony Nail Art Tutorial | Rainbow Dash Nail Art Design


My Little Pony Nail Art Tutorial
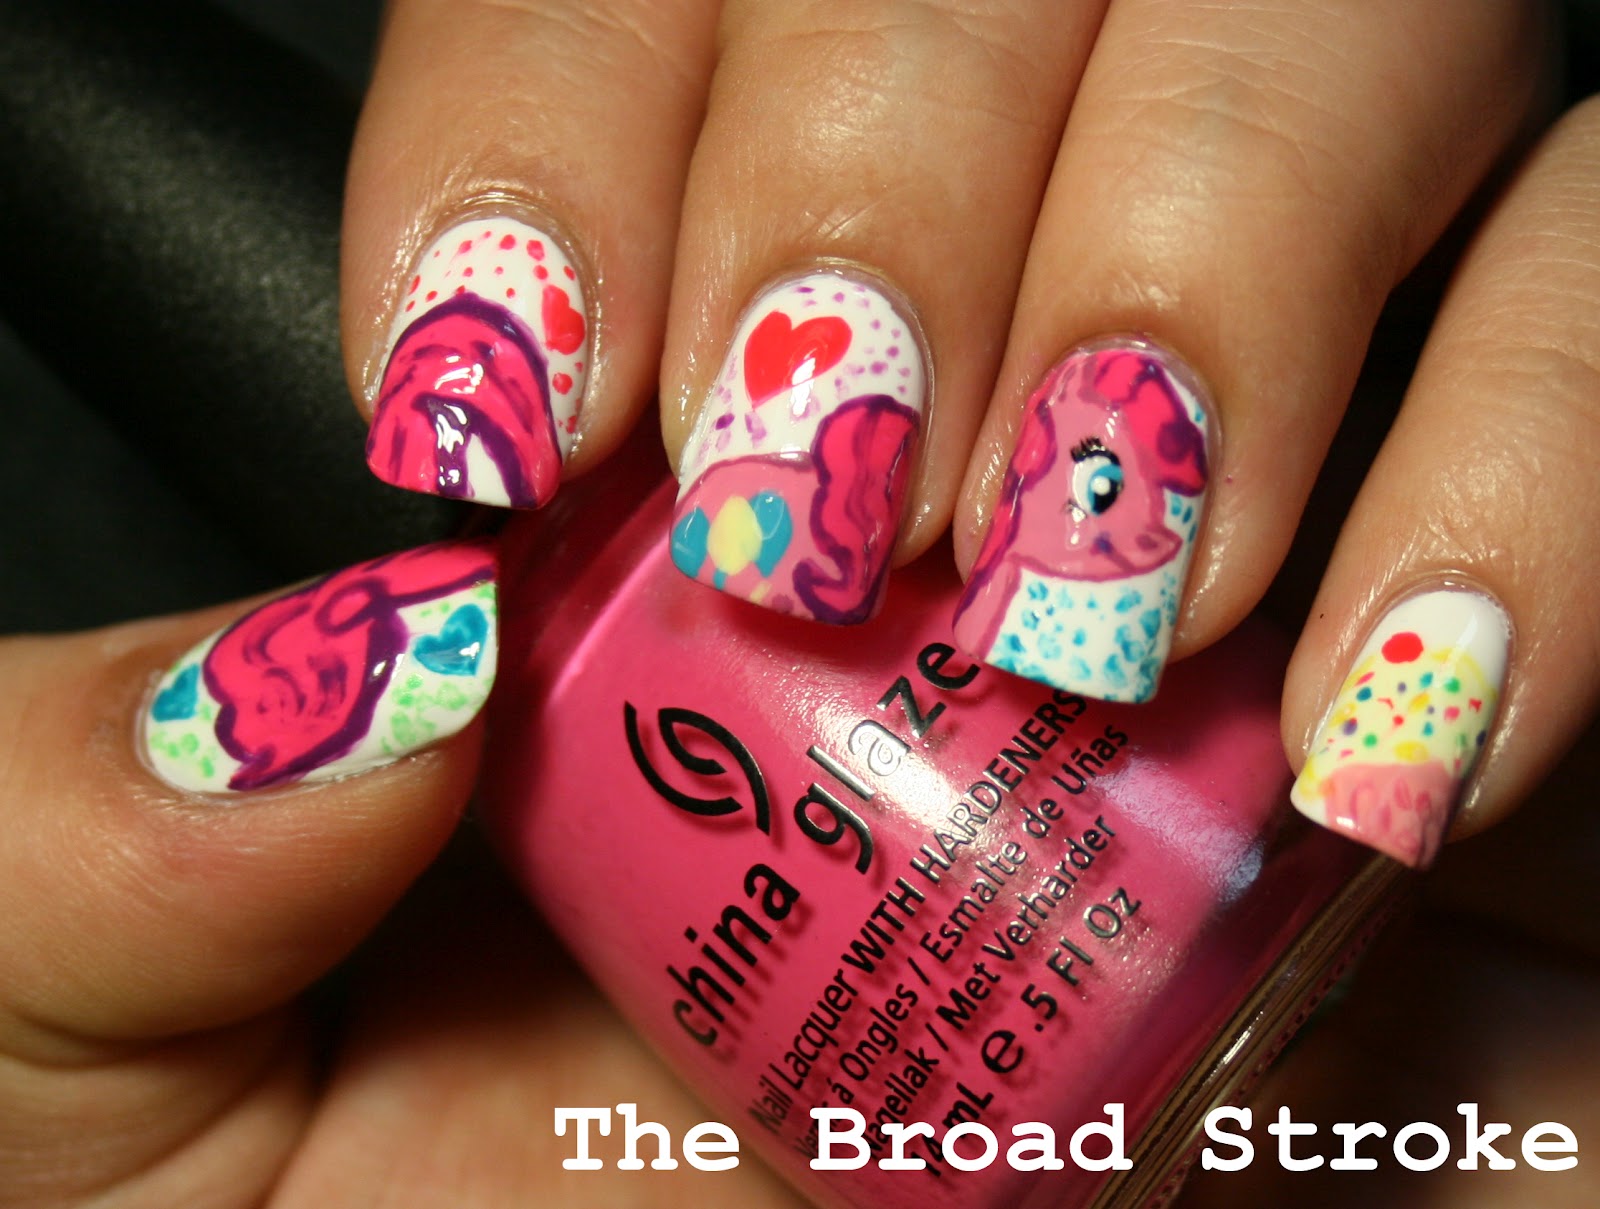
Pinkie Pie is the energetic and fun-loving pony with a pink mane and tail. Here's how to create a cute and playful nail art design inspired by her. Start with a light pink base coat and add colorful dots in different sizes using a dotting tool or bobby pin. Finish with a top coat and add a sprinkle of glitter for extra sparkle.My Little Pony Nail Art Tutorial | Pinkie Pie Nail Art Design


5 Cute and Easy Designs


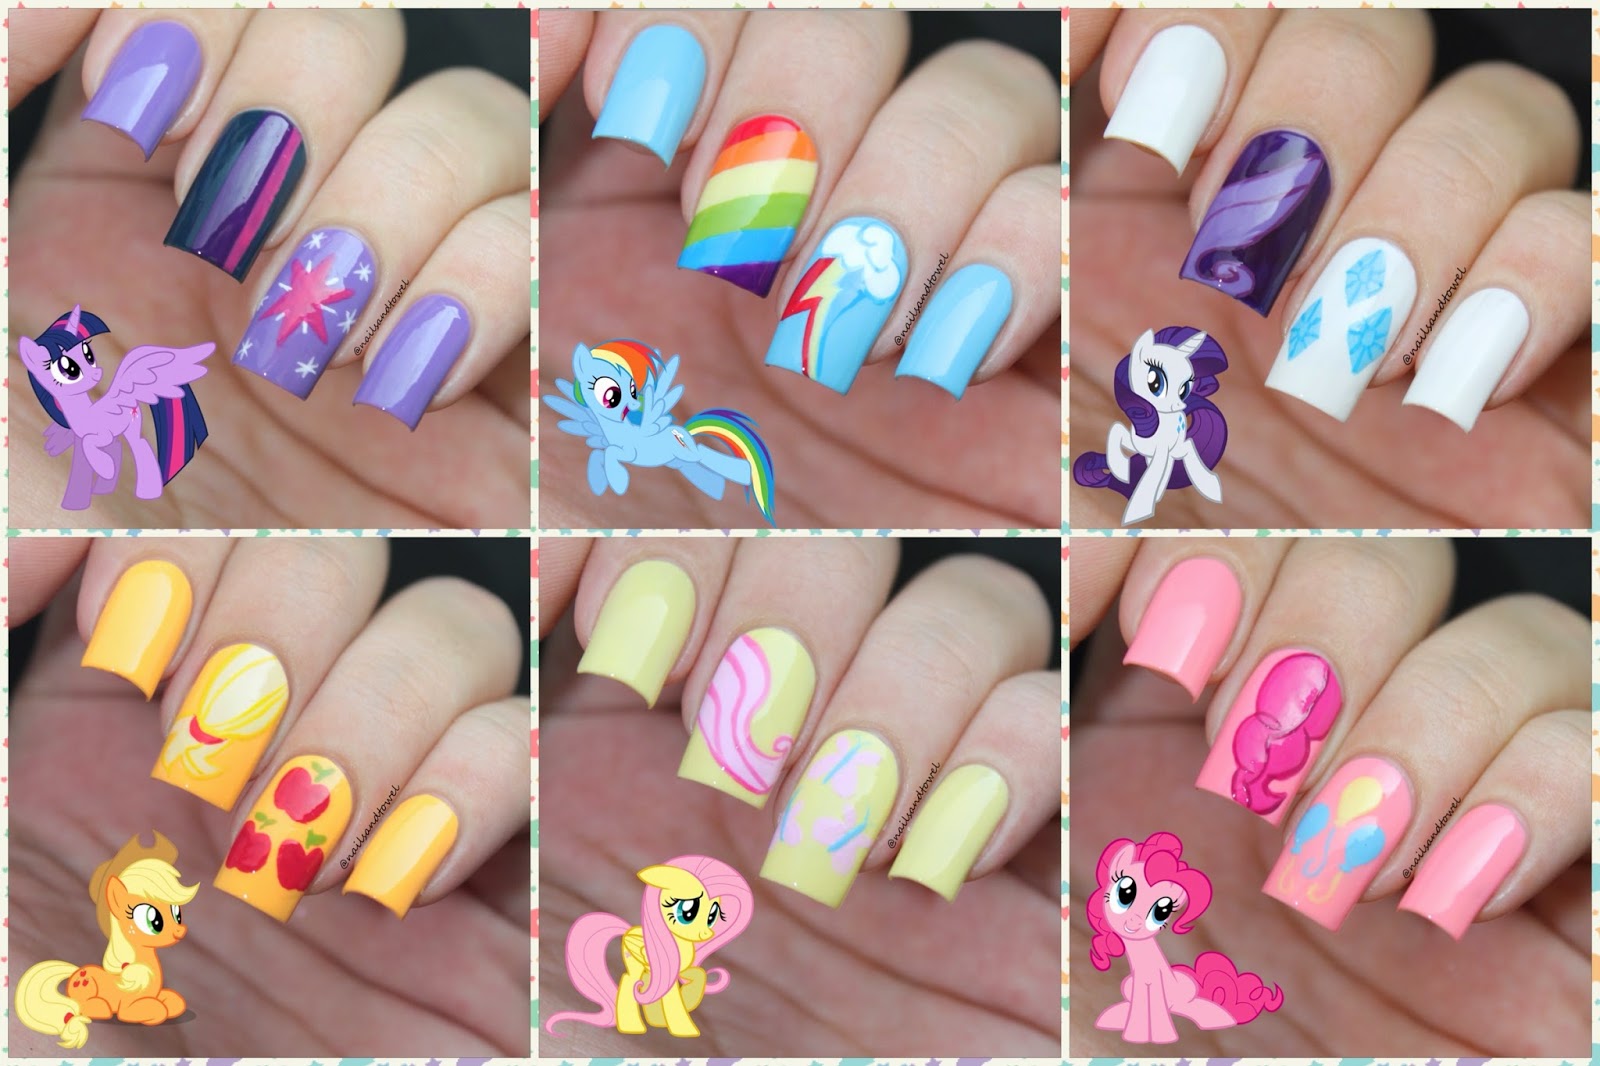


Twilight Sparkle is the studious and magical pony with a purple mane and tail. Here's how to create a dreamy and whimsical nail art design inspired by her. Paint each nail in a different pastel color and use a thin brush to create a gradient effect with a darker shade of the same color. Add a silver star decal on each nail and finish with a top coat.My Little Pony Nail Art Tutorial | Twilight Sparkle Nail Art Design
My Little Pony Nail Art Tutorial

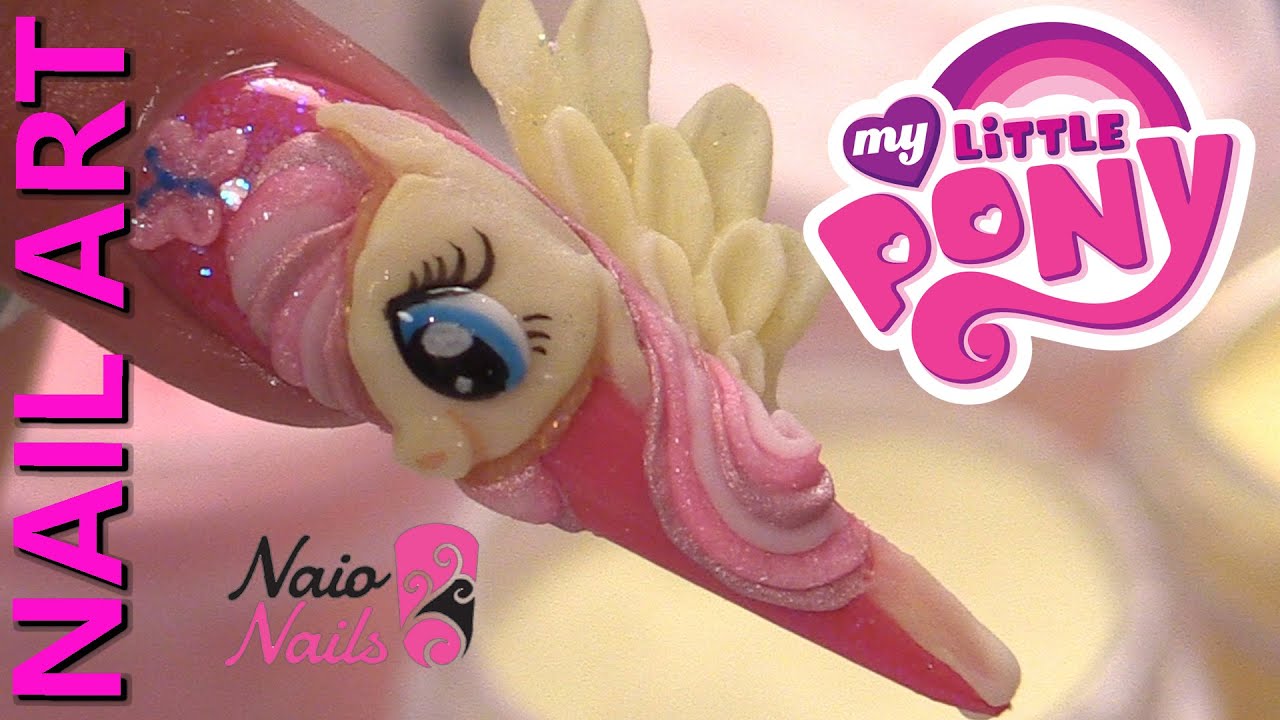
Fluttershy is the gentle and kind pony with a yellow mane and tail. Here's how to create a delicate and sweet nail art design inspired by her. Start with a light yellow base coat and add a watercolor effect using light pink, purple, and blue polishes. Add a small butterfly decal on each nail and finish with a top coat.My Little Pony Nail Art Tutorial | Fluttershy Nail Art Design


Rainbow Dash Nail Art Design


Rarity is the fashionable and glamorous pony with a white and blue mane and tail. Here's how to create a sparkly and elegant nail art design inspired by her. Start with a glitter base coat and use a thin brush to create a diamond pattern in silver or gold. Finish with a top coat and add a jewel decal on each nail.My Little Pony Nail Art Tutorial | Rarity Nail Art Design
My Little Pony Nail Art Tutorial
Applejack is the hardworking and honest pony with an orange mane and tail. Here's how to create a simple yet charming nail art design inspired by her. Start with a light green base coat and use a thin brush to create a plaid pattern in darker green and white. Add a small apple decal on each nail and finish with a top coat.My Little Pony Nail Art Tutorial | Applejack Nail Art Design


Pinkie Pie Nail Art Design


Spike is the loyal and helpful baby dragon with a purple and green color scheme. Here's how to create a fun and spiky nail art design inspired by him. Start with a purple base coat and use a thin brush to create a spiky pattern in green and yellow. Add a small dragon decal on each nail and finish with a top coat.My Little Pony Nail Art Tutorial | Spike Nail Art Design


My Little Pony Nail Art Tutorial
The Mane 6 are the main characters of My Little Pony: Friendship is Magic. Here's how to show love for all of them with these fun and colorful nail art designs. Paint each nail in a different color inspired by a character and use a thin brush to add their cutie mark in the corresponding color. Finish with a top coat for a colorful and fun manicure.My Little Pony Nail Art Tutorial | Mane 6 Nail Art Designs


Twilight Sparkle Nail Art Design


The Magic of My Little Pony Nail Art

Unleash Your Inner Pony
 Are you a fan of
My Little Pony
and looking for a fun and creative way to show your love for these colorful characters? Look no further than
My Little Pony nail art
! This trend has taken the beauty world by storm and has become a popular choice for people of all ages. Whether you're a seasoned nail artist or a beginner, this tutorial will guide you through the steps to create your very own
My Little Pony
inspired nails.
Are you a fan of
My Little Pony
and looking for a fun and creative way to show your love for these colorful characters? Look no further than
My Little Pony nail art
! This trend has taken the beauty world by storm and has become a popular choice for people of all ages. Whether you're a seasoned nail artist or a beginner, this tutorial will guide you through the steps to create your very own
My Little Pony
inspired nails.
Step 1: Gather Your Supplies
 Before starting the nail art, it's important to gather all the necessary supplies. You will need a base coat, top coat, nail polish in various colors, a small brush or dotting tool, and a top coat. Make sure to choose nail polish colors that represent your favorite
My Little Pony
characters. For example, pink for Pinkie Pie, purple for Twilight Sparkle, or blue for Rainbow Dash.
Before starting the nail art, it's important to gather all the necessary supplies. You will need a base coat, top coat, nail polish in various colors, a small brush or dotting tool, and a top coat. Make sure to choose nail polish colors that represent your favorite
My Little Pony
characters. For example, pink for Pinkie Pie, purple for Twilight Sparkle, or blue for Rainbow Dash.
Step 2: Paint Your Base
 Start by applying a base coat to your nails to protect them and ensure the nail polish lasts longer. Once the base coat is dry, choose a color for your base. This can be a solid color or a gradient using two or more colors. For a gradient, apply a light base color and then use a sponge to dab on a darker color to create a faded effect. Let your base coat dry completely before moving on to the next step.
Step 3: Create the Characters
 Now for the fun part! Using a small brush or dotting tool, carefully create the faces of your favorite
My Little Pony
characters on each nail. This can include their iconic cutie marks, colorful manes, and cute expressions. Be creative and have fun with it! If you're not confident in your freehand skills, you can also use nail stickers or stencils to create the designs.
Now for the fun part! Using a small brush or dotting tool, carefully create the faces of your favorite
My Little Pony
characters on each nail. This can include their iconic cutie marks, colorful manes, and cute expressions. Be creative and have fun with it! If you're not confident in your freehand skills, you can also use nail stickers or stencils to create the designs.
Step 4: Add Some Sparkle
 To add some extra magic to your
My Little Pony
nail art, add some glitter or rhinestones. You can apply these to the entire nail or just on certain areas for a more subtle look. This step is completely optional, but it will definitely make your nails stand out.
To add some extra magic to your
My Little Pony
nail art, add some glitter or rhinestones. You can apply these to the entire nail or just on certain areas for a more subtle look. This step is completely optional, but it will definitely make your nails stand out.
Step 5: Seal the Deal
 Once you're happy with your design, let it dry completely before applying a top coat. This will seal in your design and make it last longer. It will also give your nails a shiny finish, just like the characters in
My Little Pony
.
Now you have your very own
My Little Pony
inspired nails! This fun and colorful nail art is perfect for any occasion and is sure to bring a smile to anyone's face. So gather your supplies and unleash your inner pony with this magical nail art tutorial.
Once you're happy with your design, let it dry completely before applying a top coat. This will seal in your design and make it last longer. It will also give your nails a shiny finish, just like the characters in
My Little Pony
.
Now you have your very own
My Little Pony
inspired nails! This fun and colorful nail art is perfect for any occasion and is sure to bring a smile to anyone's face. So gather your supplies and unleash your inner pony with this magical nail art tutorial.


