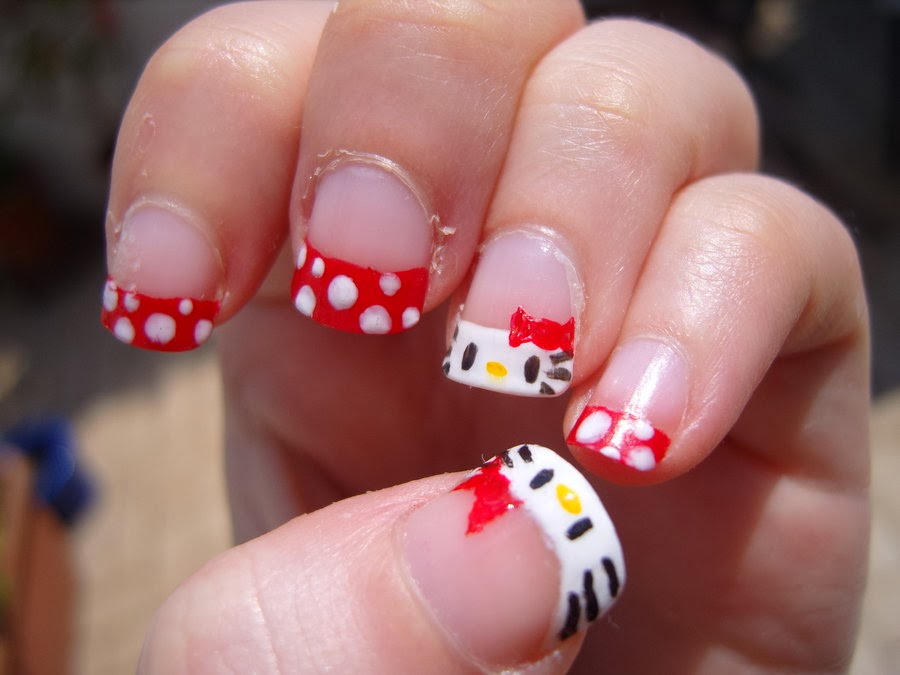
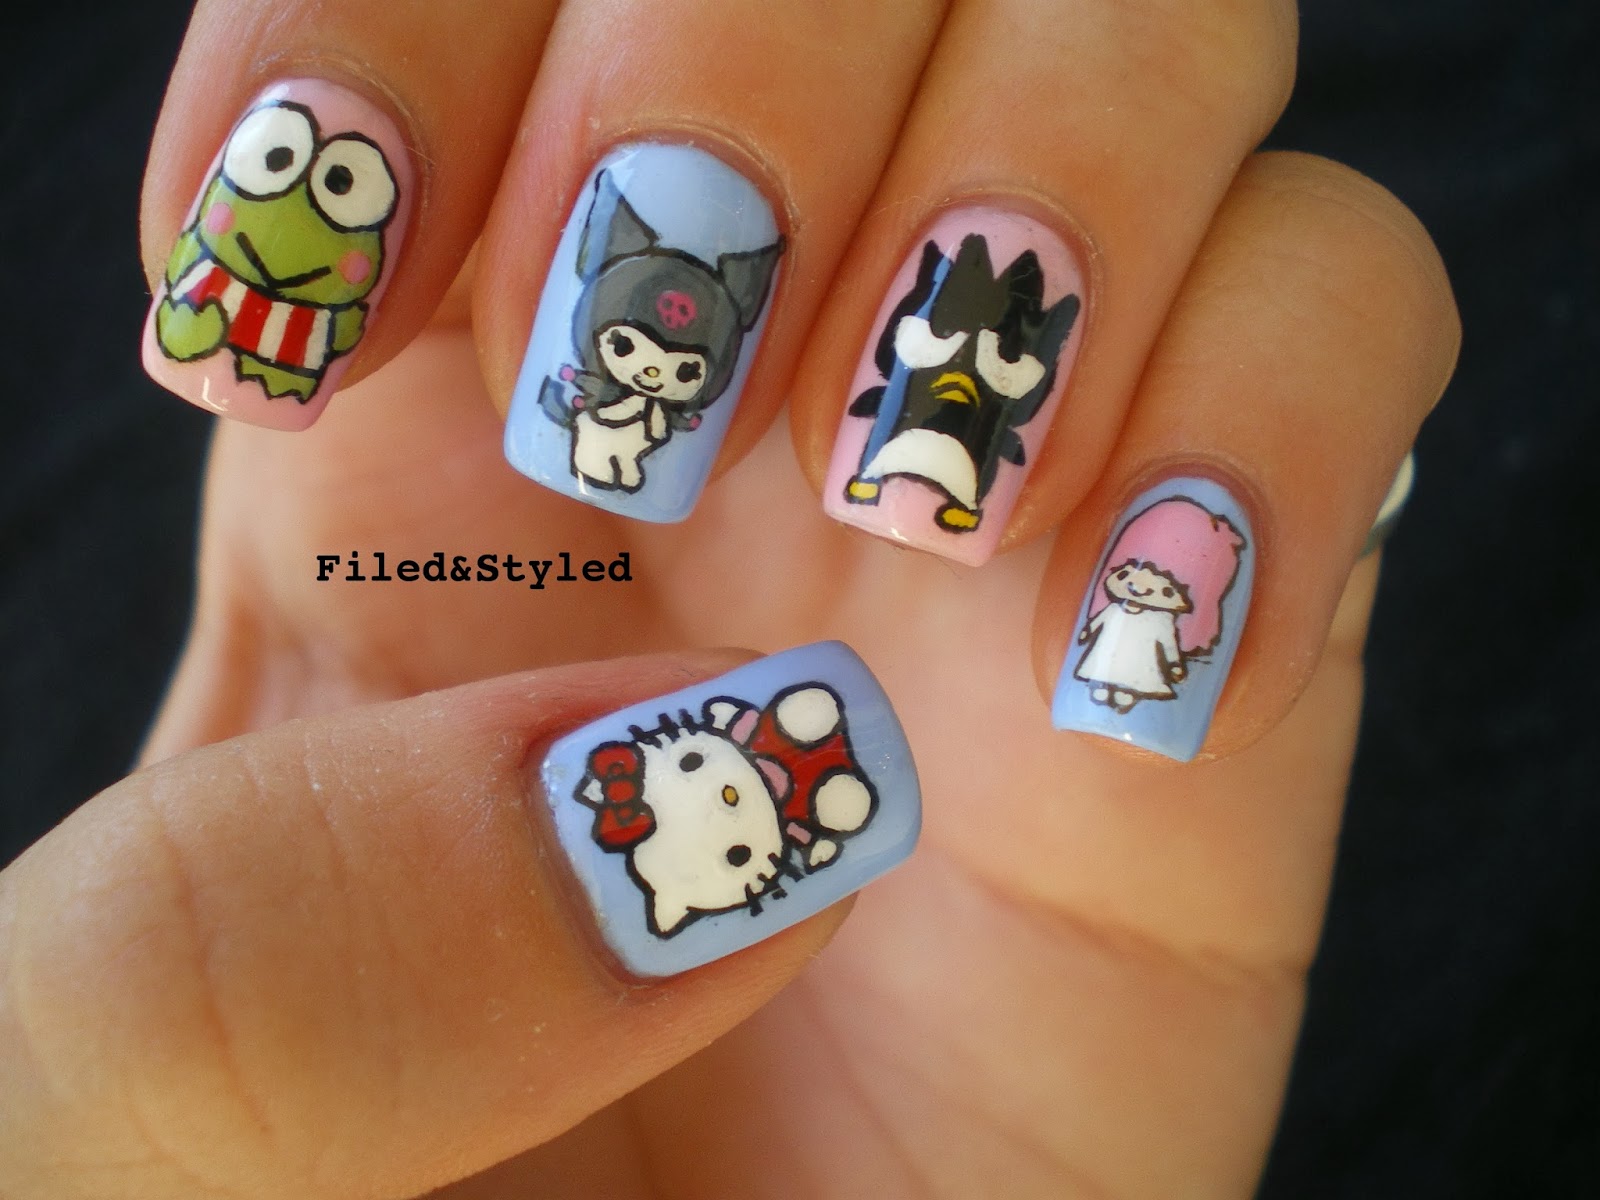
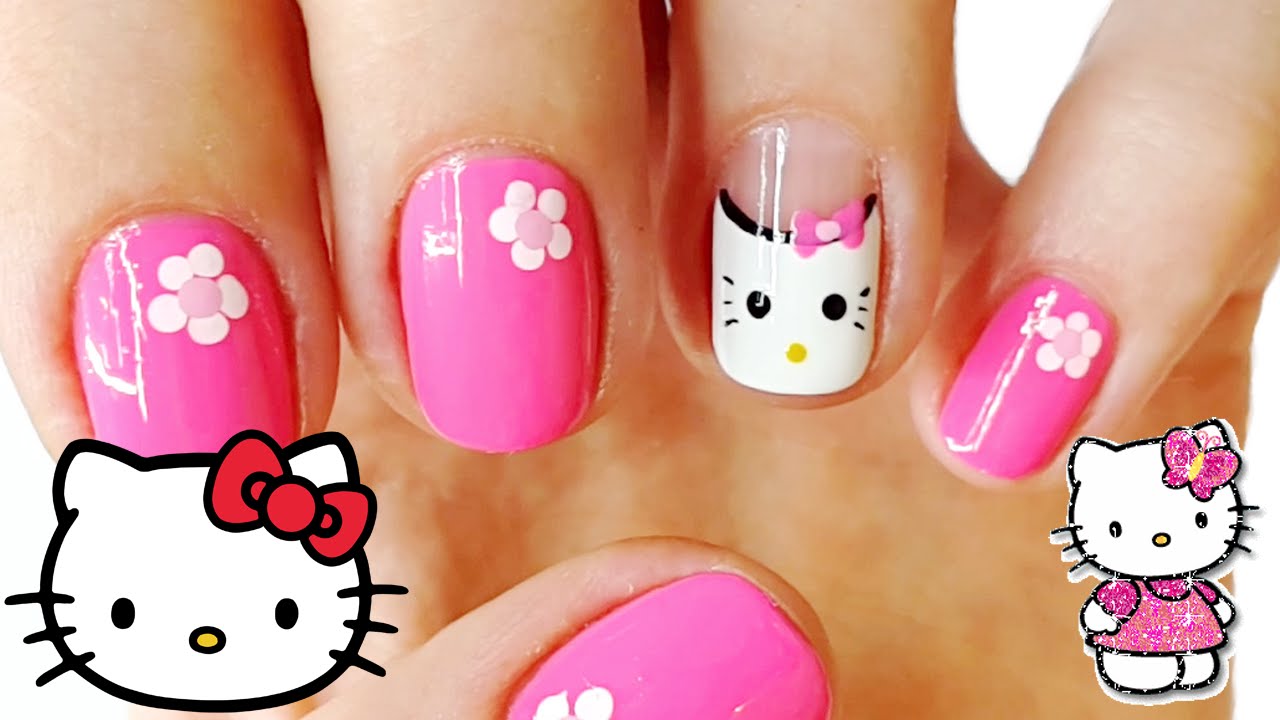
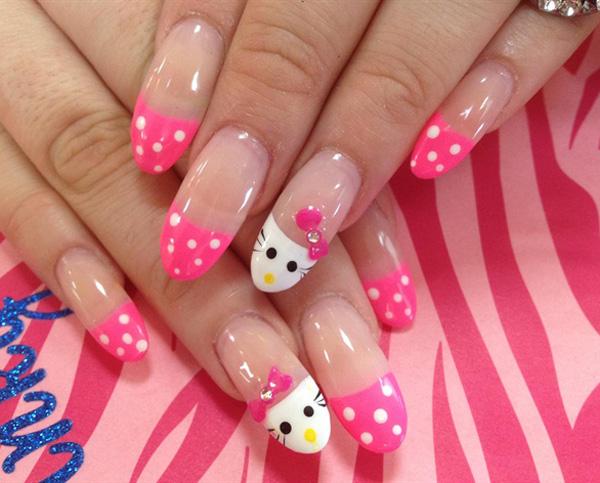
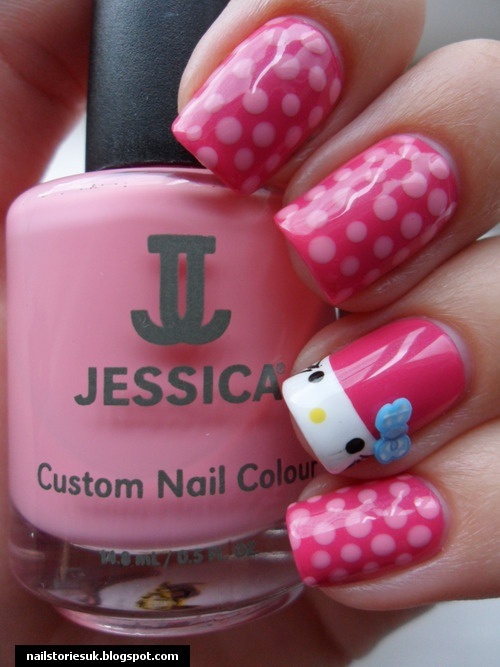
Are you a fan of the adorable Hello Kitty character? Then why not show your love for her on your nails with this cute Hello Kitty French tip nail art tutorial! This design is perfect for those who want a touch of cuteness on their nails without going overboard. Plus, it's easy to recreate and perfect for beginners! To start, you will need a light pink polish for the base, a white polish for the French tips, a black polish for the details, and a small dotting tool or toothpick. Optional but recommended tools include a base coat and top coat for longer-lasting results. Start by applying a base coat to protect your nails and allow it to dry completely. Then, apply two coats of the light pink polish to all your nails and let it dry. Next, using the white polish, create a French tip on each nail. You can do this by using a French tip sticker or by carefully free-handing it. Allow the white polish to dry before moving on to the next step. Now for the fun part, creating the Hello Kitty design! Dip your dotting tool or toothpick into the black polish and carefully make two small dots for the eyes near the cuticle of each nail. Then, make a small triangle for the nose and two small lines for the whiskers. Finally, using the dotting tool or toothpick, add a small bow on the side of each nail using the black polish. For a final touch, you can add a small rhinestone in the center of the bow for a bit of sparkle. Once you're happy with the design, seal it in with a top coat to protect the design and add shine. And there you have it, your very own Hello Kitty French tip nail art!1. Hello Kitty French Tip Nail Art Tutorial

1. Hello Kitty French Tip Nail Art Tutorial


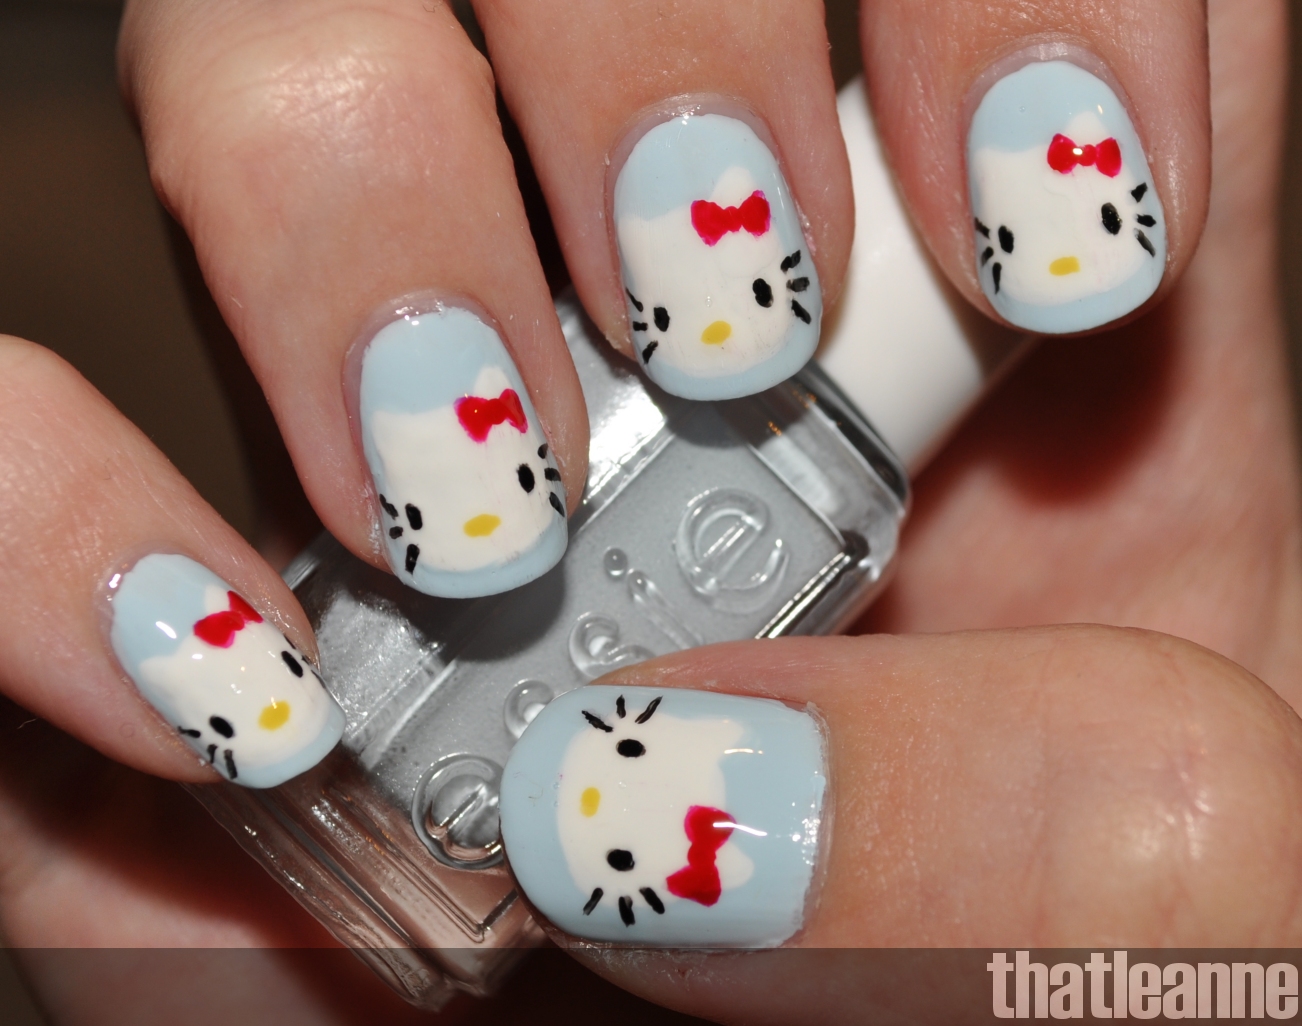
If you're new to nail art or simply don't have a lot of time, this easy Hello Kitty nail art tutorial is perfect for you! With minimal tools and steps, you can quickly recreate this adorable design on your nails. Start by applying a base coat to protect your nails and allow it to dry completely. Next, apply two coats of a light pink polish to all your nails and let it dry. Using a white polish, create a French tip on each nail, either with a sticker or by free-handing it. Allow the white polish to dry before moving on to the next step. Now, using a black polish, create two small dots for the eyes near the cuticle of each nail. Then, make a small triangle for the nose and two small lines for the whiskers. Finally, using the black polish, create a small bow on the side of each nail. For a quick and easy version of this design, you can use a Hello Kitty nail sticker instead of free-handing the design. Simply place the sticker on the desired nail and press down lightly to secure it. Seal in the design with a top coat, and you're done!2. Easy Hello Kitty Nail Art Tutorial


2. Easy Hello Kitty Nail Art Tutorial


If you're a visual learner, then this step-by-step Hello Kitty French tip nail art tutorial is perfect for you! Follow along with each step to recreate this adorable design on your own nails. Step 1: Start by applying a base coat to protect your nails and allow it to dry completely. Step 2: Apply two coats of a light pink polish to all your nails and let it dry. Step 3: Using a white polish, create a French tip on each nail, either with a sticker or by free-handing it. Allow the white polish to dry before moving on to the next step. Step 4: Using a black polish, create two small dots for the eyes near the cuticle of each nail. Step 5: Make a small triangle for the nose and two small lines for the whiskers using the black polish. Step 6: Using the black polish, create a small bow on the side of each nail. Step 7: For a final touch, add a small rhinestone in the center of the bow for a bit of sparkle. Step 8: Seal in the design with a top coat to protect it and add shine. And there you have it, your very own Hello Kitty French tip nail art!3. Step-by-Step Hello Kitty French Tip Nail Art Tutorial

3. Step-by-Step Hello Kitty French Tip Nail Art Tutorial


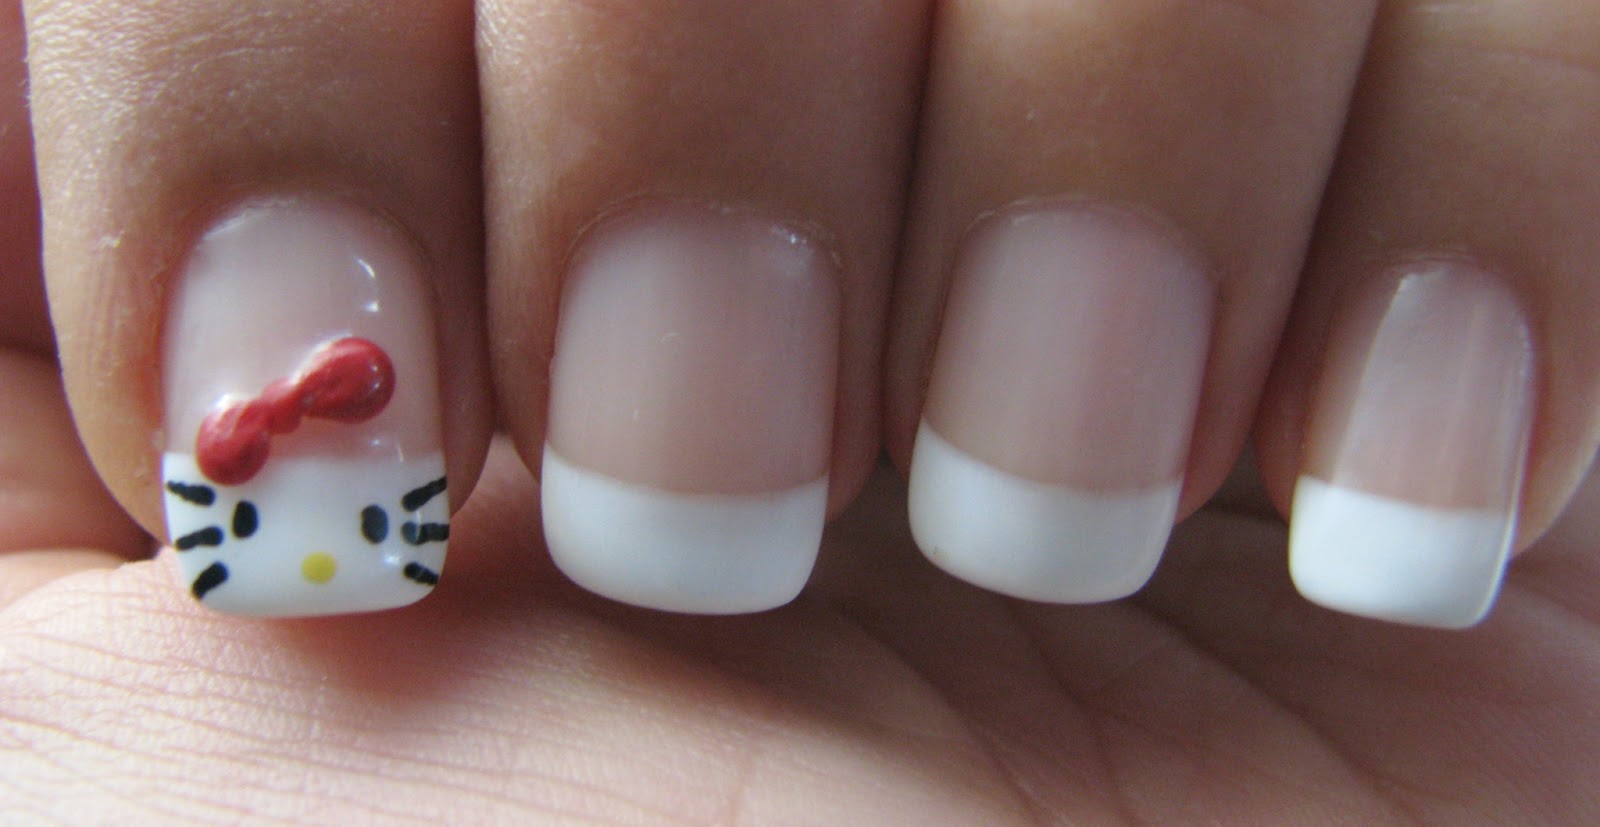
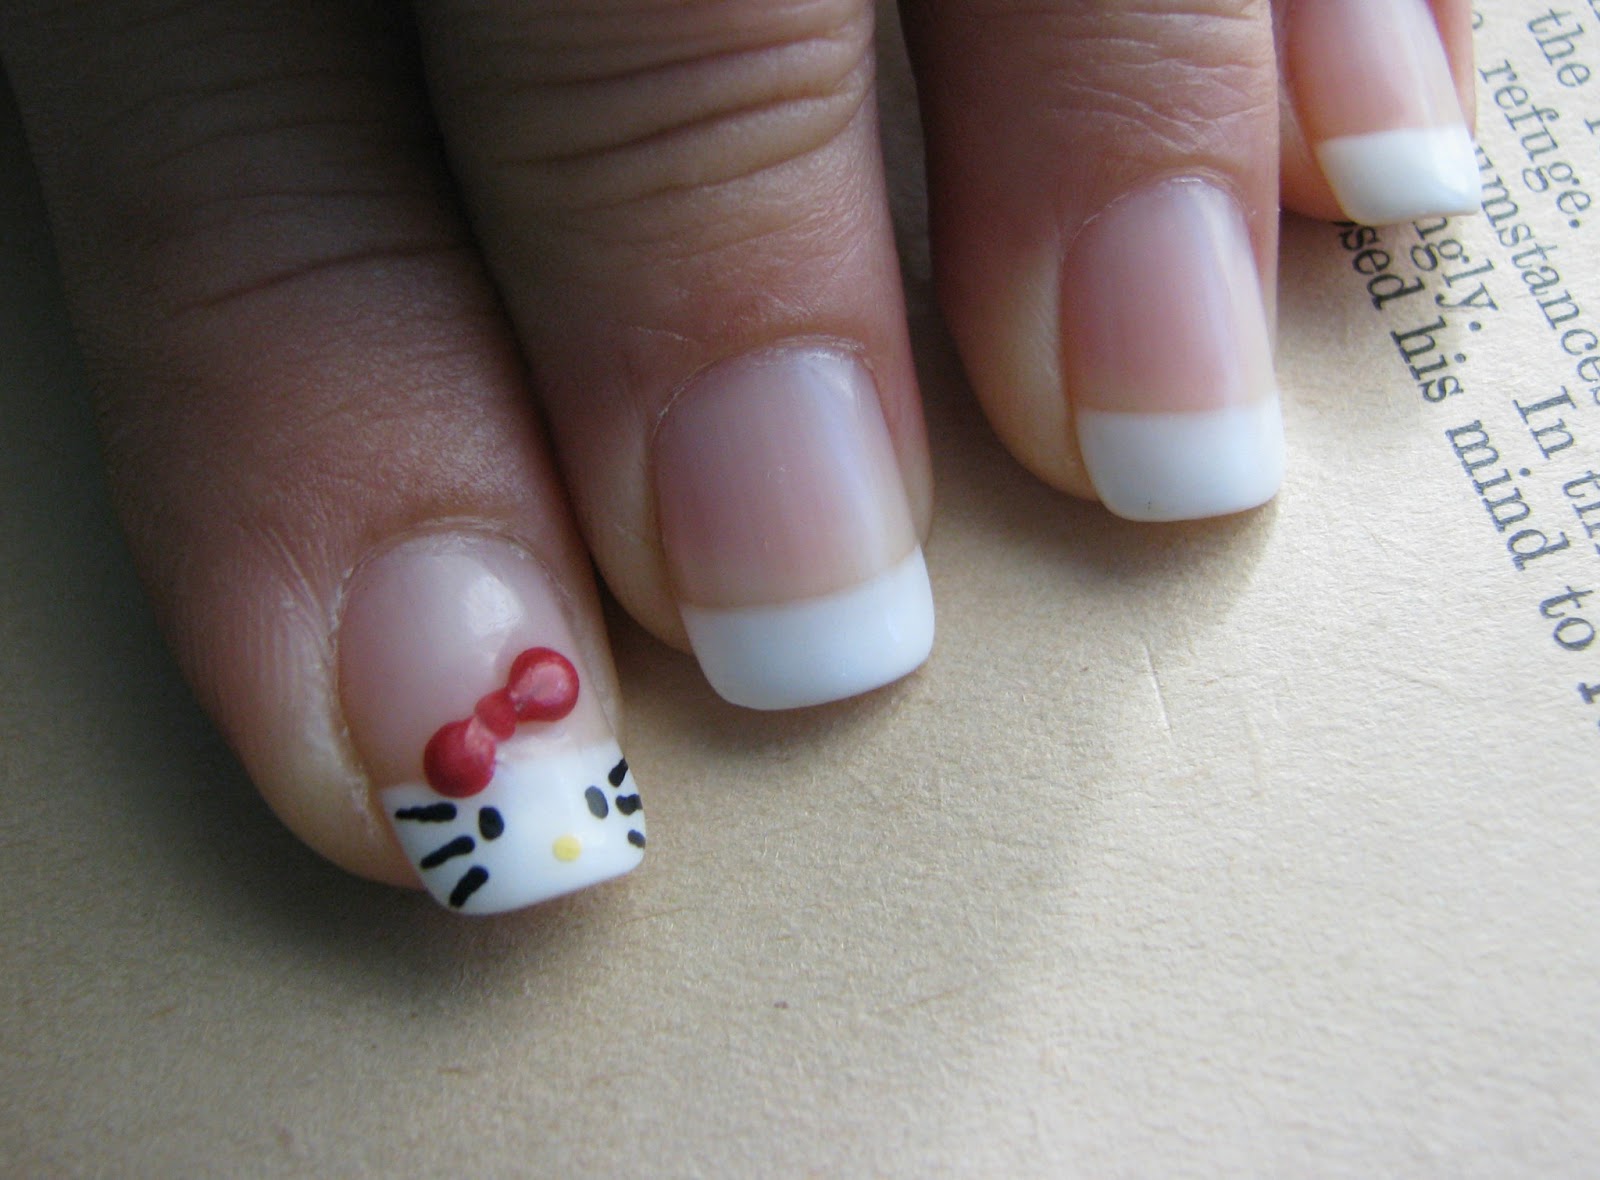
Looking for a cute and playful nail design? Look no further than this Hello Kitty French tip nail art tutorial! With its pink and white color scheme and adorable Hello Kitty details, this design is sure to bring a smile to your face. To get started, you will need a light pink polish for the base, a white polish for the French tips, a black polish for the details, and a small dotting tool or toothpick. Optional but recommended tools include a base coat and top coat for longer-lasting results. Begin by applying a base coat to protect your nails and allow it to dry completely. Then, apply two coats of the light pink polish to all your nails and let it dry. Next, using the white polish, create a French tip on each nail. You can use a French tip sticker or free-hand it. Allow the white polish to dry before moving on to the next step. Using the black polish, create two small dots for the eyes near the cuticle of each nail. Then, make a small triangle for the nose and two small lines for the whiskers. Finally, using the black polish, create a small bow on the side of each nail. If you want to take this design to the next level, you can add some rhinestones or glitter to the bow for a bit of sparkle. Seal in the design with a top coat to protect it and add shine, and you're all set with this cute Hello Kitty French tip nail art.4. Cute Hello Kitty French Tip Nail Art Tutorial

4. Cute Hello Kitty French Tip Nail Art Tutorial

If you're new to nail art, don't worry, this Hello Kitty French tip nail art tutorial is perfect for beginners! With simple steps and minimal tools, you can easily recreate this design on your own nails. Start by applying a base coat to protect your nails and allow it to dry completely. Next, apply two coats of a light pink polish to all your nails and let it dry. Using a white polish, create a French tip on each nail, either with a sticker or by free-handing it. Now, using a black polish, create two small dots for the eyes near the cuticle of each nail. Then, make a small triangle for the nose and two small lines for the whiskers. Finally, using the black polish, create a small bow on the side of each nail. For a quick and easy version of this design, you can use a Hello Kitty nail sticker instead of free-handing the design. Simply place the sticker on the desired nail and press down lightly to secure it. Seal in the design with a top coat, and you're done!5. Hello Kitty French Tip Nail Art Tutorial for Beginners


5. Hello Kitty French Tip Nail Art Tutorial for Beginners


If you love the long-lasting and glossy finish of gel polish, then this Hello Kitty French tip nail art tutorial is perfect for you! With gel polish, you can achieve a smooth and flawless look for your design. To get started, you will need a light pink gel polish for the base, a white gel polish for the French tips, a black gel polish for the details, and a small dotting tool or toothpick. Optional but recommended tools include a base coat and top coat for longer-lasting results. Begin by applying a base coat to protect your nails and cure it under a UV or LED lamp according to the instructions. Then, apply two coats of the light pink gel polish, curing each layer under the lamp. Next, using the white gel polish, create a French tip on each nail. Cure it under the lamp before moving on to the next step. Using the black gel polish, create two small dots for the eyes near the cuticle of each nail. Then, make a small triangle for the nose and two small lines for the whiskers. Finally, using the black gel polish, create a small bow on the side of each nail. Cure the design under the lamp for the final time. Seal in your design with a top coat and cure it under the lamp. And there you have it, your very own Hello Kitty French tip nail art with gel polish!6. Hello Kitty French Tip Nail Art Tutorial with Gel Polish


6. Hello Kitty French Tip Nail Art Tutorial with Gel Polish


For those who prefer using acrylic paint for their nail art, this Hello Kitty French tip nail art tutorial is for you! With its detailed design, using acrylic paint allows you to have more control and precision in creating the Hello Kitty character. To get started, you will need a light pink acrylic paint for the base, a white acrylic paint for the French tips, a black acrylic paint for the details, and a small paintbrush. Optional but recommended tools include a base coat and top coat for longer-lasting results. Begin by applying a base coat to protect your nails and allow it to dry completely. Next, using the light pink acrylic paint, create a base on all your nails. Allow it to dry before moving on to the next step. Using the white acrylic paint, create a French tip on each nail. You can use a French tip sticker or free-hand it. Allow the white paint to dry before moving on to the next step. Now, using the black acrylic paint, create two small dots for the eyes near the cuticle of each nail. Then, make a small triangle for the nose and two small lines for the whiskers. Finally, using the black acrylic paint, create a small bow on the side of each nail. Seal in your design with a top coat to protect it and add shine, and you're done with this cute Hello Kitty French tip nail art!7. Hello Kitty French Tip Nail Art Tutorial with Acrylic Paint

7. Hello Kitty French Tip Nail Art Tutorial with Acrylic Paint

If you're a fan of nail stamping, then this Hello Kitty French tip nail art tutorial is perfect for you! With stamping plates, you can easily create a detailed design without the need for free-handing. To get started, you will need a light pink polish for the base, a white polish for the French tips, a black polish for the details, a small dotting tool or toothpick, and a stamping plate with a Hello Kitty design. Optional but recommended tools include a base coat and top coat for longer-lasting results. Start by applying a base coat to protect your nails and allow it to dry completely. Then, apply two coats of the light pink polish to all your nails and let it dry. Next, using the white polish, create a French tip on each nail. Allow the white polish to dry before moving on to the next step. Using the black polish, create two small dots for the eyes near the cuticle of each nail. Then, make a small triangle for the nose and two small lines for the whiskers. Finally, using the dotting tool or toothpick, add a small bow on the side of each nail using the black polish. Now for the stamping part, place a small amount of black polish on the Hello Kitty design on the stamping plate, and use the scraper to remove the excess polish. Roll the stamper over the design, and then stamp it onto the desired nail. Repeat this process for each nail. Seal in the design with a top coat, and you're done!8. Hello Kitty French Tip Nail Art Tutorial with Stamping

8. Hello Kitty French Tip Nail Art Tutorial with Stamping

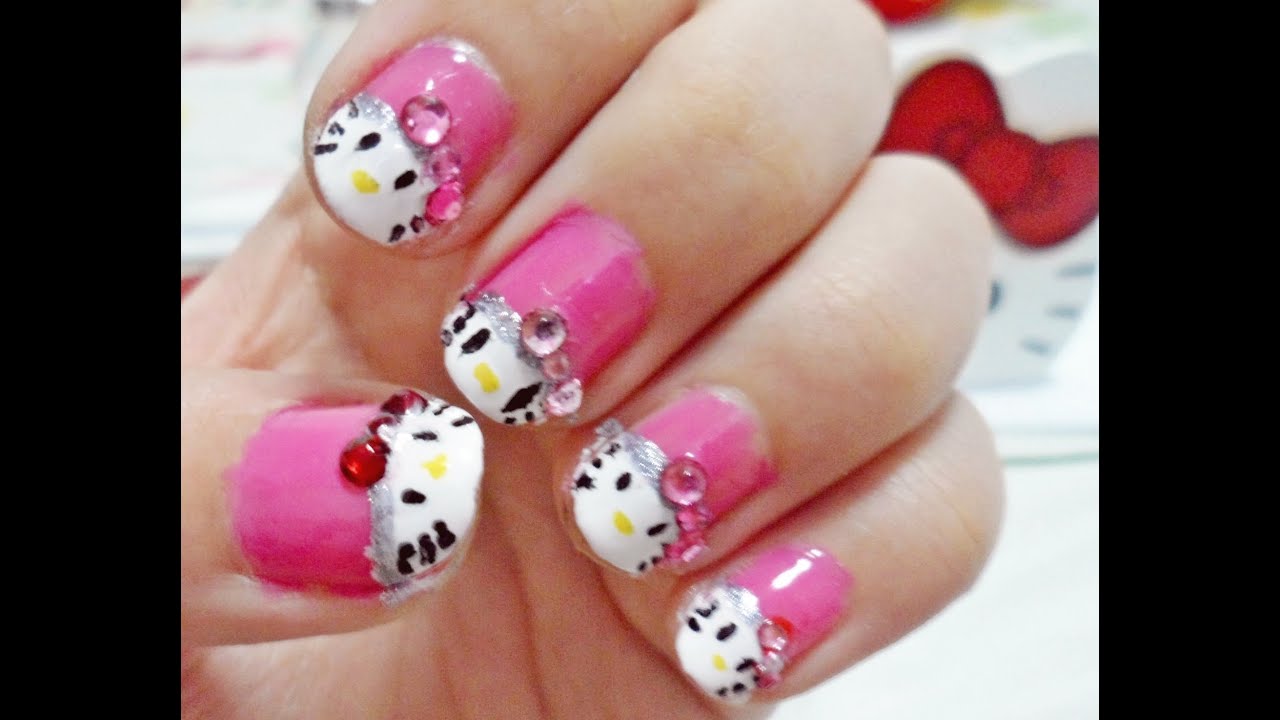
If you want to add some bling to your Hello Kitty French tip nail art, then this tutorial using rhinestones is for you! With just a few extra steps, you can elevate your design and make it stand out. Start by applying a base coat to protect your nails and allow it to dry completely. Then, apply two coats of a light pink polish to all your nails and let it dry. Next, using a white polish, create a French tip on each nail, either with a sticker or by free-handing it. Allow the white polish to dry before moving on to the next step. Using a black polish, create two small dots for the eyes near the cuticle of each nail. Then, make a small triangle for the nose and two small lines for the whiskers using the black polish. Finally, using the black polish, create a small bow on the side of each nail. To add some sparkle, place a small amount of clear nail polish on the bow and carefully place a rhinestone on top. You can also add rhinestones to the eyes or around the design for a more glamorous look. Seal in the design with a top coat, and you're all set with your Hello Kitty French tip nail art with rhinestones!9. Hello Kitty French Tip Nail Art Tutorial with Rhinestones


9. Hello Kitty French Tip Nail Art Tutorial with Rhinestones

For those who love a bit of sparkle, this Hello Kitty French tip nail art tutorial using glitter is a must-try! With just a few extra steps, you can transform your basic French tip into a fun and eye-catching design. To get started, you will need a light pink polish for the base, a white polish for the French tips, a black polish for the details, a small dotting tool or toothpick, and some glitter. Optional but recommended tools include a base coat and top coat for longer-lasting results. Begin by applying a base coat to protect your nails and allow it to dry completely. Next, apply two coats of the light pink polish to all your nails and let it dry. Using the white polish, create a French tip on each nail, either with a sticker or by free-handing it. Allow the white polish to dry before moving on to the next step. Using the black polish, create two small dots for the eyes near the cuticle of each nail. Then, make a small triangle for the nose and two small lines for the whiskers using the black polish. Finally, using the dotting tool or toothpick, add a small bow on the side of each nail using the black polish. Now for the glitter, apply a clear top coat on the bow and sprinkle the glitter on top. You can also add glitter to the white French tip for a more fun look. Seal in the design with a top coat, and you're done with your Hello Kitty French tip nail art with glitter!10. Hello Kitty French Tip Nail Art Tutorial with Glitter

10. Hello Kitty French Tip Nail Art Tutorial with Glitter


Why Hello Kitty French Tips are the Perfect Addition to Your Nail Art Collection

The Popularity of Hello Kitty
 Hello Kitty
has been a beloved character for decades, capturing the hearts of both children and adults alike. With her iconic bow and cute features, she has become a staple in pop culture and has been featured on various merchandise, from clothing to accessories. It's no surprise that she has also made her way into the world of
nail art
, with her signature
pink
and
white
color palette and adorable design.
Hello Kitty
has been a beloved character for decades, capturing the hearts of both children and adults alike. With her iconic bow and cute features, she has become a staple in pop culture and has been featured on various merchandise, from clothing to accessories. It's no surprise that she has also made her way into the world of
nail art
, with her signature
pink
and
white
color palette and adorable design.
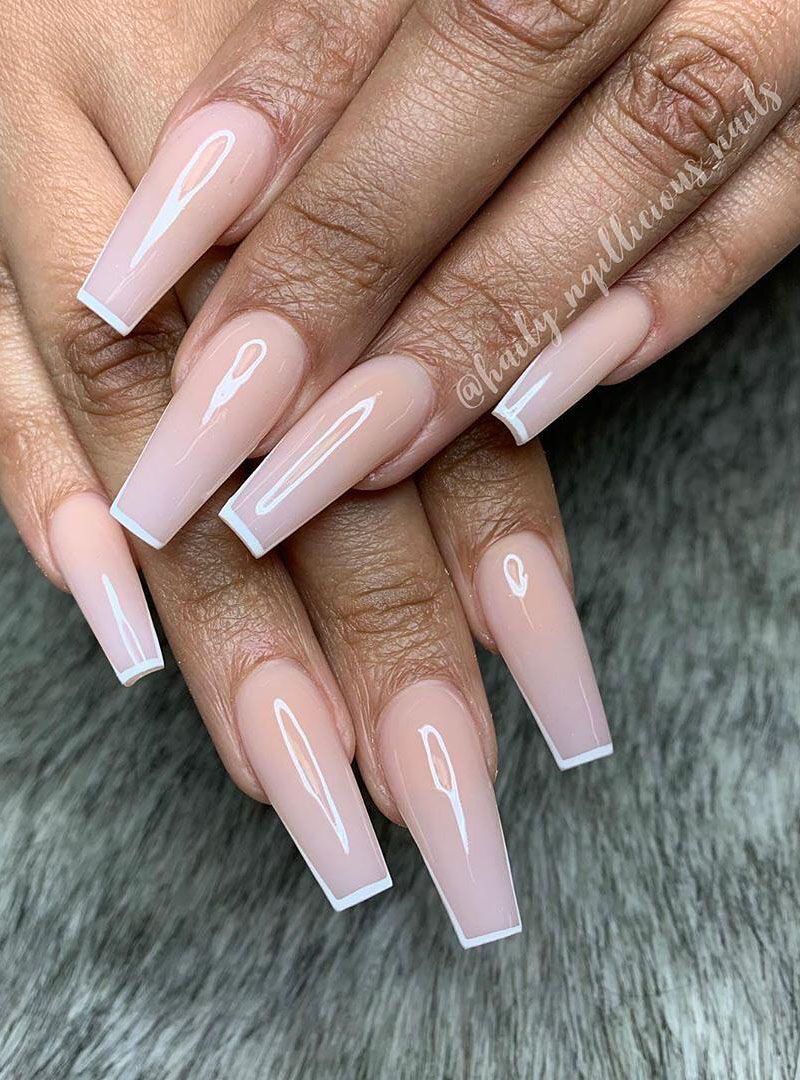
The Elegance of French Tips
 French tips have been a classic and elegant look for nails for many years. The combination of a
natural base color
with a
white tip
gives off a sophisticated and clean appearance. This style has been a go-to for many occasions, from weddings to everyday wear. Adding a twist to this traditional look with the addition of
Hello Kitty
will surely make your nails stand out and add a touch of playfulness.
French tips have been a classic and elegant look for nails for many years. The combination of a
natural base color
with a
white tip
gives off a sophisticated and clean appearance. This style has been a go-to for many occasions, from weddings to everyday wear. Adding a twist to this traditional look with the addition of
Hello Kitty
will surely make your nails stand out and add a touch of playfulness.
How to Achieve Hello Kitty French Tips
 To achieve this
nail art
look, you will need a few basic supplies such as
nail polish
,
nail art tools
,
top coat
, and
base coat
. Begin by applying a
base coat
to protect your nails and create a smooth surface. Next, paint all your nails with a
pink
base color. Once dry, use a
white nail polish
and a thin brush or
nail art pen
to create the classic
French tip
on each nail. Finally, using a
nail art tool
or
toothpick
, carefully draw
Hello Kitty's
face on the tip of your ring finger. Add a
small bow
on your pinky finger to complete the look. Finish off with a
top coat
to seal the design and add shine.
To achieve this
nail art
look, you will need a few basic supplies such as
nail polish
,
nail art tools
,
top coat
, and
base coat
. Begin by applying a
base coat
to protect your nails and create a smooth surface. Next, paint all your nails with a
pink
base color. Once dry, use a
white nail polish
and a thin brush or
nail art pen
to create the classic
French tip
on each nail. Finally, using a
nail art tool
or
toothpick
, carefully draw
Hello Kitty's
face on the tip of your ring finger. Add a
small bow
on your pinky finger to complete the look. Finish off with a
top coat
to seal the design and add shine.
Why You Should Try Hello Kitty French Tips
 Not only are
Hello Kitty French tips
a fun and unique way to express your love for this iconic character, but they also add a touch of elegance to your nails. They are perfect for any occasion, from a casual day out with friends to a special event. Plus, with the simple steps and basic supplies needed, you can easily achieve this look at home without breaking the bank.
In conclusion,
Hello Kitty French tips
are a must-try for any
nail art
enthusiast. They combine the cuteness of
Hello Kitty
with the sophistication of
French tips
, making them the perfect addition to your nail art collection. So go ahead and give them a try, and you'll see why they have become a popular trend in the
nail art
world.
Not only are
Hello Kitty French tips
a fun and unique way to express your love for this iconic character, but they also add a touch of elegance to your nails. They are perfect for any occasion, from a casual day out with friends to a special event. Plus, with the simple steps and basic supplies needed, you can easily achieve this look at home without breaking the bank.
In conclusion,
Hello Kitty French tips
are a must-try for any
nail art
enthusiast. They combine the cuteness of
Hello Kitty
with the sophistication of
French tips
, making them the perfect addition to your nail art collection. So go ahead and give them a try, and you'll see why they have become a popular trend in the
nail art
world.


